
A number of weeks ago, I wrote a post on how to fix vacuum leaks. Due to popular demand, I have done a more comprehensive write-up about diagnosing and fixing vacuum leaks. For basic troubleshooting, refer to my previous post. As you will notice, although there are many parts of this post which are universally applicable, this how-to specifically relates to RWD Volvos. However, this guide will help owners of other makes of cars in the process of troubleshooting and determining what are other potential causes of vacuum leaks.
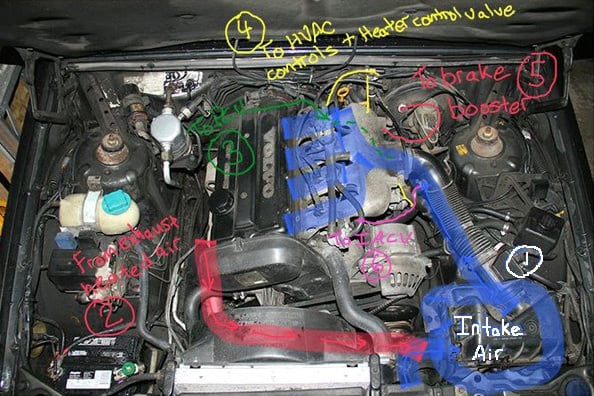 1991 940 GLE engine bay with markup of vacuum systems.
The above picture is the engine bay of my 1991 Volvo 940 GLE. It has a B234F DOHC engine. Any older generation Volvo with a B23** engine should have similar operation and routing of vacuum lines. Turbo redblock engines have their intake air box located on the left side of the engine compartment, with vacuum leak troubleshooting also involving the turbocharger and inter-cooler connections. Each coloured line represents vacuum lines and systems. Each number in the above diagram refers to the following points:
- Intake air
It is important to ensure the airbox is tightly closed or else unfiltered air can enter into the engine. In dusty locales, this can be particularly problematic. Any leaks in the area of the airbox before the Mass Airflow Sensor (MAF) will minimally affect the operation of the engine. However, any air that does not pass through the MAF but from other locations will cause the engine computer to think there is less oxygen, causing a lean combustion mixture. Intake air travels through the main tube and into the intake manifold where it is mixed with fuel for combustion. Along the intake tube, there are multiple connections where old hoses can leak, causing driveability issues. Connections along this tube include: Idle Air Control Valve hose, PCV hose, intake box, throttle body. The flexible intake tube itself may also leak along the joints. - Exhaust-Heated Air
The Volvo 940 has a thermostat just before the intake box which is normally open in warm weather. In cold weather, the valve closes and intake air is routed past the exhaust manifold in order to warm it up. This will help the engine warm up faster in cold weather, in addition to preventing potential freezing of the throttle body. Along this path, as it is located before the MAF, there are no vacuum issues that can cause problems. Just ensure the silver heater tube is connected at both ends and that the thermostat valve operates normally. Only in cold weather will the valve be shut (below 10-15C), but otherwise the valve should always be open. - PCV System
Positive Crankcase Ventilation (PCV) allows blow-by gases from the operation of an engine to escape, and be re-routed back into the engine. At the engine, there is an oil separator box, or oil trap which removes oil which has mixed into the air escaping from the engine. It looks like this: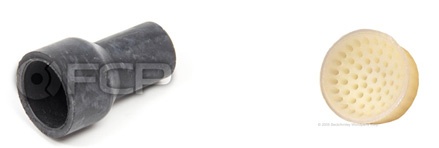 Flame Trap hose (Left) and Flame Trap (Right).
Due to the proximity to the engine, and enclosed space, over time this rubber in this hose will harden, causing vacuum leaks that are very difficult to pinpoint. In hot weather, the rubber softens slightly, sealing the leaks. But after the car cools down, or in cold winter weather, you will experience issues when the rubber hardens. Almost impossible to diagnose, the easiest fix is to replace this part. The flame trap itself should be free of blockage. Rarely do they need more than a cleaning rather than replacement. With a careful hand, it is possible to replace this part without removing the intake manifold.
- HVAC System
The Heating, Ventilation and Cooling system (HVAC) in the Volvo 940 is controlled by vacuum. Both automatic and manual ventilation controls operate similarly with vacuum-actuated valves. A common symptom of a vacuum leaks is seen during hard acceleration where the air will start blowing to the floor for the duration of acceleration, returning to normal position (main vents) soon after. There are two main culprits: Floor/defrost Vacuum Bellows on the left, and a one-way check valve on the right. Changing the check valve is a 5 minute job, changing the vacuum bellows is closer to a 5 hour job. In general, leaks in the HVAC system will not affect the operation of your engine unless the connection directly supplying vacuum has a leak.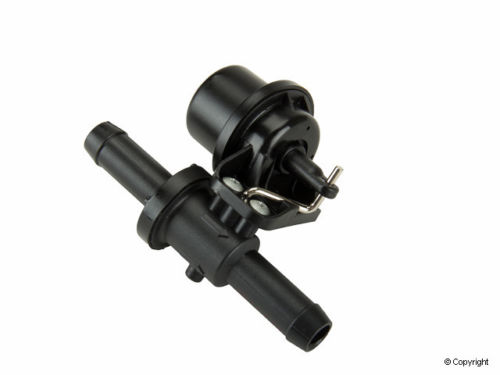 Heater Control Valve
Additionally, the heater control valve is operated through vacuum. When selected on cool, the heater control valve will have maximum vacuum applied. When heat is needed, vacuum is removed, opening the valve. It sounds counter-intuitive, but this is how it would operate under normal circumstances in this case. Other cars may be different. An HVAC system with heat always on will usually point to a non-functional heater control valve which may have issues with its vacuum operated valve. The valve is seen in the image above.
- Brake Booster + Other leak locations
The vacuum line to the brake booster is clearly seen in the image below, highlighted in red, as well as in the first image. This connection does not commonly leak, but the vacuum line can crack and lose vacuum, affecting the operation of the brakes. If this vacuum fails, your brakes won’t fail, but will require significantly more effort to operate, making it seem like your brakes are failing.The following image shows other possible locations for leaks. These include: The paper gasket between the throttle body and the intake manifold, connection of main intake tube to throttle body, and other connections at the throttle body. Note: Point 7, the cruise control, which is further explained below.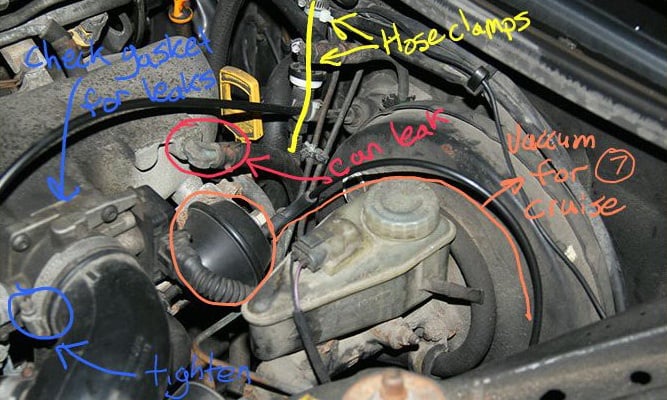 Close-up of brake booster and other components.
 - Idle Air Control Valve
The Idle Air Control Valve (IACV) controls the engine at idle to keep it at a set RPM as determined by the factory. Leaks at any connections can cause driveability problems, especially at low RPM or at idle. The IACV itself may also need to be cleaned or replaced. The valve itself is located underneath the intake manifold. Below is an IACV for a Volvo 940: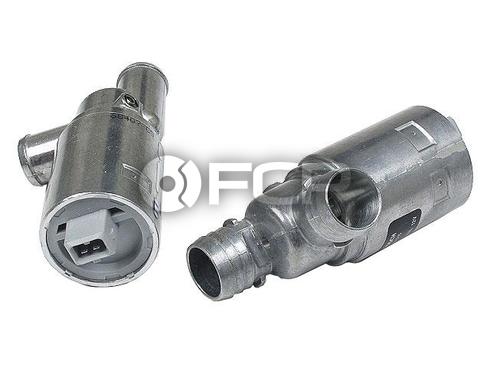 Idle Air Control Valve
 - Cruise Control
As noted by the orange line, this is the actuator and vacuum line for cruise control. This system uses vacuum to operate, but uses its own pump to create vacuum as opposed to using engine vacuum. Any leaks in this system would only affect cruise control operation. The actuator looks like this:
 Cruise Control Valve
 - Fuel Pressure Regulator
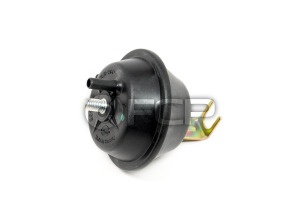
The Fuel pressure regulator also operates on Vacuum. The connection can develop cracks over time and/or the hose can harden and cause leaks. It is worth investigating, or even replacing the fuel pressure regulator and related connections as preventative maintenance.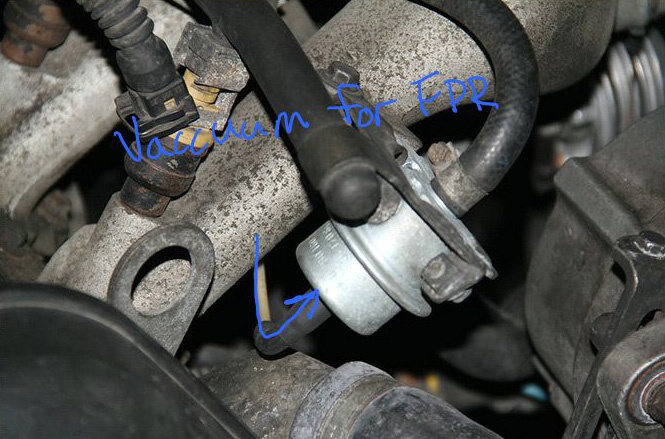 Close-up of Fuel Pressure Regulator
Vacuum leaks are not easy to solve. In the first place, you may not even have a vacuum leak, chasing a dead end. However, through a methodical check of your engine bay, ensuring all connections are leak-free and hoses in good condition, it is more than likely you will be able to solve your vacuum problems.
In my experience, pinpointing leaks is best solved through methodical checks and placing clamps on connections to seal connections. From comments previously, there are multiple ways to troubleshoot vacuum leaks. Using a pressurized smoke machine system was mentioned in one comment, which I can see working given a proper setup. Using carburetor cleaner and spraying it in suspect areas is an old method, but not one that has worked for me personally. The problem is getting enough of the cleaner in a specific area to cause any change in engine operation. It probably wont work for pinhole leaks, and most certainly won't work with leaks which seal themselves during the warm-up of an engine. It is also dangerous, so use this method at your own discretion!
If you've managed to solve the vacuum leaks and your car still is not running optimally, you will have to start looking at other components. Start with the easiest components to inspect/replace followed by major components.
Also keep in mind, this how-to format is a work in progress as we determine the best method of guiding our readers through various how-to's and DIY's.
Let us know any additional tips or opinions you may have in the comments below. Good Luck!


