- 10/09/2018
- 5 Min Read
- By: Evan Madore
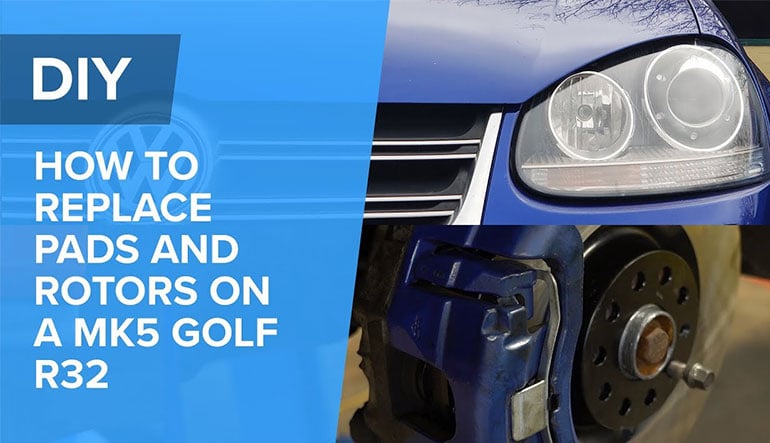
How To Replace Brake Pads And Rotors On A VW MK5 Golf R32 (Passat, GTI, CC, TT, S3)

 Does your brake pedal or steering wheel shudder under hard braking? Do the pads sound like they're squealing at low speeds? Does your brake pedal engage lower than you remember? If so, than it's time to refresh your brake system. Here's how to do it yourself in just a few easy steps.
Tools needed to complete brake rotor and pad replacement:
- Flat Head Screw Driver
- Ratchet
- Breaker Bar
- 21MM Socket
- 7MM Allen/Hex
- T30 Torx - Version 1 or Version 2
- Caliper Compressor (optional but highly recommended)
- Brake Clean
- Tool Pick
Parts needed to complete brake rotor and pad replacement:
Steps to complete brake rotor and pad replacement:
Step 1: Jack Up Your Car And Remove The Wheel
Follow your car's jacking instructions to lift one corner at a time, making sure to put jack stands under it. After removing your wheel, place it under the car in case the jack and/or jack stand fails.
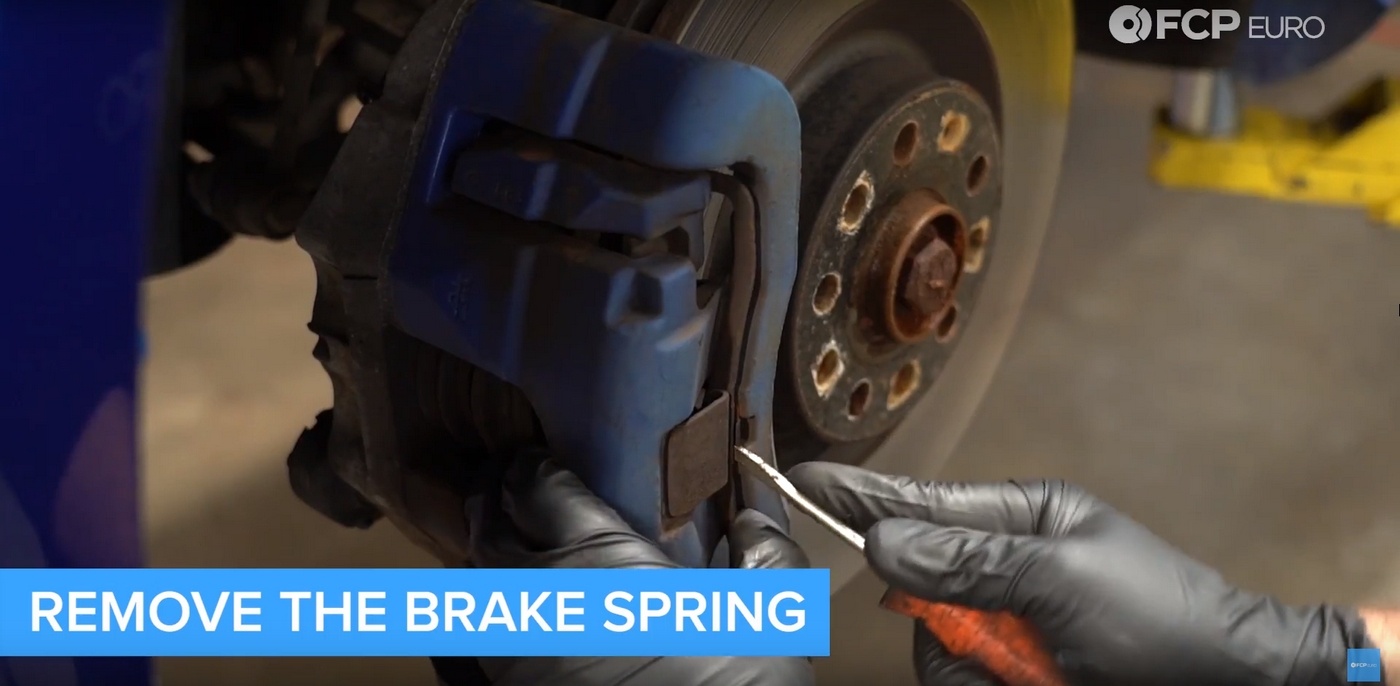
Step 2: Remove Brake Caliper Spring
Using a flat/slotted head screwdriver, wedge it between the caliper and the spring. Apply constant pressure and pull back until the spring releases. (Pro Tip: Place a rag over the spring once you're ready to release it. That way if it shoots out, the rag catches/dampens it rather than catching it with your face!)
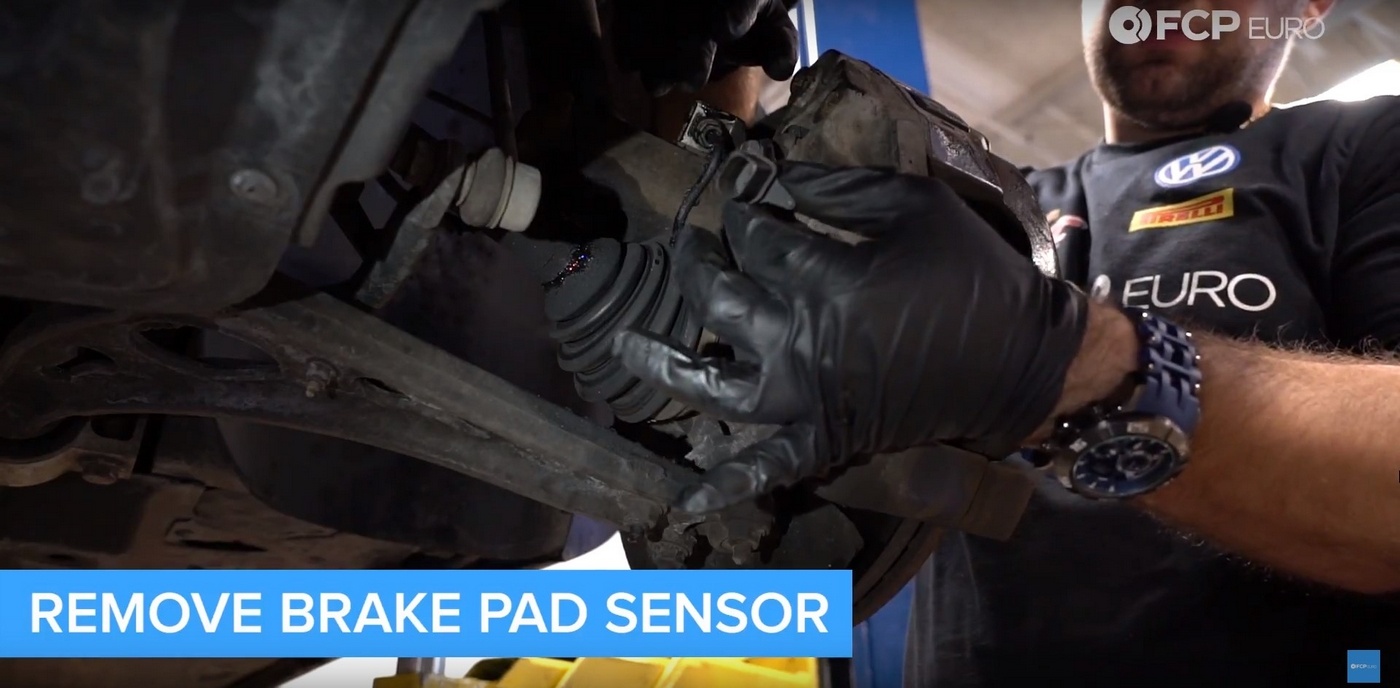
Step 3: Remove Brake Pad Wear Sensor
The brake pad wear sensor simply un-clips. It is on the back side of the caliper, near the caliper bolts.
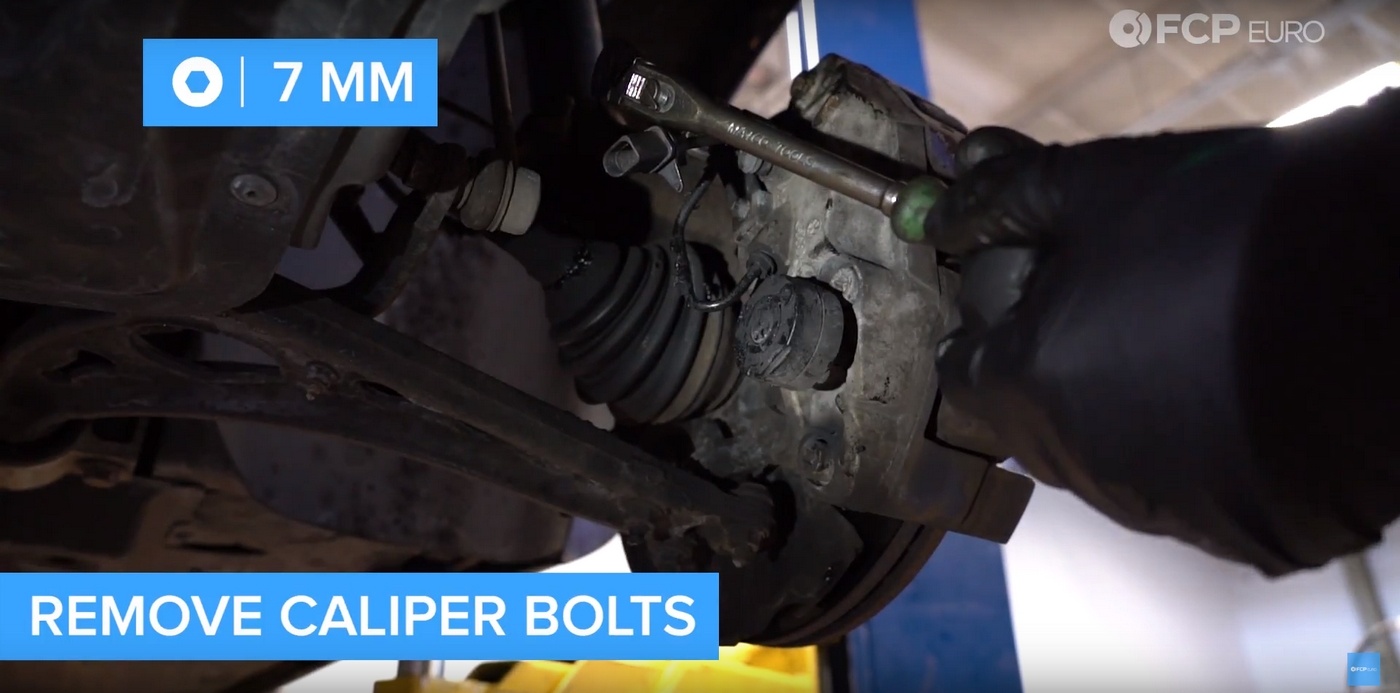
Step 4: Remove Brake Caliper Bolts
Using your 7MM Allen/Hex head socket, remove the brake caliper bolts. These are accessible behind the caliper, inside the wheel well. There are only two bolts and they slide into rubber sleeves. If the brakes have never been worked on, or you live in an area that salts the roads, there's a chance these bolts will be tough to remove. If that's the case, you can turn the wheels to give you more room to access them or even get a breaker bar in there for more persuasion.
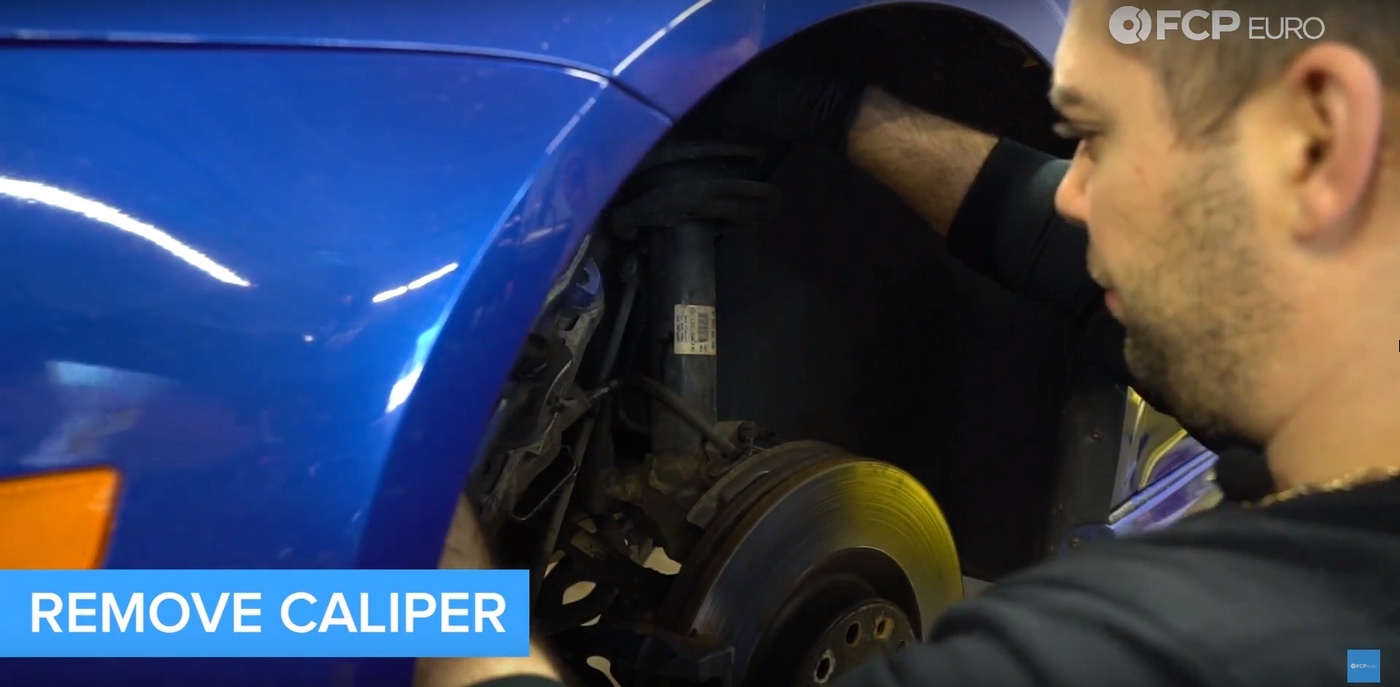
Step 5: Remove The Brake Caliper
Now that you have removed the bolts that fasten the caliper to the bracket, you can slide the caliper off the rotor. Now would be a good time to inspect your caliper piston for pitting if you live in a place that uses salt on the roads.
**Once you remove your brake caliper, use a metal coat hanger, spare wire, or bungee cord to hang it up from underneath the car. This keeps stress off your brake lines.**
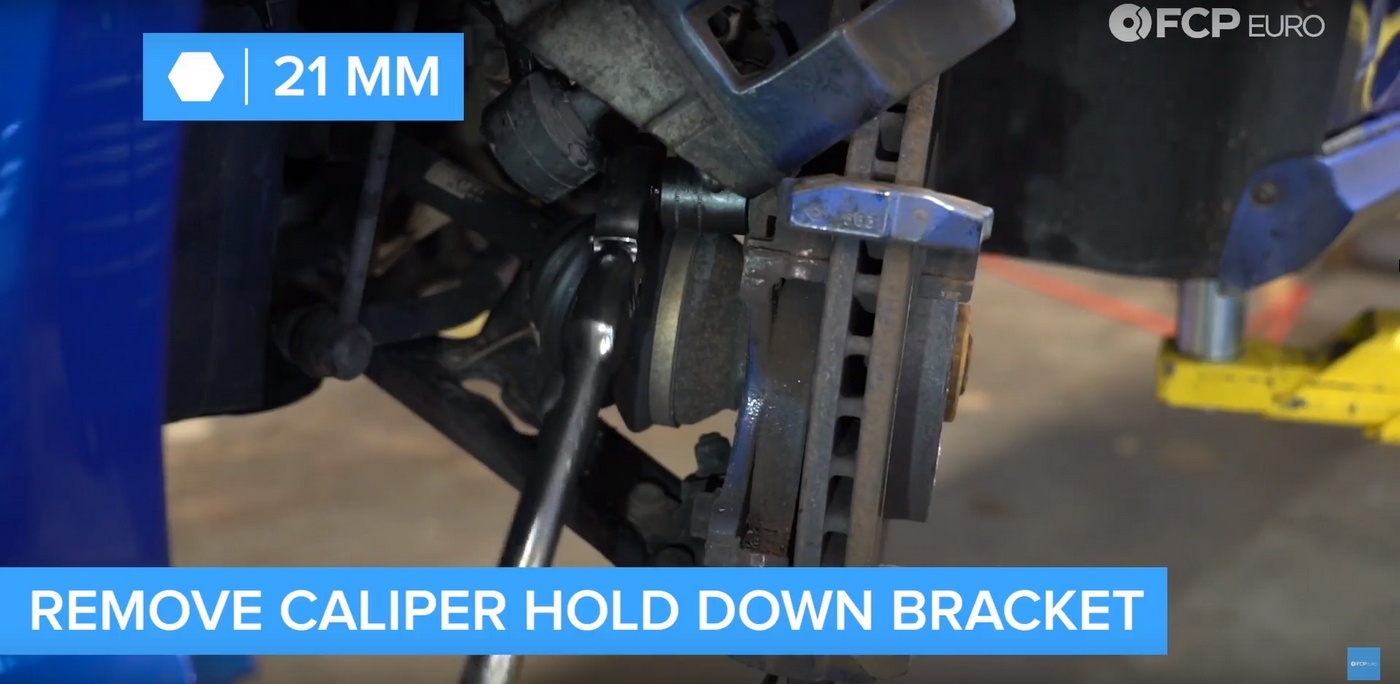
Step 6: Remove The Caliper Hold Down Bracket
From behind the rotor (inside the wheel well), use a 21MM socket to remove two bolts that fasten the caliper hold down bracket. Once again, these are susceptible to road salt and may be difficult to remove. It might be beneficial to use penetrating oil to assist in the bolt removal should they be stubborn.
Step 7: Remove Rotor Set Screw
Using a T30 Torx, remove the set screw on the face of the rotor. Spray penetrant can be handy once again, depending on the last service.
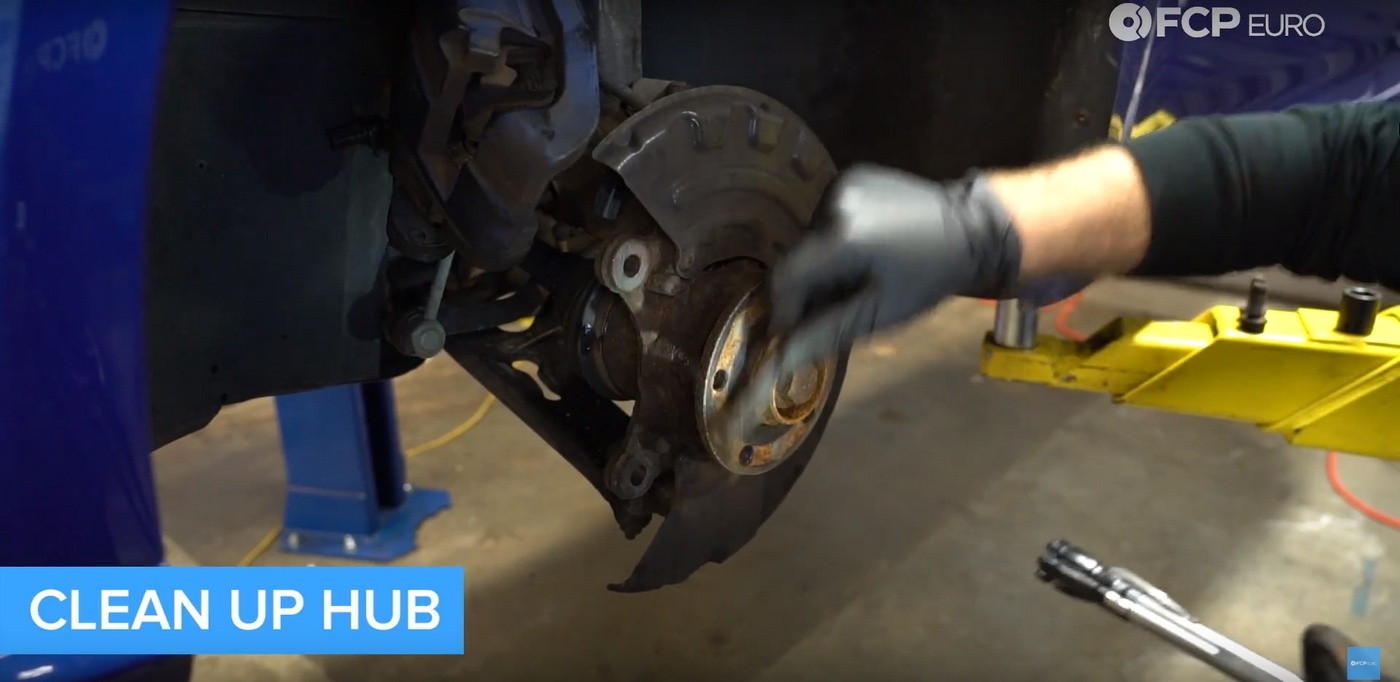
Step 8: Remove The Brake Rotor and Clean The Hub
The old rotor might take some gentle persuasion to remove it from the hub since surface corrosion holds them in place fairly well sometimes. If they have ever been replaced before, some mechanics use anti-seize between the surfaces to prevent this from happening in the future.
Once the rotor is removed, use your libation of choice to clean the hub. Brake clean and a stiff wire brush is usually enough to do the job.
Step 9: Clean and Install New Brake Rotor
Your new brake rotors come looking clean and brand new; a far cry from what you just took off your car. Most times however, there's shipping grease protecting them from corrosion while they sit on warehouse shelves. Using a clean rag and a healthy dose of brake clean, clean the new rotors thoroughly. Once clean, use the new T30 Torx screw to affix your new rotor to your cleaned hub. I personally like to add a touch of anti-seize to the face of the hub before installation.
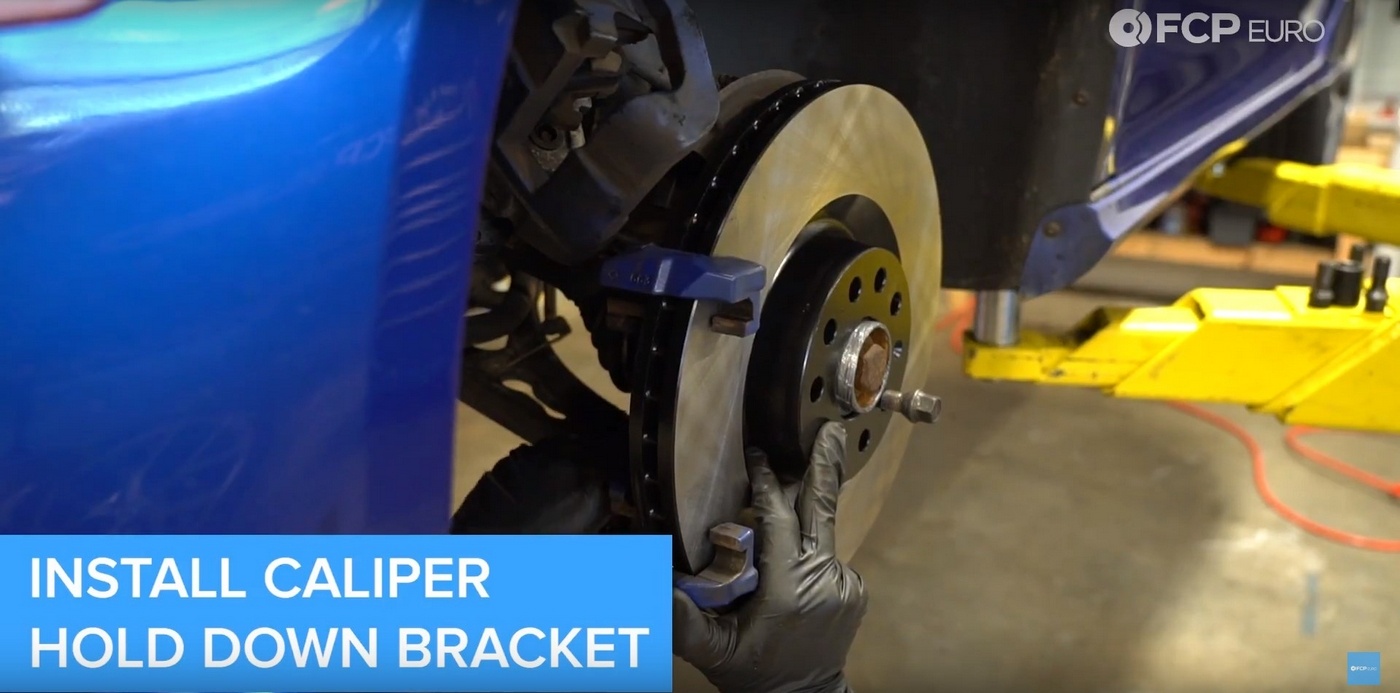
Step 10: Reinstall Caliper Hold Down Bracket
Like everything else, make sure your hold down bracket is clean of rust and debris. Using your 21MM socket, reinstall the caliper hold down bracket from inside the wheel well. I suggest using a torque wrench at this point to torque these bolts to manufacture spec (140 lbs-ft).
Step 11: Remove Brake Pads
Removing the pads is simple. Sometimes, the outside pad will just fall off, other times it takes a little coaxing to remove. The inner pad has to be removed from the caliper piston. It's affixed to the caliper piston using spring clips. You can usually remove it just by prying with your hands or a flat head screw driver if necessary.
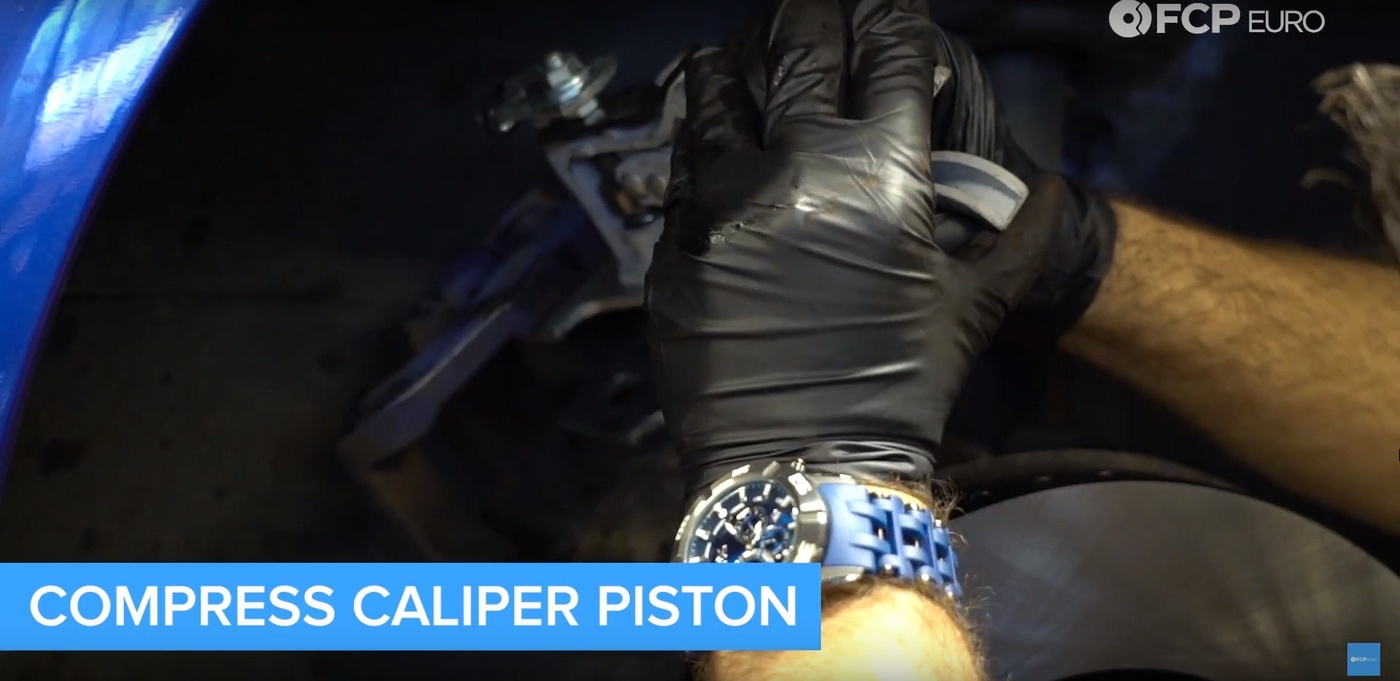
Step 12: Compress Caliper Piston
Take your caliper compressor (or a pry bar) and fit it between the front of the brake caliper and the piston. As you squeeze, this will push the piston back into the cylinder. If you plan on doing many brake jobs yourself, I'd highly recommend purchasing the compressor. Using c-clamps and other makeshift tools can work, but after doing two cars worth of brakes, you'll be wishing you purchased one from the beginning.
**Make sure you compress it entirely. If you don't, there's a good chance it won't clear with the pads on.**
Step 13: Brake Pad Installation
Installation of your new pads is straight forward. Apply a small dab of brake pad grease to the BACK SIDE of the new pads. This grease helps prevent your new brakes from squeaking. One pad you will latch onto the brake caliper bracket, while the other pad gets clipped into the brake caliper piston. It might take a bit of pressure to get it to pop in, but it will go. If you accidentally had grease get on the faces of the pads, a quick rub with a rag soaked in brake clean will do the trick removing it.
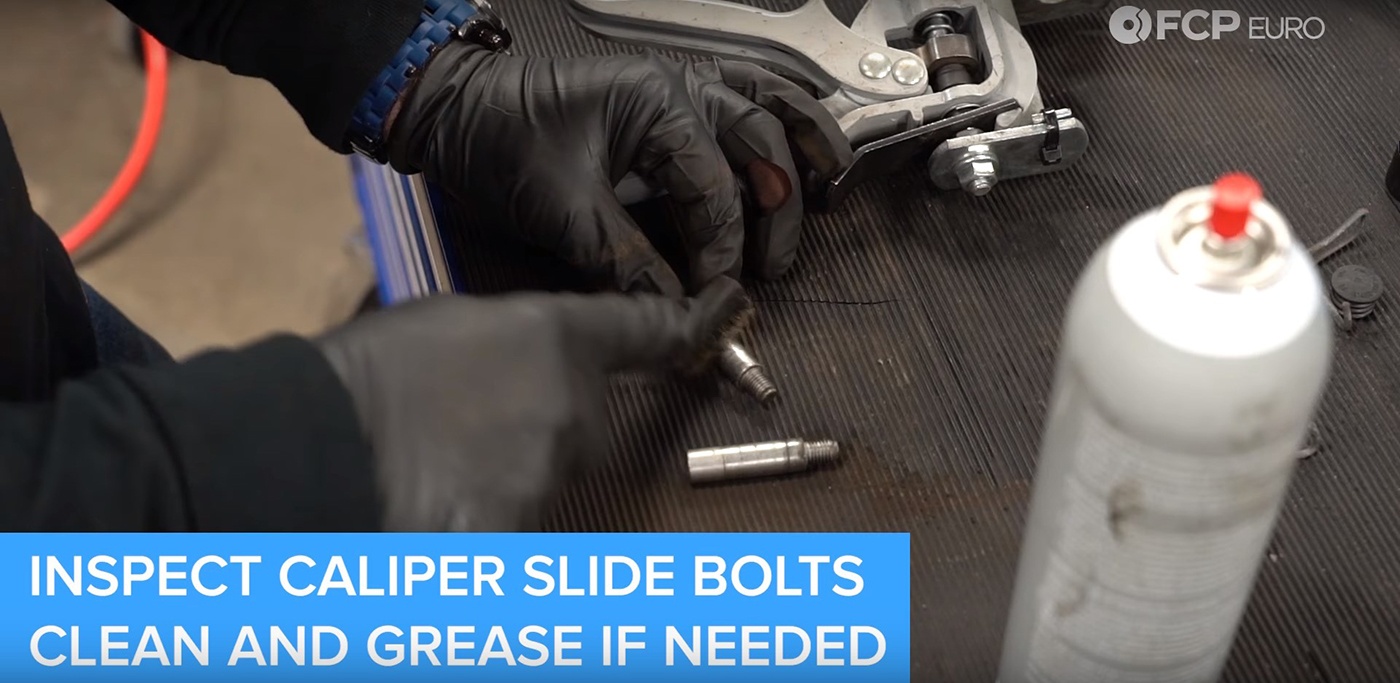
Step 14: Inspect, Clean, and Lubricate Caliper Slide Bolts
The slide bolts that hold your caliper to the bracket allow your caliper to self-locate. It is crucial for these bolts to be clean and greased. Inspect the bolts for any discrepancies, clean well with brake clean, and apply new grease. White Lithium grease works, as well as silicone or PTFE based grease. Be careful when using other types of grease as it can break down the rubber boots. Slide the bolts into the rubber boots so they're ready for caliper re-installation.
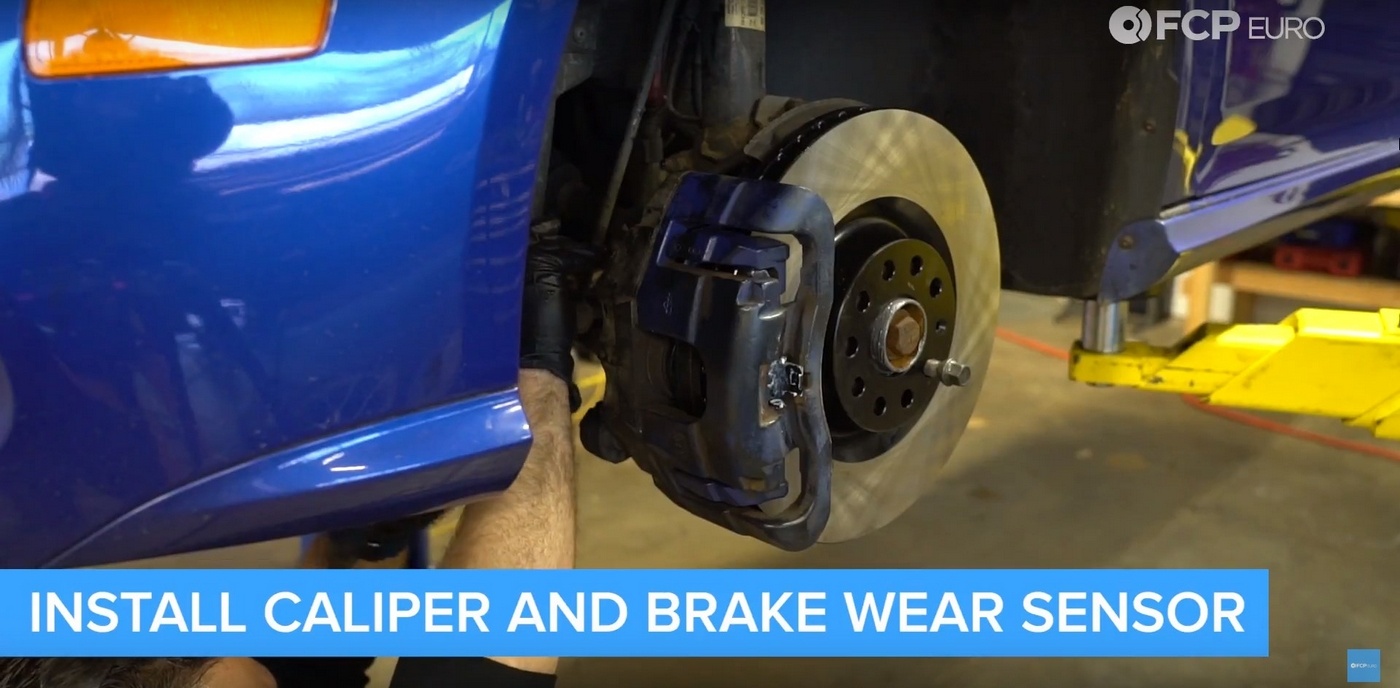
Step 15: Brake Caliper and Wear Sensor Installation
Installation is the reverse of the disassembly. From inside the wheel well, use a 7MM allen/hex socket to tighten the two caliper slide bolts. Manufacture torque spec on these slide bolts is 18 lbs-ft. The wear sensor just clips back in.
Step 16: Install Brake Pad Anti-Rattle Springs
Some people run without them for track use, but I feel they're a must for daily drivers. Anti-Rattle springs do just as implied. Without this spring clip, the pads rattle so loudly it sounds as if you're carrying loose items in the trunk. To install, hook the two ends into the brake pad. Then, pull the clip back and push in until it snaps into place.
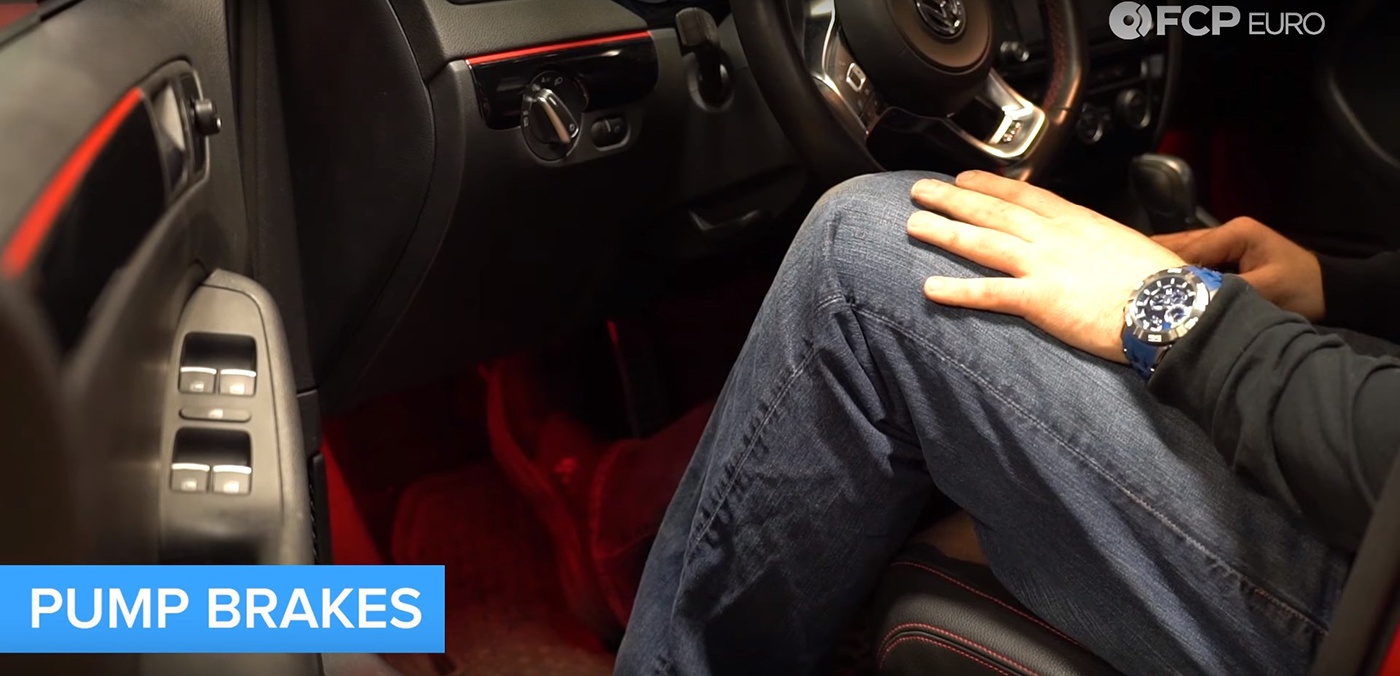
Step 17: Reinstall Wheel, Lower your Car, and Pump your Brakes
At this point, you're almost done. You can reinstall your wheel (making sure to torque it to spec). Get ready to lower your car by making sure any tools are out from underneath and your jack stands are clear. Once you know this, lower it to the ground. Start it up and pump the brakes until you feel them go hard. If they do, you're all set.
Hopefully by the second wheel, you won't have to reference this guide again. Your fourth corner brake rotor and pad replacement will only take you a fraction of the time as the first. Brake rotor and pad replacement is one of the simplest, yet most impactful jobs on your car that you can do yourself. On your first test drive, make sure to take it slow and feel out the brakes. Once you establish that they're functioning as they should, perform the bed in procedure for your pads and rotors. You can find the procedure on your pad manufacture website; each brand has a slightly different process.
Be sure to check the video below on our YouTube page, and don't forget to subscribe to get all new videos pushed right to your inbox.