An oil change is one of the first DIYs most getting into the game learn to do. There are a few DIY guides on how the oil service is done on the B6 Audi A4 with the 1.8T engine, each author providing their own tips and tricks. There were a few things I learned along the way that could be helpful to those attempting the job. On my second oil change, I collected a sample of the drained oil to be sent out to Blackstone Labs to have a thorough analysis done on it. At that time, my Audi had 223k miles on it. It ran (and continues to run) very well.
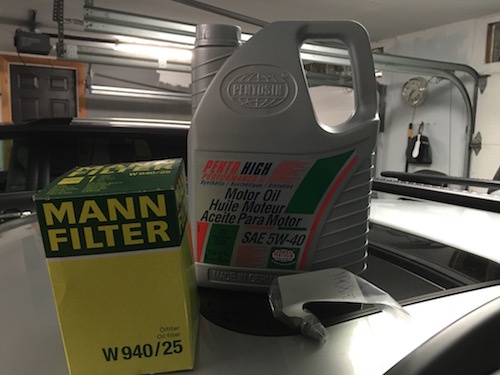
I change the oil on my Audi roughly every 4k miles with Pentosin 5W-40 full synthetic oil and a MANN W940 filter. This may seem frequent but I do so with good reason. The 1.8T and some of the 2.0T Audi/VW engines can have issues with sludge build up due to most of their early owners following Audi/VWs 8k-12k oil change interval for full-synthetic. If you don’t like sludge, change your oil every 3k-5k with an approved full synthetic! I drive about 25k a year so it’s not unusual for this to be once every two months.
Tools/Supplies:
- Flat Head Screwdriver
- 19mm (6pt) Socket w/ ratchet or Box End Wrench
- Phillips Screwdriver
- Oil Filter Wrench (optional)
- Catch Pan
- Oil (5W-40 Full Synthetic)
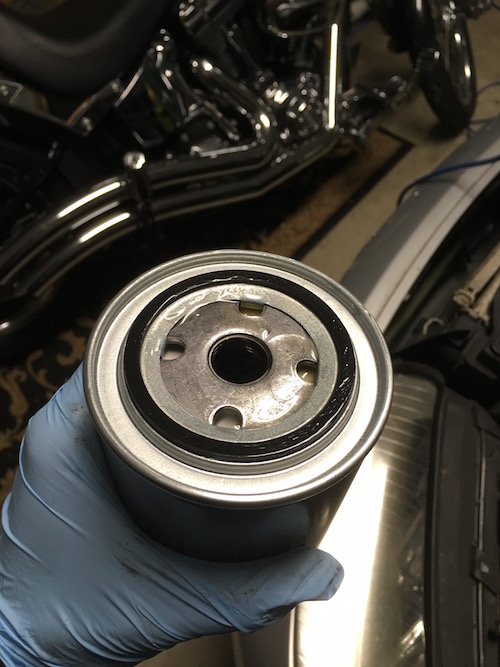
- Filter
- Drain Plug & Crush Washer
Note: FCP sells a variety of oil service kits to suit your preferences that will contain the correct weight/type of oil, filter and drain plug. However, if you decide not to go that route be sure the oil you choose is full synthetic, the filter is the larger capacity one for the 1.8T (i.e. W940 MANN) and if you don’t get a new drain plug, get a new crush washer!
Procedure:
It is always a good idea to start with warm engine oil before changing it. Take your car for a short drive or let it run for a little bit to warm it up.
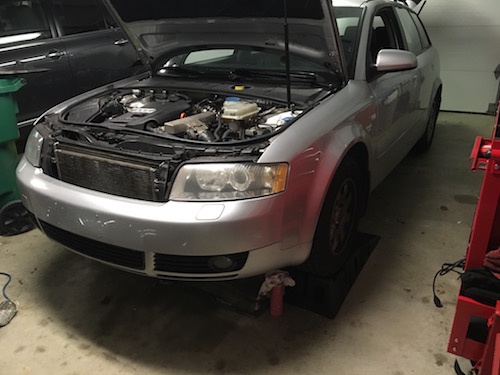
Begin by lifting your car safely. I used a set of ramps under the front wheels however jacks and jack stands will work perfectly fine. I will warn you however that the B6, in general, is a pain to jack up and get stands under due to a lack of suitable jack points other than the pinch welds. You may find yourself spending a lot of time trying to get the car in the air without ramps…
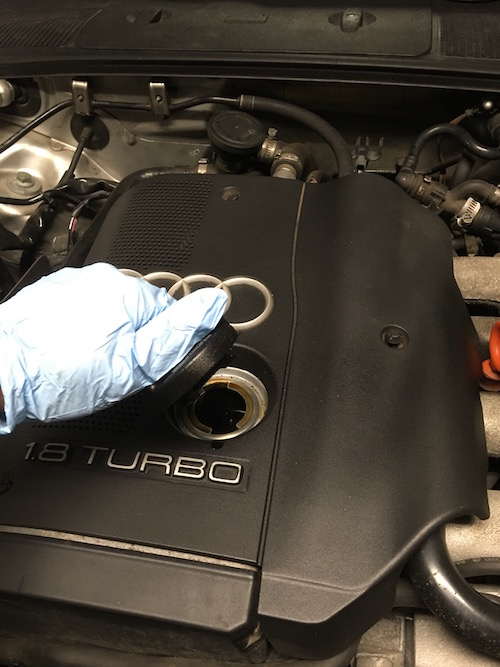
Remove your engine oil cap and place it somewhere where it won’t roll or fall in the engine bay.
Get underneath the car and remove the splash pan (if you have one) using a flathead screwdriver. If you have a stubby flathead, that works great. There are 6 screws to drop it down. Set it aside
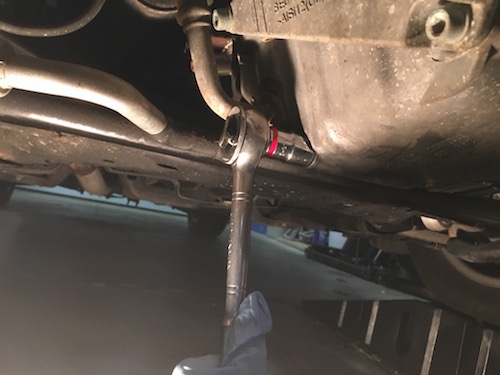
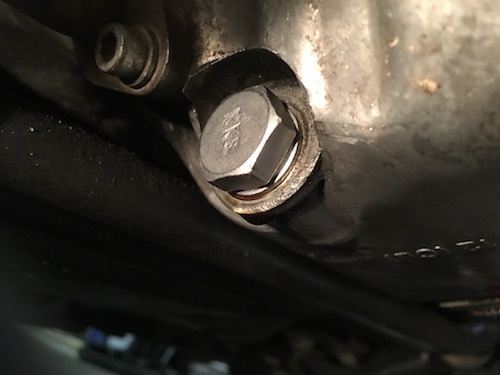
Locate the oil pan. On the passenger side of the pan is a 19mm bolt. This is the drain bolt.
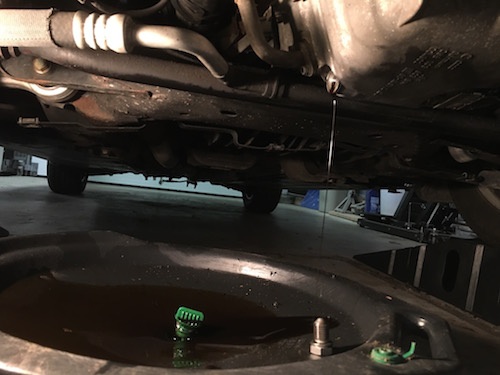
Slide a catch pan over and align it properly. Remember, the oil is going to come out with a bit of a trajectory, so, if your catch pan is directly under the bolt, when it initially comes out, it may briefly miss your catch pan!
Get a socket or wrench (19mm) onto your drain bolt. You should only need the tool to break it loose and from there can back it out with your fingers. Don’t use an impact gun to remove this bolt…back it out with your fingers slowly keeping a little pressure inward on the bolt as you remove it.
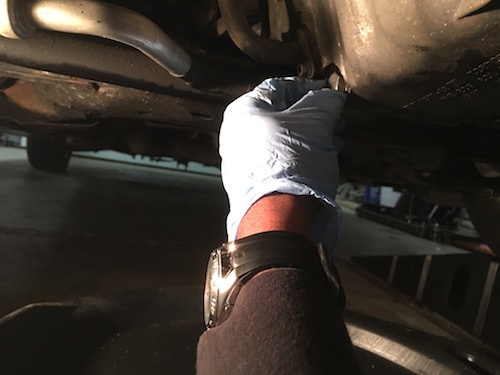
Try not to drop the bolt into the oil once you remove it if you have an open catch pan. It’s not the end of the world if you do, just pain fishing for it in the oil. Let it drain…
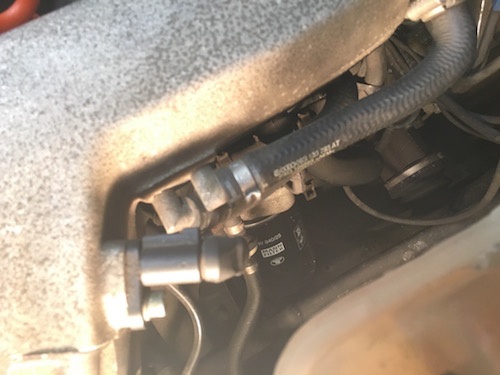
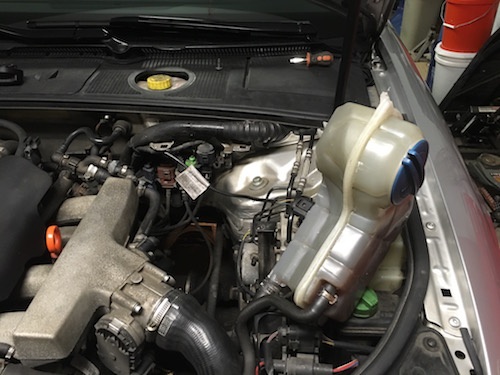
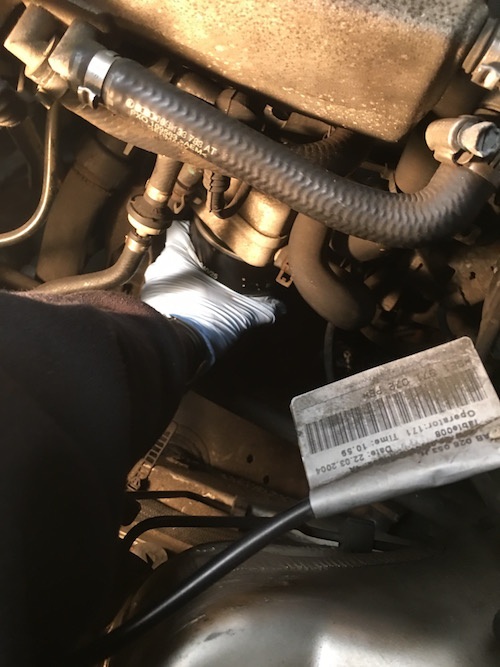
In the meantime you can prepare to access the oil filter (Look between your intake manifold and coolant reservoir and you will see the filter). The easiest method I found was to simply move the coolant reservoir out of the way. You will have plenty of room to remove and install the new filter this way.
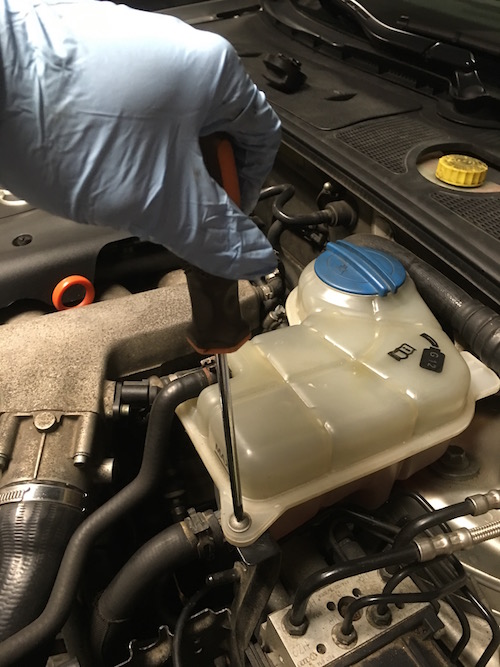
Remove the one Phillips screw holding the coolant reservoir in and set it aside where you wont loose it. Ensure the cap is on tight. Maneuver the reservoir out of its tabs in the back. I got the right tab first then the left. Be firm but don’t crack it or break the tabs!
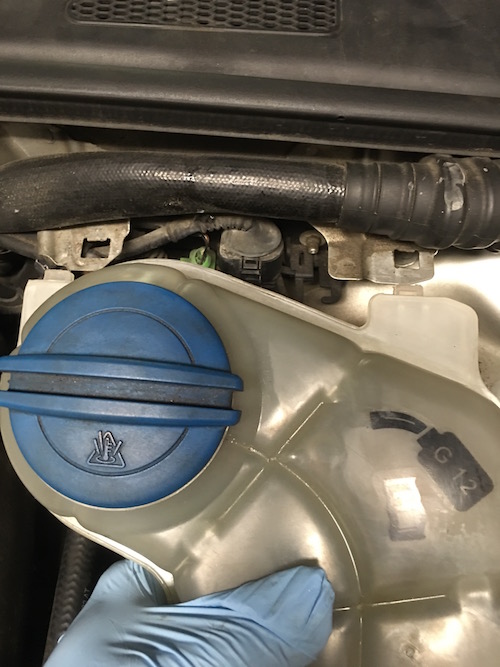
Once its out of the tabs, the reservoir can rest off to the side. Now you have good access to the oil filter.
Your old oil should be a very slow drip at this point. You can install your new drain bolt or the old one with a new crush washer. THERE IS NO NEED TO OVERTIGHTEN THIS BOLT!
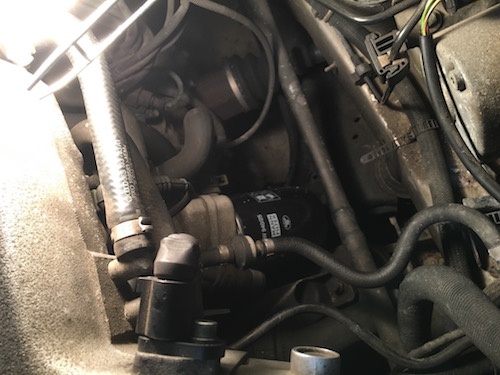
While still under the vehicle, slide the catch pan over so it’s underneath the filter area to catch any oil that may come out when you remove the filter.
It’s a good idea to prepare and have ready the new filter so you can swap them out quickly to minimize the amount of oil that will inevitably drip onto your sub frame. It’s never been much in my case; still I just like to have the new filter all ready to go.
Prime the new filter by putting some oil in it, no need to fill it all the way up, about half way is fine. Also, get a little oil on the o-ring at the top. Set it aside.
Reach down and unscrew the old filter. It should be on there hand tight, however, if it seems to be tight beyond that, use an oil filter wrench to loosen it and then back it off by hand. It is full of oil so keep it upright when you remove it. I quickly and carefully moved it to the catch pan and rested it in there to drain.
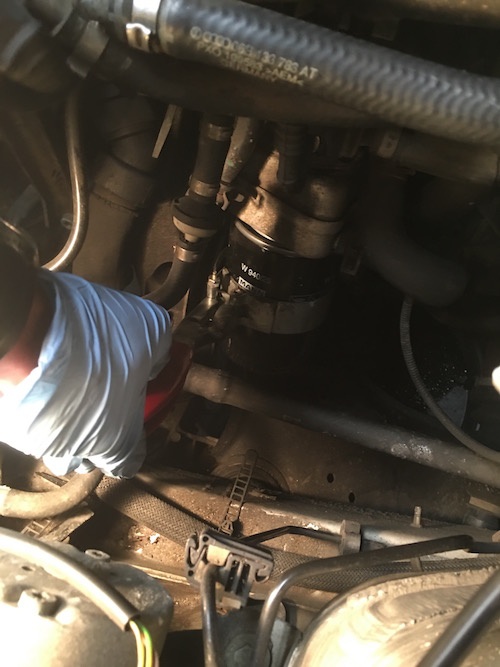

Grab the new, prepped filter and screw it on. Again no need to over tighten, get it hand tight and snug.
If you got some oil on the sub frame and or side of the block, use a little brake cleaner and a rag to clean it up.
Replace the coolant reservoir to its location. Don’t forget the single Phillips screw.
Fill the car up with new oil! The 1.8T takes usually about 3.5-4 quarts of new oil, in my experience. It’s going to be a little difficult to tell if it’s full using the dipstick with the car on ramps. If your pan has markings on it, look at those and you can tell how much oil should be replaced.
Run the engine for a little bit and check for leaks. If all looks good, shut the car off and replace your splash pan. Get it down off the ramps/jack stands and check the oil level. Top off if necessary.
That’s it!
Blackstone Oil Analysis at 223k miles:
After my Audi’s second oil change in my ownership, I decided to send an oil sample out to Blackstone Labs to be analyzed for its metallic (perhaps other things as well) content. The test will run $35 and is fairly comprehensive. I have attached a copy of the first report. This report was done when the car had 223k miles. The oil from that sample was run a little longer than I would have liked at nearly 5k miles.
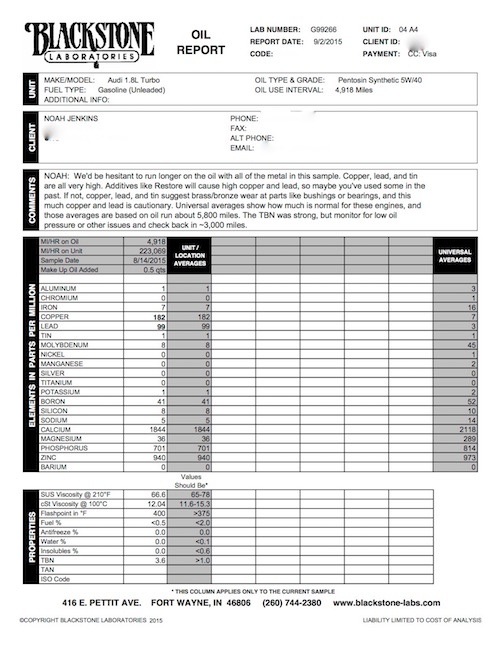
While this may not seem like entirely good news that suggested internal bearing wear, I was pleased to read that they suggested that using engine additives such as Restore could motivate high amounts of metal in the sample. The previous owner of the car had mentioned to me his use of Restore at every other oil change. I personally don’t use engine additives so I was anxious to see my next analysis. If the PPM of the metal ions decreased closer to average, this would confirm that the additional additives from the Restore are being cleared from my engine with each oil change.
At 231k, two oil changes later; I sent another sample out to be analyzed. Sure enough, my hypothesis was confirmed! See the attached report below:
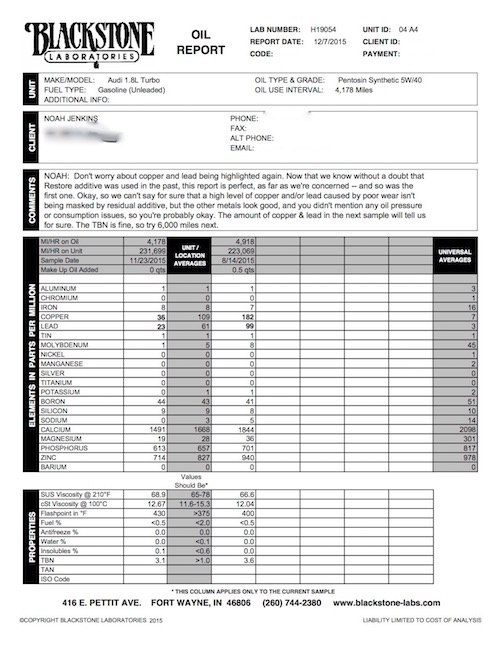
I will have another sample sent out at my next oil service around 238k. The car currently has 236k miles on it and I have no issues with oil pressure or even oil consumption.