Early Volvo XC90 V8 models were plagued with premature alternator failures, often happening well before 100k miles. This actually happened to my 2006 XC90 V8 at about 92k miles. When I was searching around to have it repaired, I got quotes of over $1400 to replace the alternator. Perfect candidate for a DIY!
The alternator is made by Bosch and has the following specifications:
- Current output: 180 amps
- Bosch part number: Rebuilt: AL0821X / New: AL0821N
- Volvo OEM part number: 36000791
It’s also important to note that 2003-2004 V8 model uses a self-regulating alternator where the current and voltage regulation system is built inside of the alternator unit. Starting from 2005, the regulation is controlled by the ECU. The regulators are still inside of the alternator, but the current and voltage output is now controlled by the ECU instead of internally by the alternator.
You can put in a 2003-2004 V8 alternator in a 2005+ V8, however you will get a red triangle warning “POWER SYSTEM SERVICE URGENT” and a battery idiot light because the ECU cannot communicate with the alternator. The alternator will continue to function normally and will charge the battery, but you will still get the warning messages. The cost difference is not significant, so it’s worth it just to get the 2005+ alternator and fix it correctly.
Start by letting the car sit for at least 5 minutes since you took the key out. This allows the ECM to store any running parameters and go into a safe state to disconnect the power. Go have a drink, use the bathroom, clean the garage, whatever for 5 minutes, then go into the back and disconnect the battery. While the battery is disconnected, hook up a battery charger to the battery.
[gallery ids="5048,5049,5053,5051,5050,5052"]
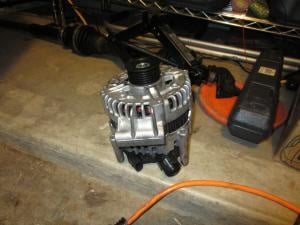
Here is the refurbished alternator shipped from Bosch – this particular unit was made in Hungary and has the part number AL0821X. Also attached to the alternator is a red tag that explains some warnings about installing the alternator. Interestingly, the warning says to make sure either a brand new battery is installed, or the battery is fully charged before starting the engine with the new alternator.
[gallery ids="5045,5046,5047"]
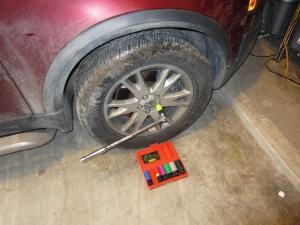
Step 1: Remove front passenger side wheel
Since the V8 powerplant is so crammed in the engine bay, the alternator is installed at the bottom behind the passenger side front wheel. The first step is to remove the wheel so you can access the panel and components behind it. Make sure the vehicle is jacked up and on a secure jackstand – you can see the mounting point I used below. After the wheel is off, there are a series of plastic flange nuts that have to be taken off so the lower component cover can be removed. Remove the nuts and then remove the panel.
[gallery ids="5054,5055,5057,5062,5061,5059"]
Step 2: Disconnect suspension components
Now take a look at the hub assembly – there is an axle nut on the front that needs to be taken off. Remove this, the outer tie rod, and the swaybar endlink. Spray them down thoroughly with a penetrating lubricant before to make the job easier. The joints may rotate in the socket, so you might need to improvise something to take the nut off. It will also help to jack up the entire hub assembly with a floor jack to make it much easier to remove the swaybar endlink connection to the strut body.
[gallery columns="4" ids="5063,5064,5066,5065,5067,5068,5069,5071"]
Step 3: Remove axle
With the linkages removed, it’s now time to remove the axle from the hub assembly. Make sure the ABS sensor and the brake lines are out of the way – I unbolted the bracket and tucked them away. Turn the hub assembly hard to the left all the way as if you were making a hard left turn – turn it all the way and then get a punch with a blunt point, like a socket and socket extension. Put the punch into where you removed the axle nut and hammer away to remove the axle from the hub assembly. You will need to play with the hub angle and varying the pressure on the axle to get it to pop out.
Before the axle will come out from the transaxle willingly, the axle bearing cradle has to be opened. It’s a lot easier than it sounds – follow the axle into the car until you come across a U-shaped piece bolted in at two opposite points. Remove the bolts, and give it a firm whack with a drift and rubber mallet and it will come off. Now, jack up the hub assembly again as if you were removing the swaybar endlink bolt, firmly grab the axle with both hands, and give it a firm tug. The axle will literally pop out of the transaxle. You will need to fidget with the hub and the axle to maneuver it out. You will be able to remove it without removing the lower ball joint, it will just take some time, and some effort to wiggle it out. Remove the jack that’s holding up the hub assembly.
[gallery ids="5076,5075,5074,5073,5072,5077"]
Step 4: Remove drive belt and alternator
This was the most difficult part of the DIY. See the alternator hidden up there? Before you remove the three bolts, you will need to disconnect the wiring harnesses to the alternator. The alternator output positive cable was easier for me to remove by getting a small 1/4 inch socket wrench from under the car. Reach up from the wheel well, up behind the engine, and up over the alternator and remove the nut that holds the positive cable in and remove it. The alternator field wiring was easier for me to remove from the top of the car – you will need to remove the upper engine mount assembly that goes between the strut towers, the rear plastic engine cover, and the plastic accessory belt cover. Beware – on the accessory belt cover, there are two Torx screws holding it in. With the plastic covers off, you can reach behind the engine from the top of the engine bay, reach the alternator, and disconnect the field wiring.
Now we will need to remove the accessory belt around the alternator. You can do this one of two ways – you can do it from under the car, pull the accessory cable towards you, and put a socket on the crank pulley, and turn the crank pulley clockwise – this will force the belt to derail over the alternator pulley and pop it off. The recommended way is to get a long socket wrench like a breaker bar, put a 19mm socket on it, and attach that to the welded-on nut on the belt tensioner from the top of the engine bay. You will need to pull on this towards the front of the car firmly for about 40 seconds and slowly the belt tensioner will release and you can slip the belt off the top idler pulley. Take your time on this! If you exceed 177 lb-ft on the tensioner, you can damage it so just do it slowly!
It’s just a matter of unbolting the three bolts (two lower, one upper) that hold the alternator to the engine block and dropping it out! This was what took by far the longest for me – it’s a tight squeeze to get the alternator out of this little hole you made. Get the alternator out, and turn it around. You need to remove the heatshield on the back of the old alternator and install it on the back of the new alternator, reusing the Torx mounting screws.
Step 5: Install new alternator and drive belt
Now, you’ll need to negotiate the new alternator back into the engine bay and bolt it up. The alternator alone is nearly 20lb – it will be extremely beneficial to have someone hold it while you navigate the mounting bolts in – be very careful not to gouge or strip these threads! The engine block that you are bolting the alternator onto is made of aluminum! Once the alternator is bolted up, install the output positive cable and the field cable – again for me it was easier to do the output positive cable from the bottom, and the field cable from the top. Get yourself a beer, you’re halfway done!
Get your 19mm socket and long socket wrench again. Install the alternator belt around all the accessories except the top idler pulley. From the top of the engine bay, put the socket wrench on the tensioner, and give it a firm and steady pull for about 40 seconds to a full minute. The tensioner will release and allow you to slip the belt over the upper idler pulley. I was able to do this with one hand in a few tries, but it would probably be easier to do with a helper. Don't exceed 177 lb-ft on the tensioner pre-loading bolt!
[gallery columns="2" ids="5079,5080"]
Step 6: Install axle
Now, jack up the hub assembly again and install the axle back into the transaxle – putting it back in required some wiggling of the axle, the hub assembly, and adjusting the height with the jack. Make sure the bearing surface is clean and then bolt the bearing cradle back up. Now comes the tricky part – turn the hub assembly to the hard left again and get a long prybar or long thick screwdriver and brace it against the lower A-arm, and the other end near the ABS sensor teeth. With enough careful prying, and fine adjustments with a large hammer, you CAN get the axle back into the hub assembly without removing the lower ball joint. Trust me on this, it is possible. I had no tools available to remove the lower ball joint so this was the only option I had.
[gallery columns="4" ids="5060,5056,5063,5055"]
Step 7: Connection suspension components
With the axle back in place and the hub assembly still jacked up, connect the swaybar endlink back to the strut housing and lower the hub assembly. Reinstall the axle bolt and the tie rod. I found I didn’t need to hold the center bolt section on tightening. Re-install the ABS sensor line and brake line brackets.
[gallery columns="2" ids="5082,5083"]
Step 8: Double check!
Now, clean off the engine bay and reconnect the battery. Double check that the belt is installed correctly and the alternator is wired correctly, and the engine bay is free and clear of tools, rags, and foreign objects. Start the car and check the voltage across the positive junction and a ground – you should get above 14 volts now! I was able to get 14.29 volts. Yay! The alternator works! Shut off the engine before it gets warm so you can work in the engine bay without getting burned and so the radiator fan doesn’t run continuously.
Step 9: Install wheel
You can now install the wheel, the accessory belt cover, the rear engine cover, and the upper engine mount. Pat yourself on the back well done, and soak in the feeling that you didn’t have to pay Volvo over $1500 to fix the car. Enjoy! The fact that you disconnected the battery cable will clear any CEL/MIL.
About the Author: Andrew Peng
 Andrew is an aerospace engineer and car fanatic that enjoys working on his garage of Volvos and Subarus. When he's not busy attending car meets and shows or taking things apart, he enjoys driving his cars and finding interesting new ways to break them. He can be reached via his personal website at http://andrewpeng.net, Facebook, Google+, Instagram, or Twitter.