- 05/06/2019
- 7 Min Read
- By: Jose Martinez
How to Replace The Hard Oil Cooler Lines On An Air-Cooled Porsche 911

Many air-cooled Porsche 911s have hard oil lines that have been crushed as a result of being jacked or lifted improperly. If this has happened to your car, this guide will help you replace your damaged oil lines and restore maximum oil flow to your front oil cooler.
Your 1974-1989 air-cooled Porsche 911 has an engine in the rear, an oil cooler under the right front fender well, and a series of long oil lines and an external thermostat circulating oil between the two. If your car has been serviced by shops not familiar with Porsches, it is very likely that it was lifted improperly at some point and that the hard brass oil lines running along the right side rocker panel have been dented. If the damage is severe, it could reduce oil flow to the oil cooler and affect engine cooling and oil pressure. Fortunately, these are straightforward to replace, and while you're at it, you can replace the short flexible lines connecting to the front oil cooler and eliminate a common oil leak.
Model Years Applicable:
Porsche 911 cars 1974-1989 as well as earlier cars that have had a 1974+ style front oil cooler and thermostat added. They are virtually the same with slight differences in the oil cooler style. We are covering two styles of oil coolers to cover all oil line installations from 1974 to 1989.
Note: 1973 and earlier cars had several different styles of external oil coolers and oil lines that will not be covered here.
Tools Needed To Complete This Repair:
- Floor jack
- Jack pad adapter tool
- 4 Jack stands
- 2 Wheel chocks
- 2 Oil drain pans
- Shop rags or paper towels
- Rubber gloves
- Safety glasses
- Penetrating oil
- Degreaser spray
- Big open-ended wrenches (36mm and 30mm)
- Propane torch
- Fire extinguisher
- Bench vise
- Small wire brush
- Anti-seize paste
Parts Needed:
- If performing an oil change:
- 1-2 Oil Drain Plug Gaskets
- 1 Oil Filter
- 12 Quarts of Engine Oil
- Inner Hard Line (supply line)
- 1974-1986 911, Turbo: 93020704503
- 1987-1989 911, Turbo: 93020704504
- Outer Hard Line (return line)
- 1974-1989 911, Turbo: 93020704602
- Hard Line Clamp (if any are missing or damaged)
- 1974-1989 911, Turbo: 91120730300
- External Thermostat (if your current one is damaged)
- 1974-1989 911, Turbo: 93010701700
- Front Inner Line (supply line)
- 1984-1989 911, Turbo: 93020711105
- Front Outer Line (return line)
- 1984-1989 911, Turbo: 93020711304
Caution:
- Oil is carcinogenic so wear rubber gloves, long sleeves, and safety glasses to protect your skin.
- Work in a well-ventilated area with no sources of heat, spark, or open flame when using a propane torch. Keep a fire extinguisher within reach.
- A large quantity of oil may spill out of the hard oil lines so wear clothes and shoes that may get oil on them.
Step 1: Lift Car on Jack Stands
Lift the entire car up on jack stands using step 2C of this procedure. You will need wrench clearance around the external thermostat and room to maneuver the hard oil lines out from under the rocker panel. Additionally, the car should be lifted relatively level to ensure all engine oil drains towards the back of the car. Remove both passenger-side wheels.
Step 2: Locate External Oil Thermostat and Front Oil Lines
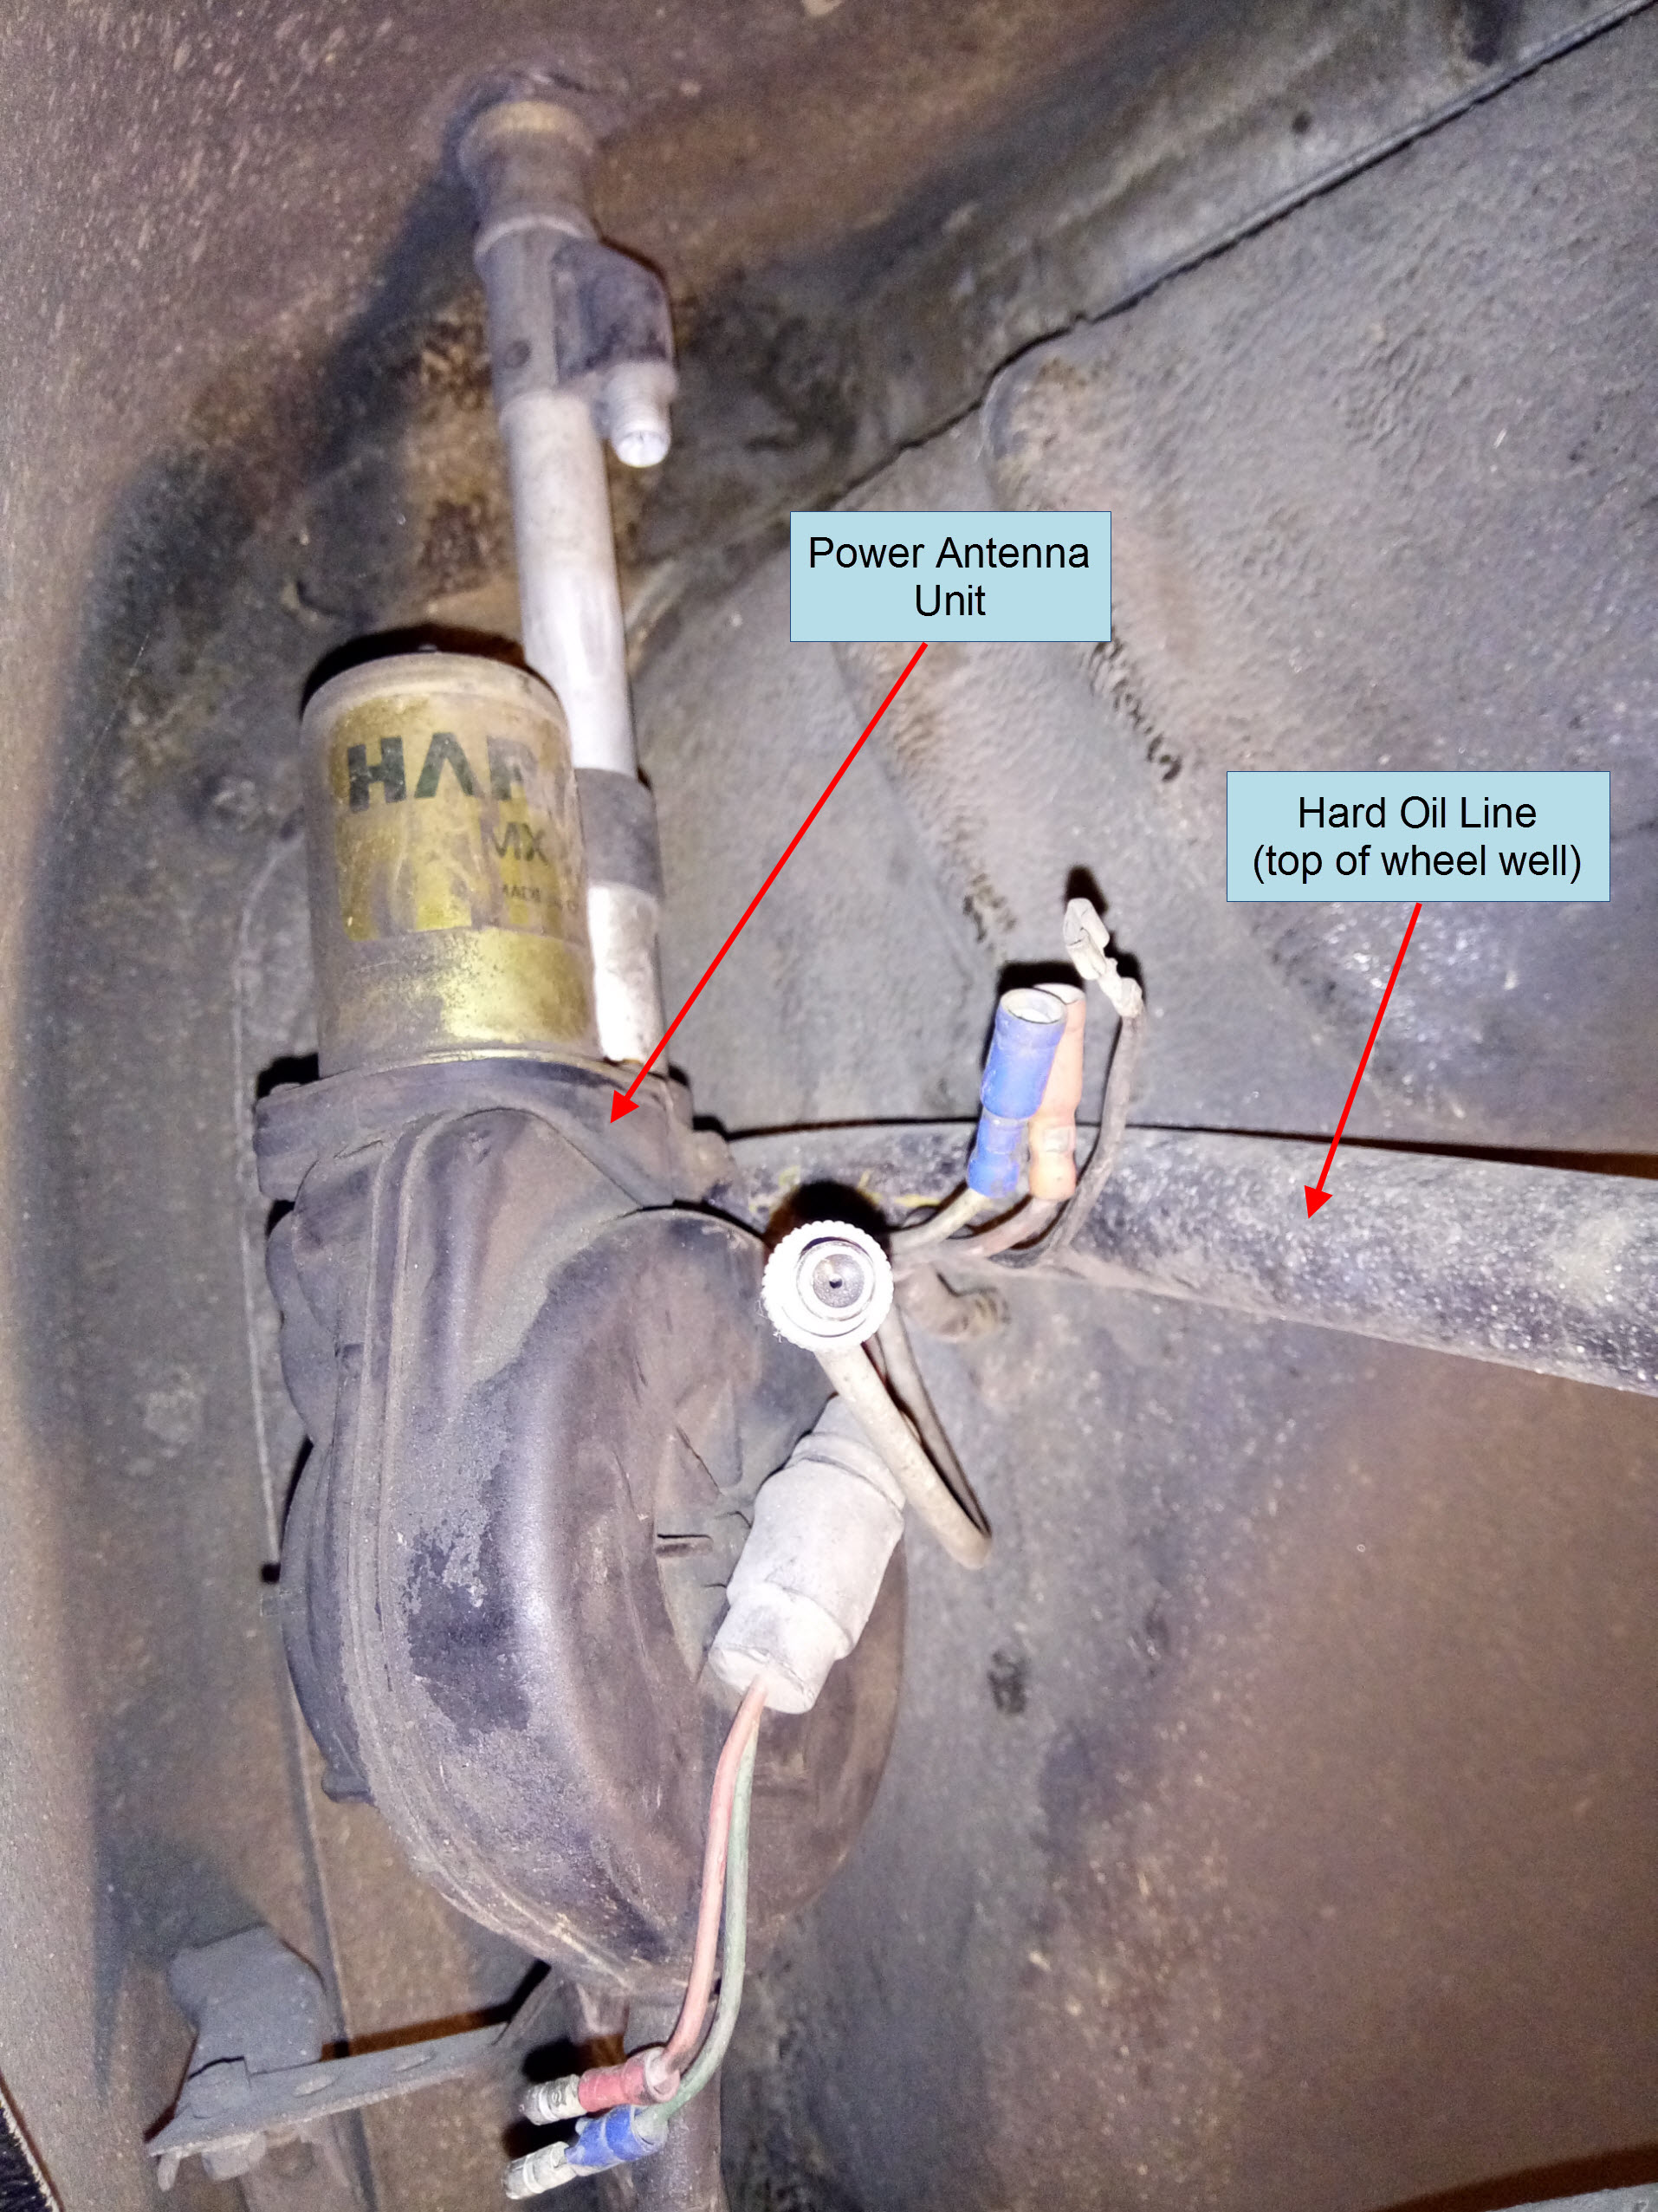
Locate the external thermostat tucked in the front lower corner of the right rear wheel well.
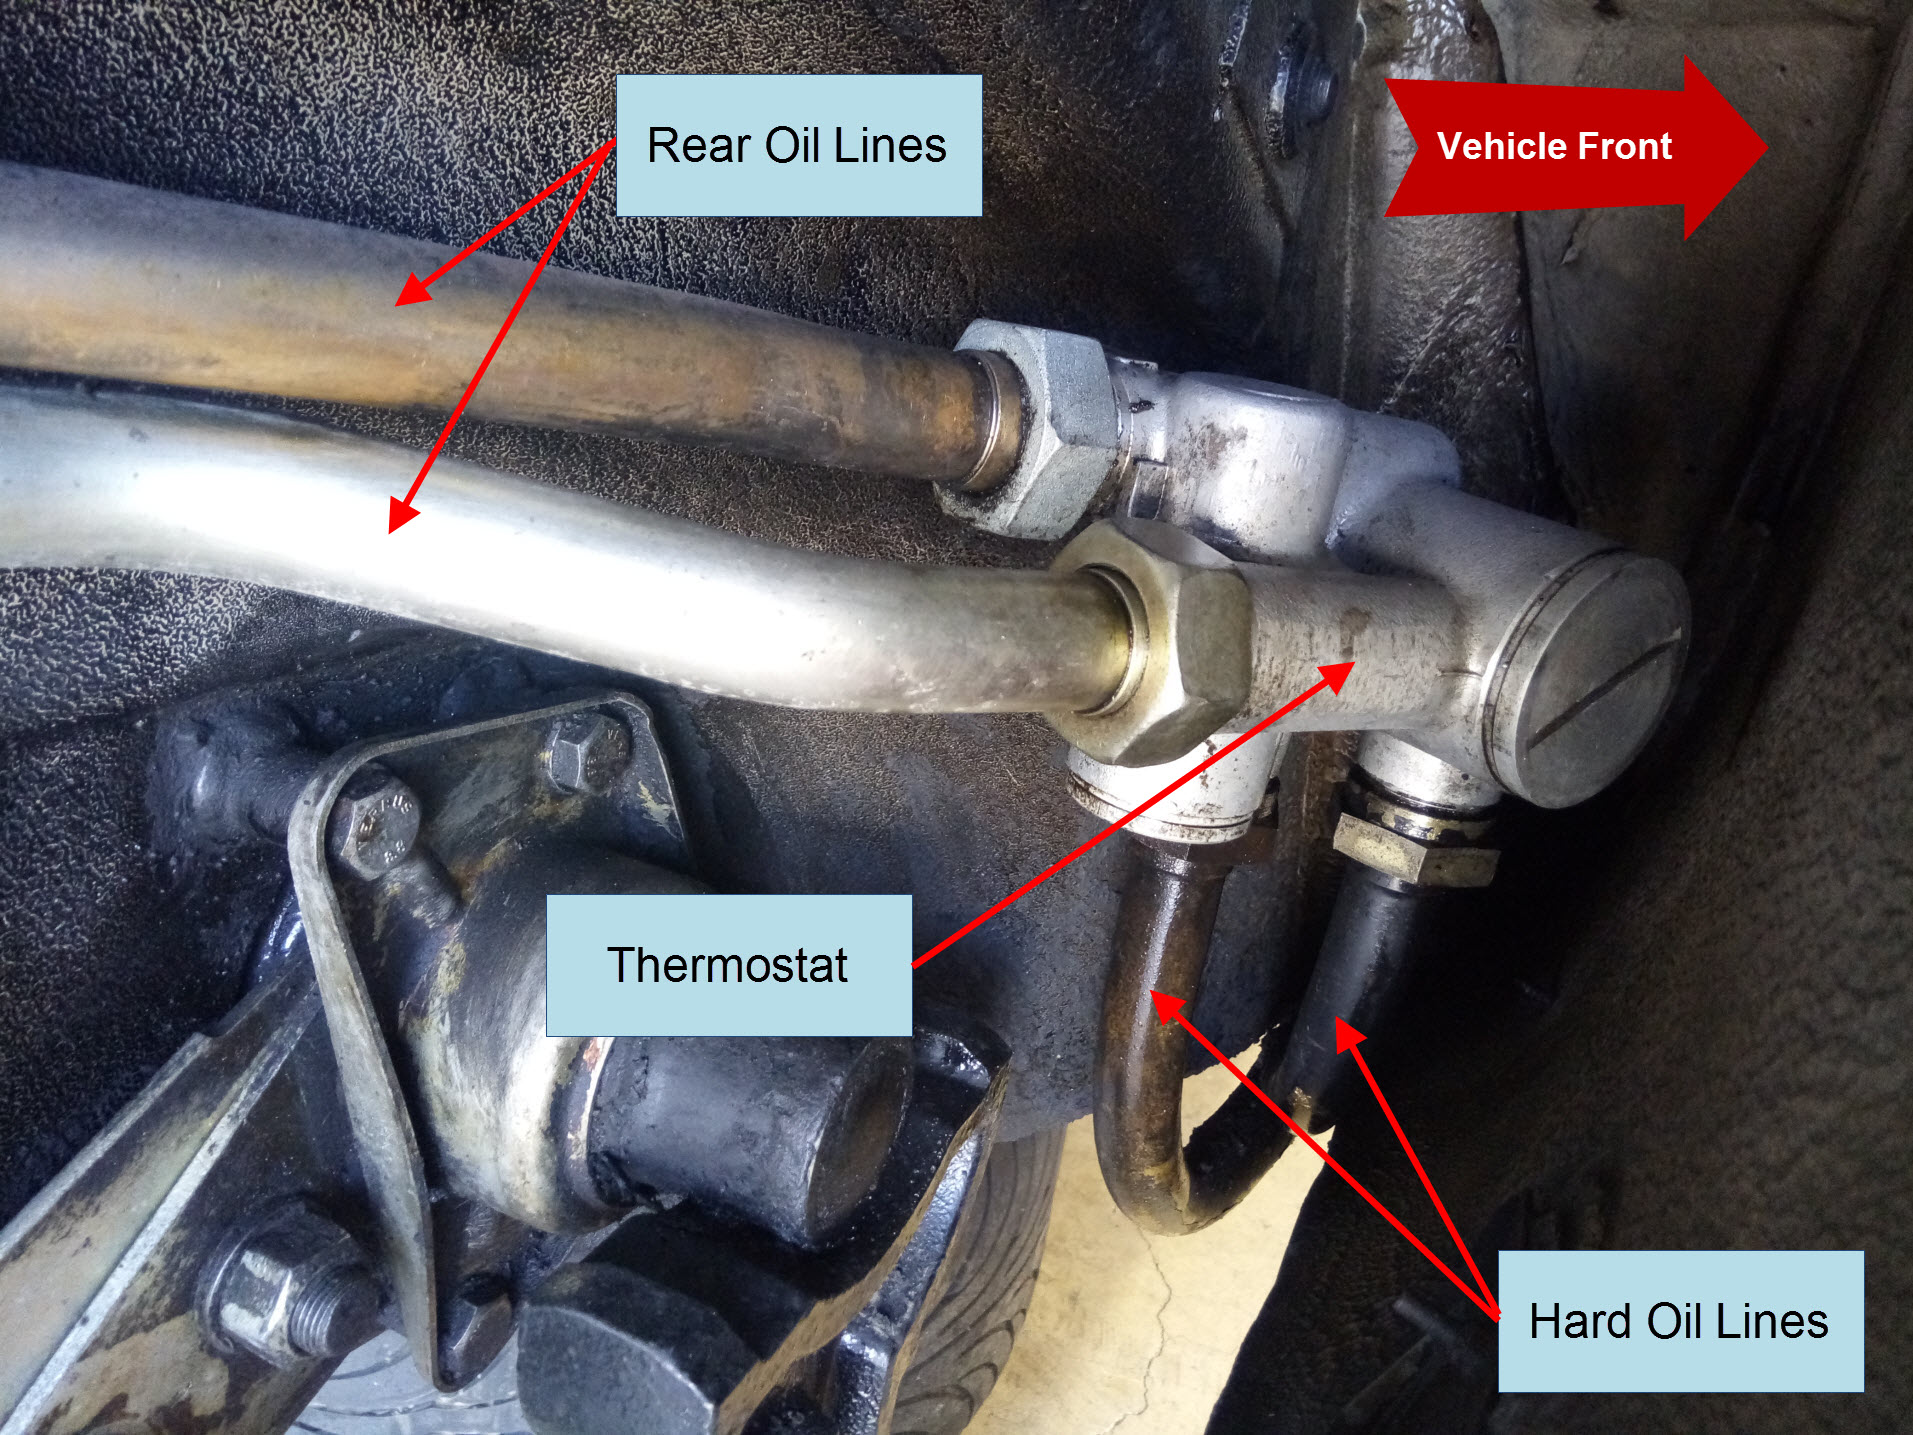
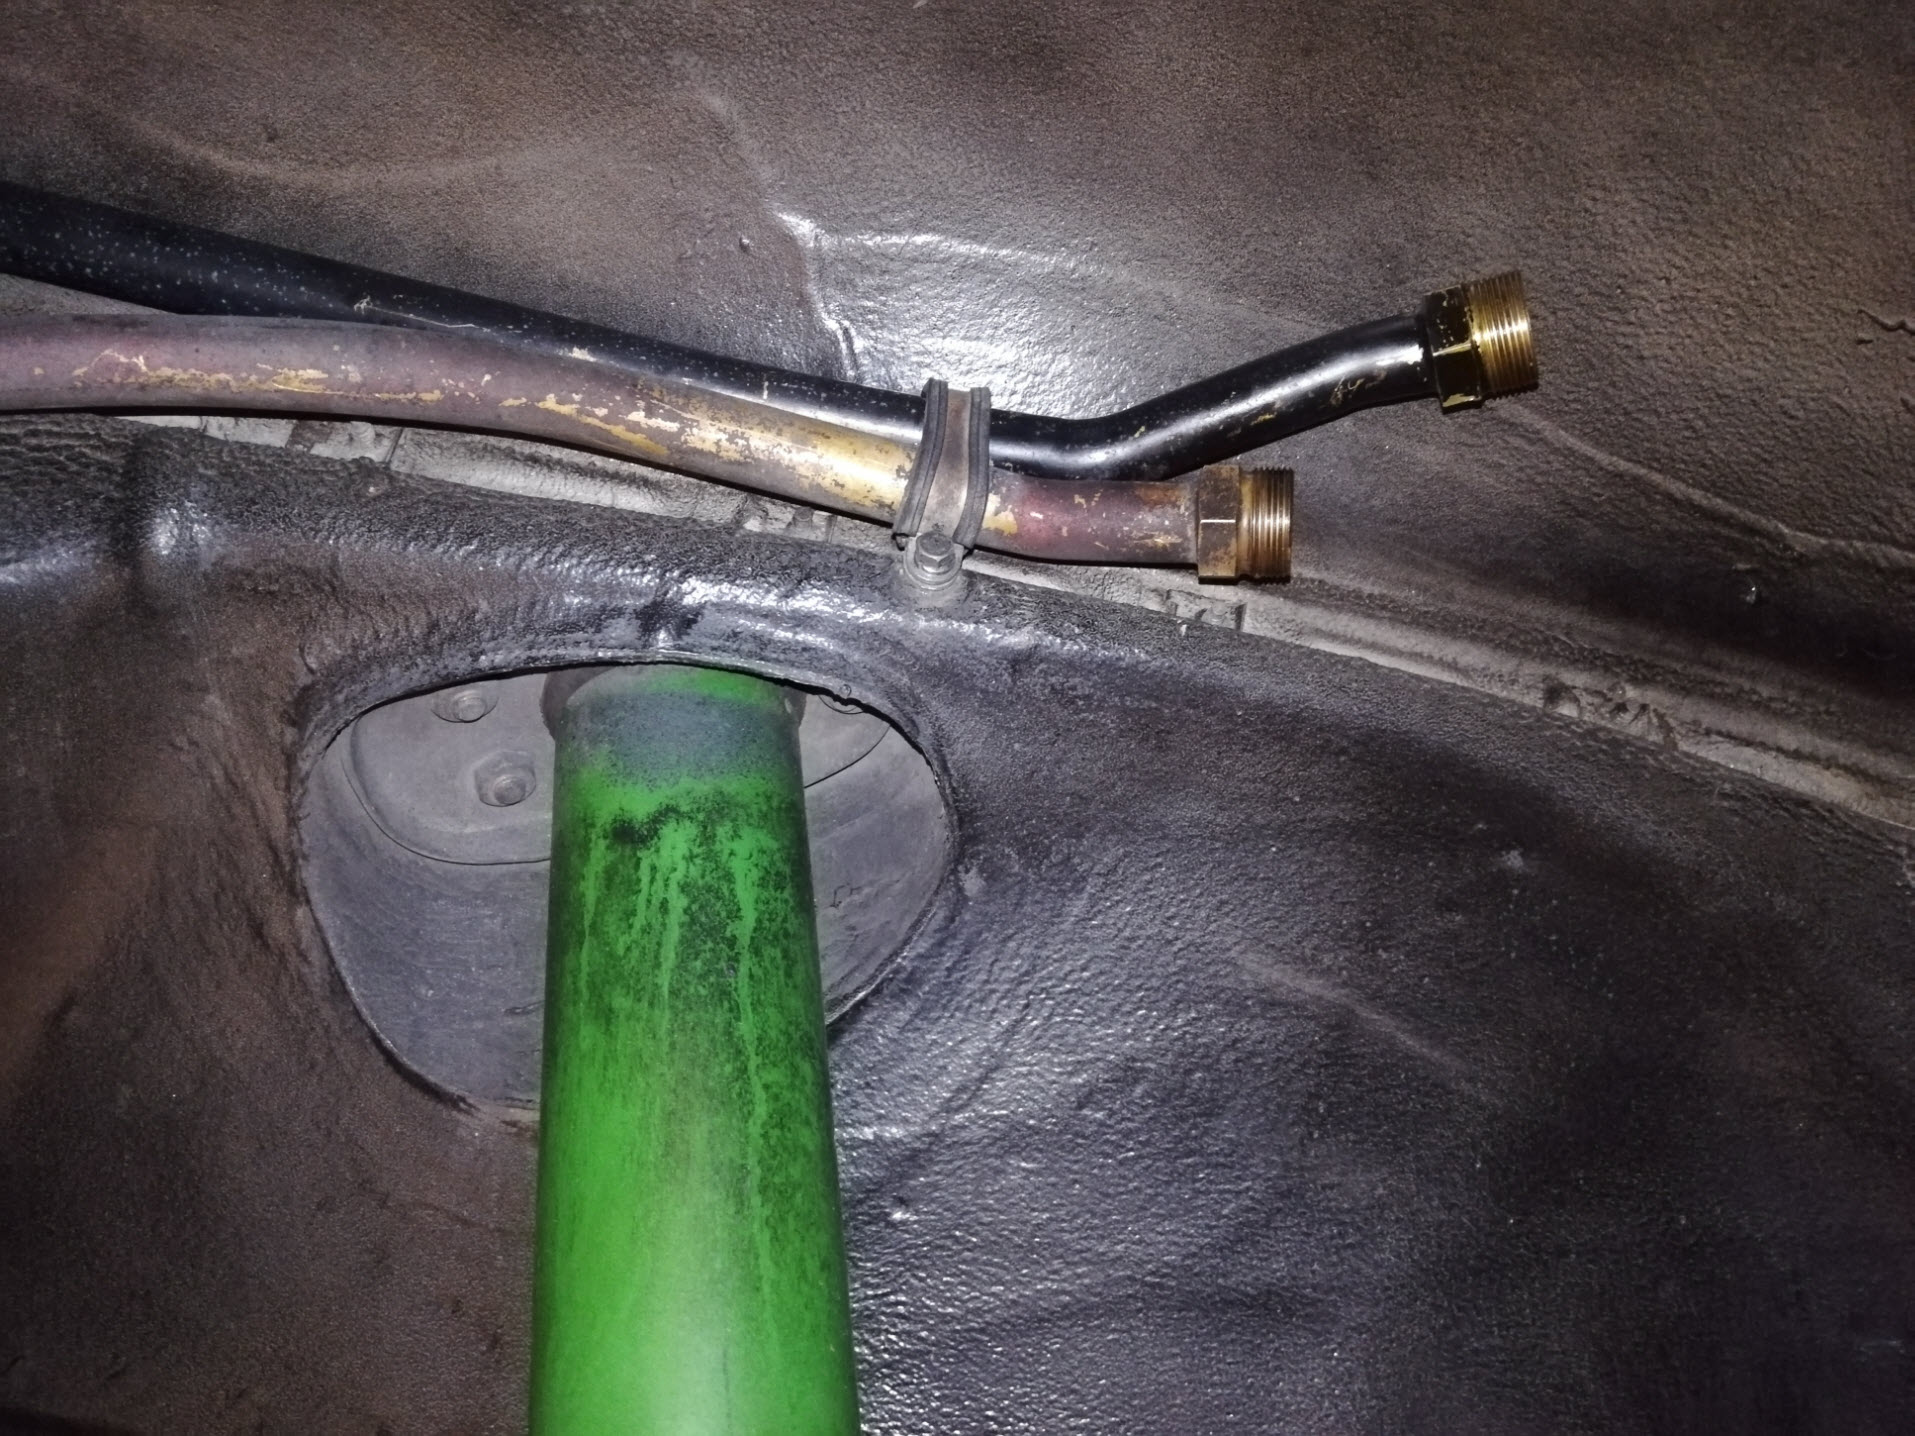
Follow the two brass hard oil lines that connect to the bottom of the thermostat and run along the bottom edge of the rocker. Those run up and over the front right wheel well.
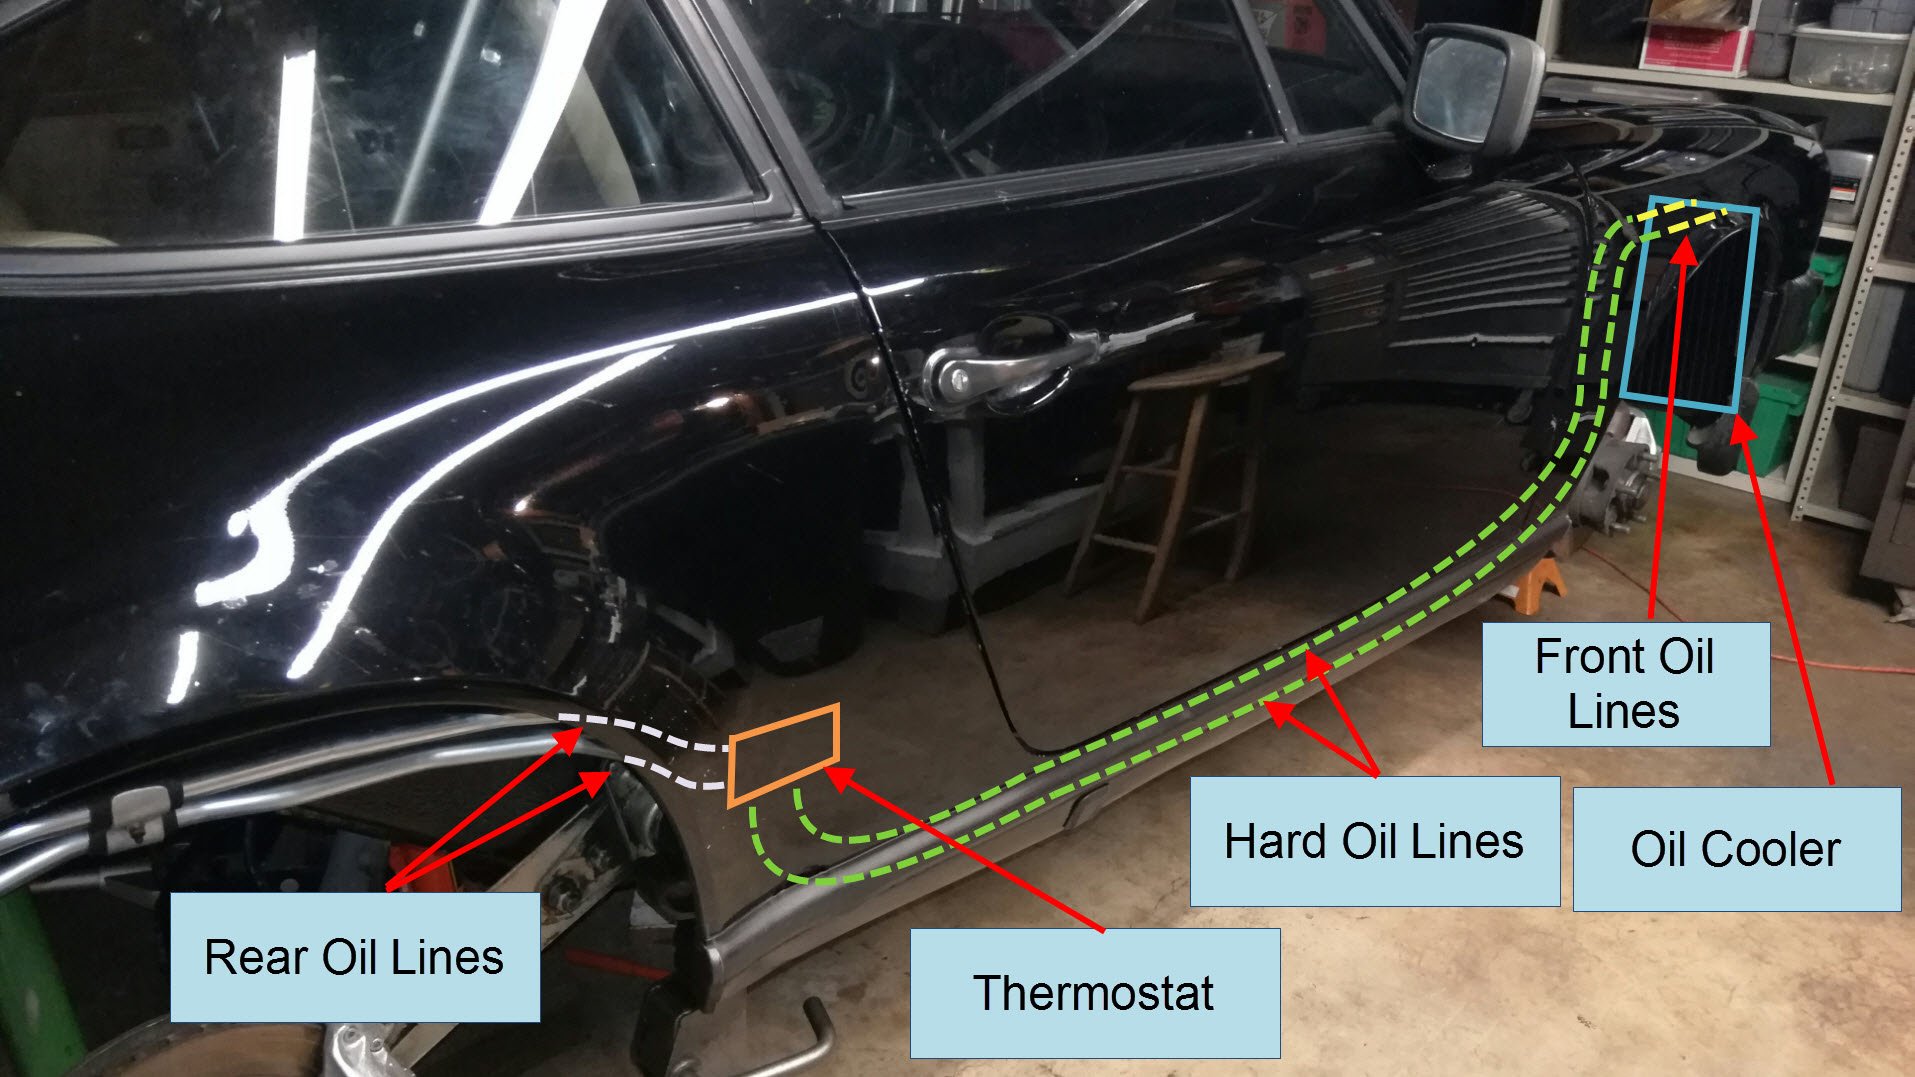

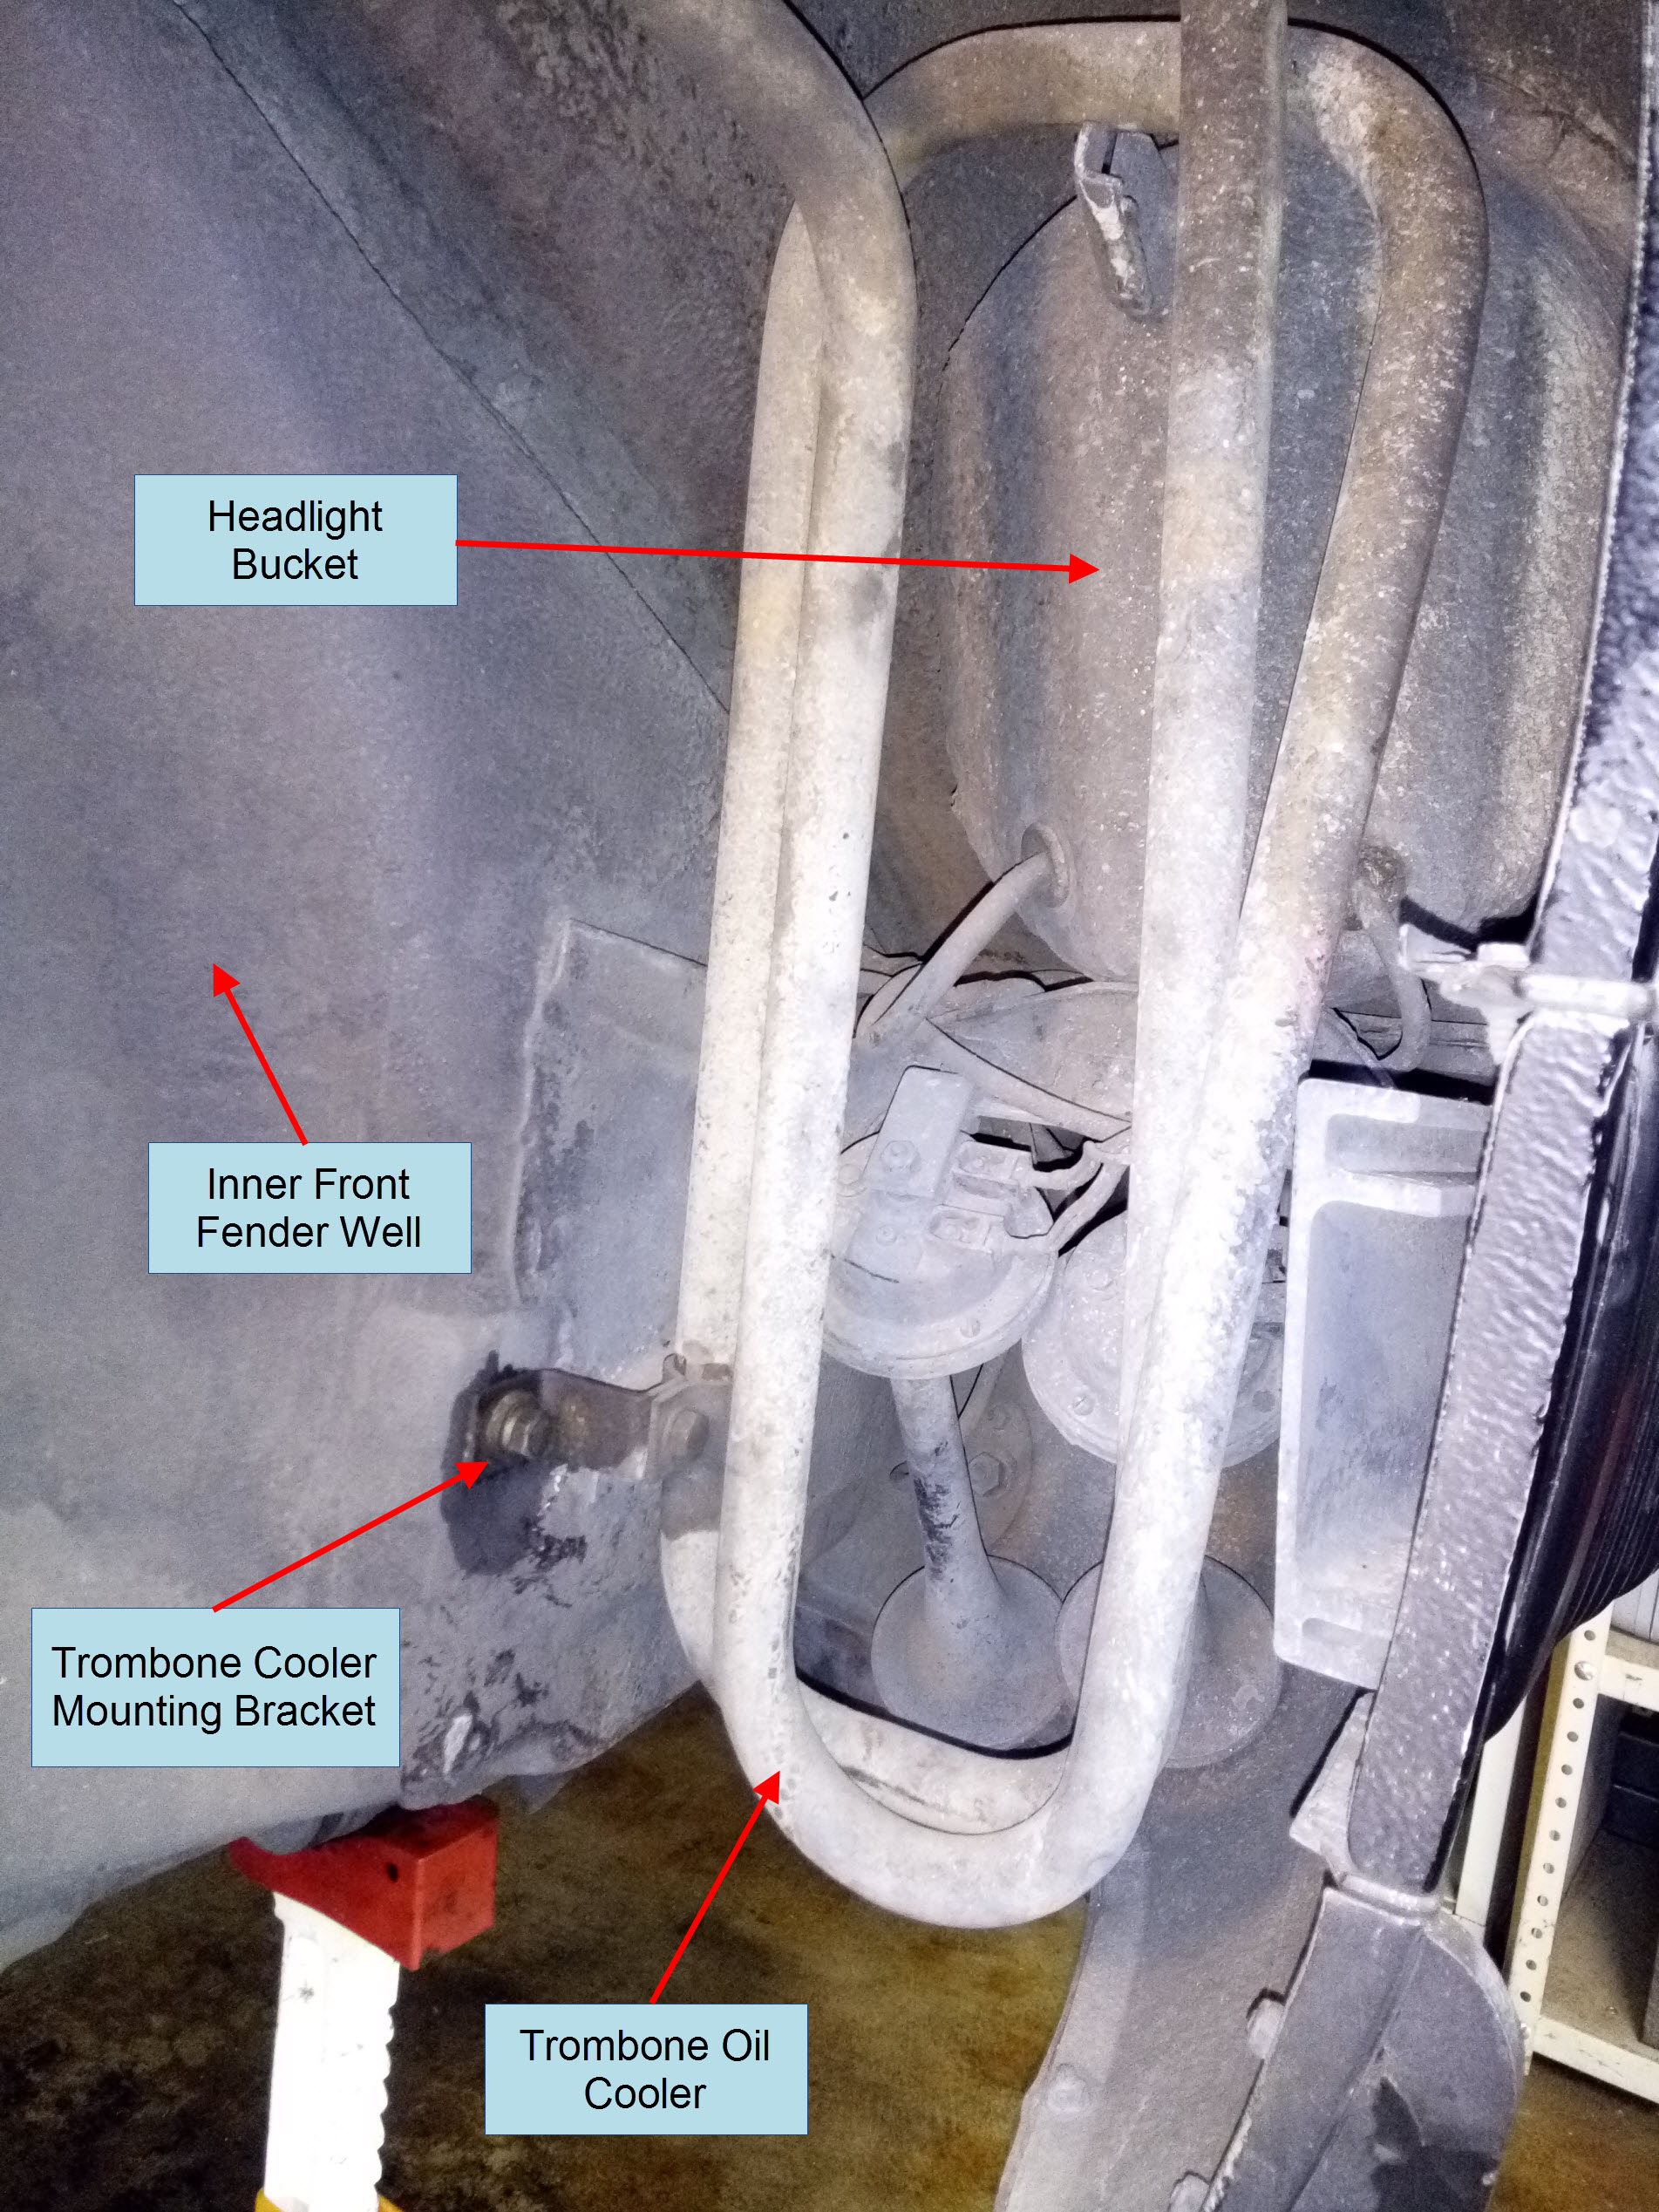
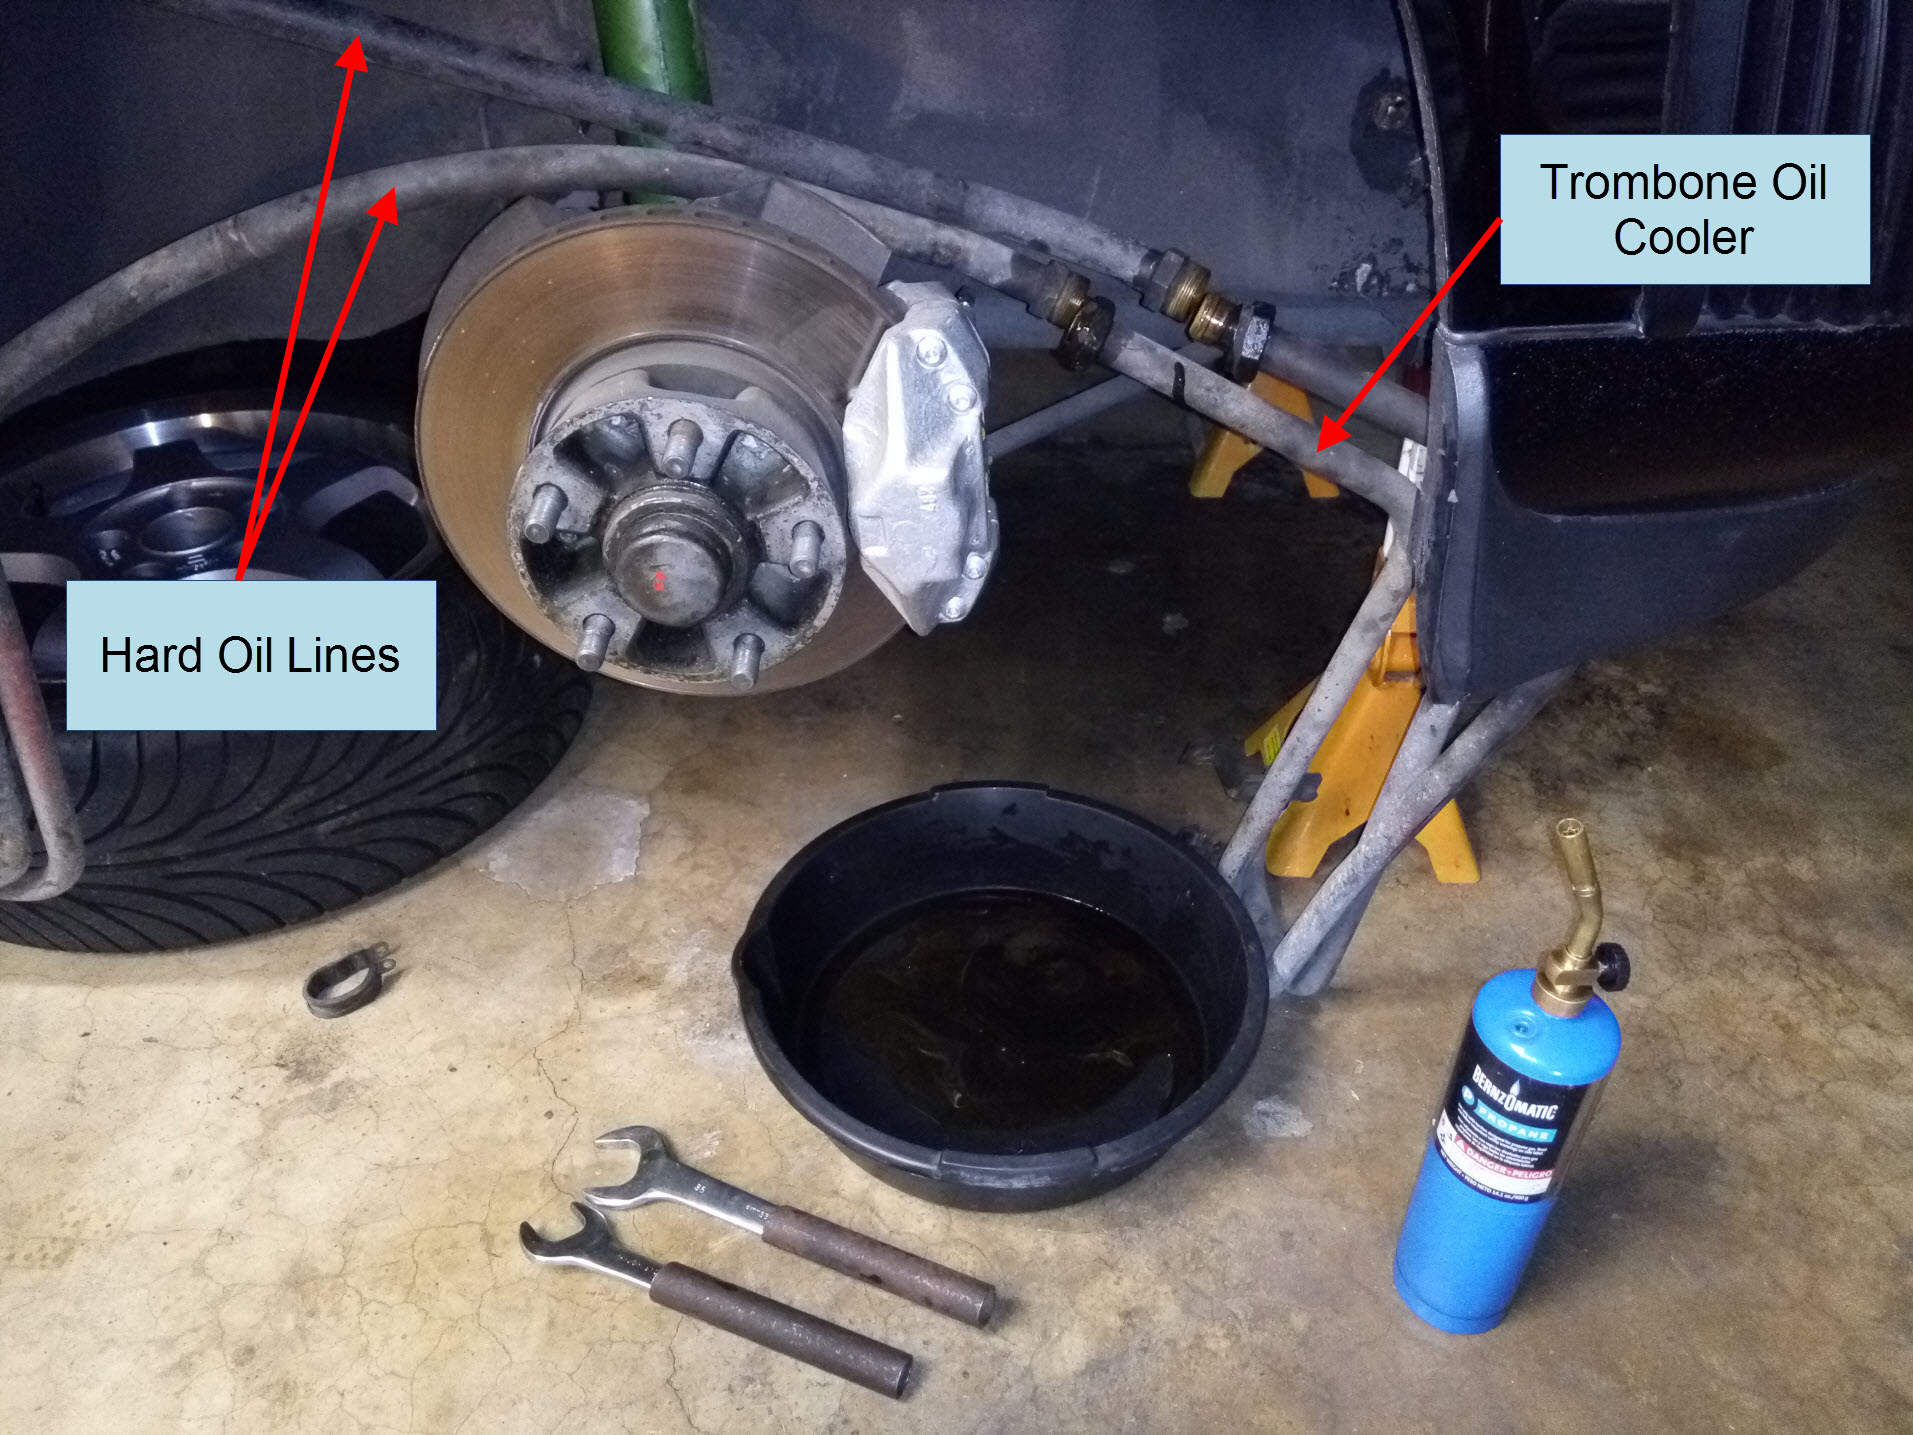
If your car is a 1974-1983 with stock oil cooling, the hard oil lines connect directly to a brass loop oil cooler, commonly known as a "trombone" oil cooler. There are no short front oil lines on this type of oil cooler setup.
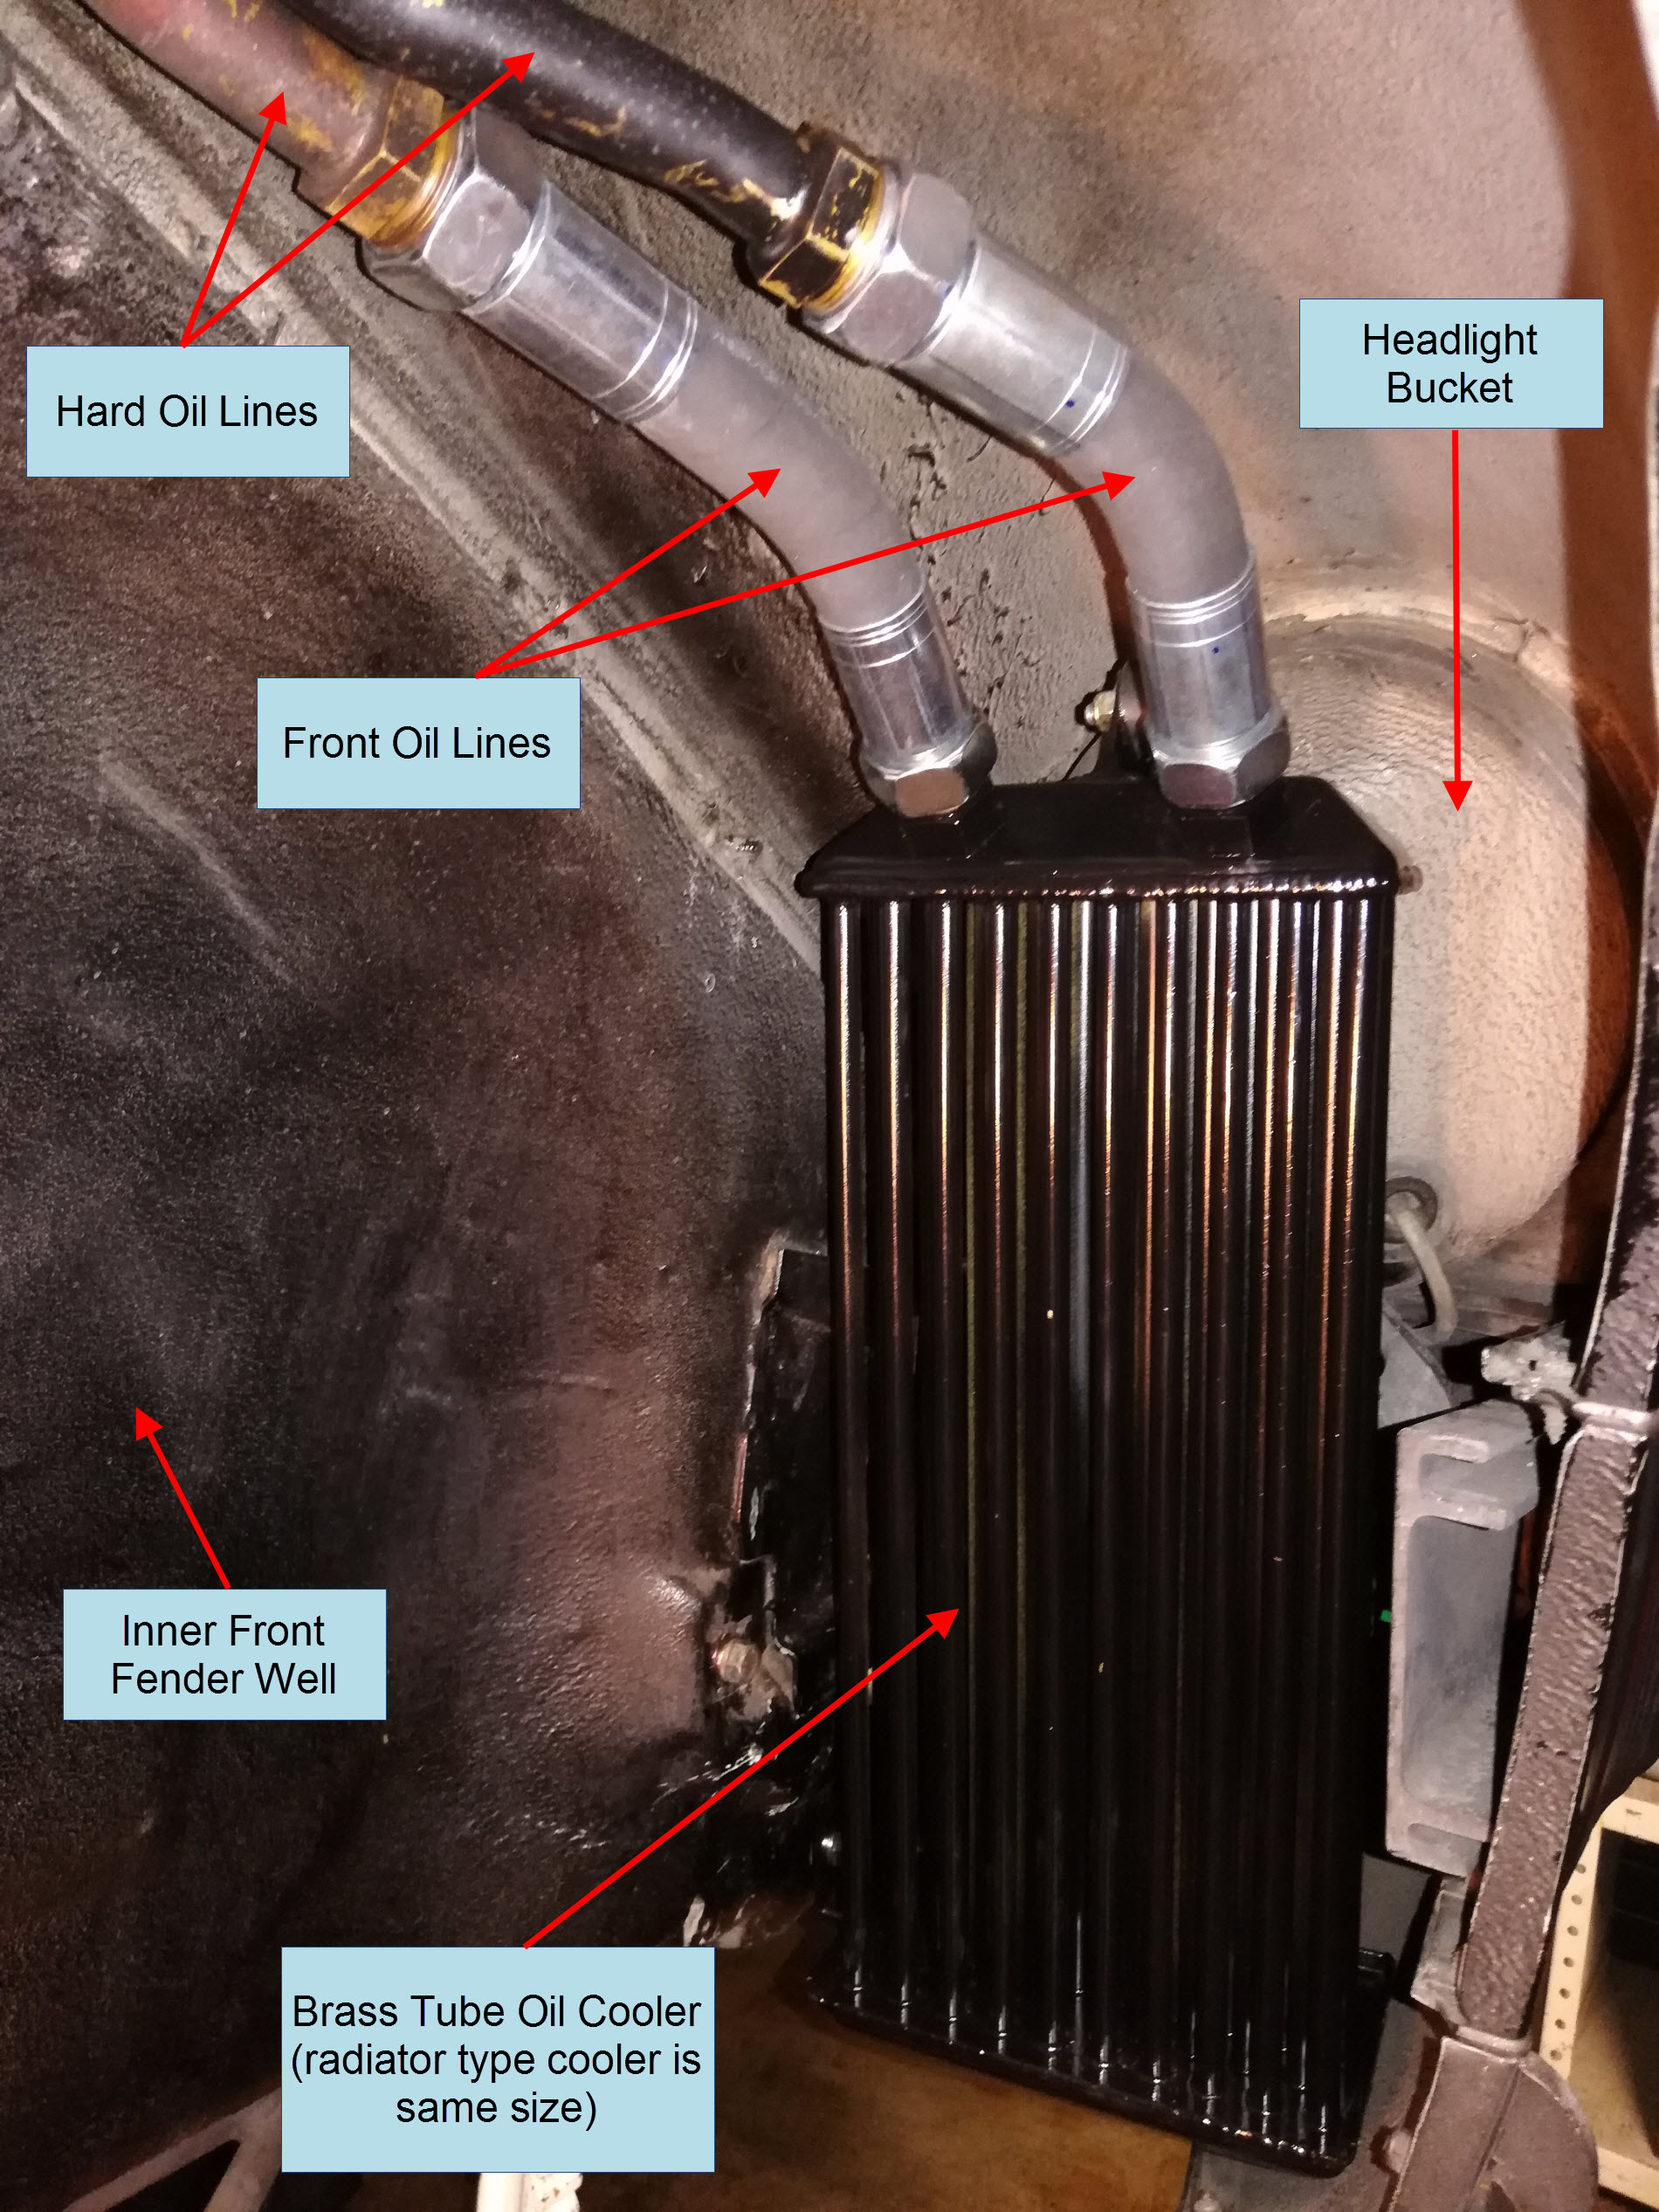
If your car is a 1984-1989 or has been upgraded to that newer style of oil cooling, you will have a larger brass tube-type oil cooler or a radiator style oil cooler with an electric fan. Both these oil coolers use short rubber lines to connect the brass hard oil lines to the oil cooler.
Step 3: Apply Penetrating Oil
A day or two before disassembling the oil lines, apply penetrating oil on the large hex nuts on each end of the rear oil lines behind the cooler, each end of the brass hard lines, and if you have them, each end of the front oil lines. It will help make loosening them much easier, especially on the thermostat end. Spray a little on once every few hours.
Step 4: Drain Engine Oil
You are required to drain the oil tank so take this opportunity to do a complete oil change and fully drain all engine oil. Follow steps one through four of this procedure to drain your oil and change your oil filter. If you have recently performed an oil change and still have fairly new oil, fully drain your oil tank and store the oil in a clean, covered container to re-use again.
Fully drain the oil while the engine is warmed up to ensure the thermostat is open and all the oil in the hard lines and oil cooler drains as much as possible. If you cannot warm up the engine to drain the oil, be prepared to drain two to three quarts of oil that will be trapped upstream of the thermostat in the brass hard lines and oil cooler.
Empty the two oil pans because you will need them again when disconnecting the oil lines. Clean the thermostat and oil lines’ exterior of any heavy grease deposits to prevent any contamination from getting inside the oil lines.
Step 5: Loosen Oil Lines
If your car has been serviced regularly or is from a location with mild winters, there is a slim chance the connectors might not be seized up, and you might be able to remove the hard oil lines and front lines while on the car. Try to loosen the hex nuts in place using a propane torch as needed. A brief method of how to use a propane torch to loosen threaded fasteners is described in step five of this procedure. If you are not so lucky and the hex nuts are stuck or if working in the wheel wells is too difficult, you can drop the entire oil line assembly in one piece and disassemble it outside of the car for better clearance.
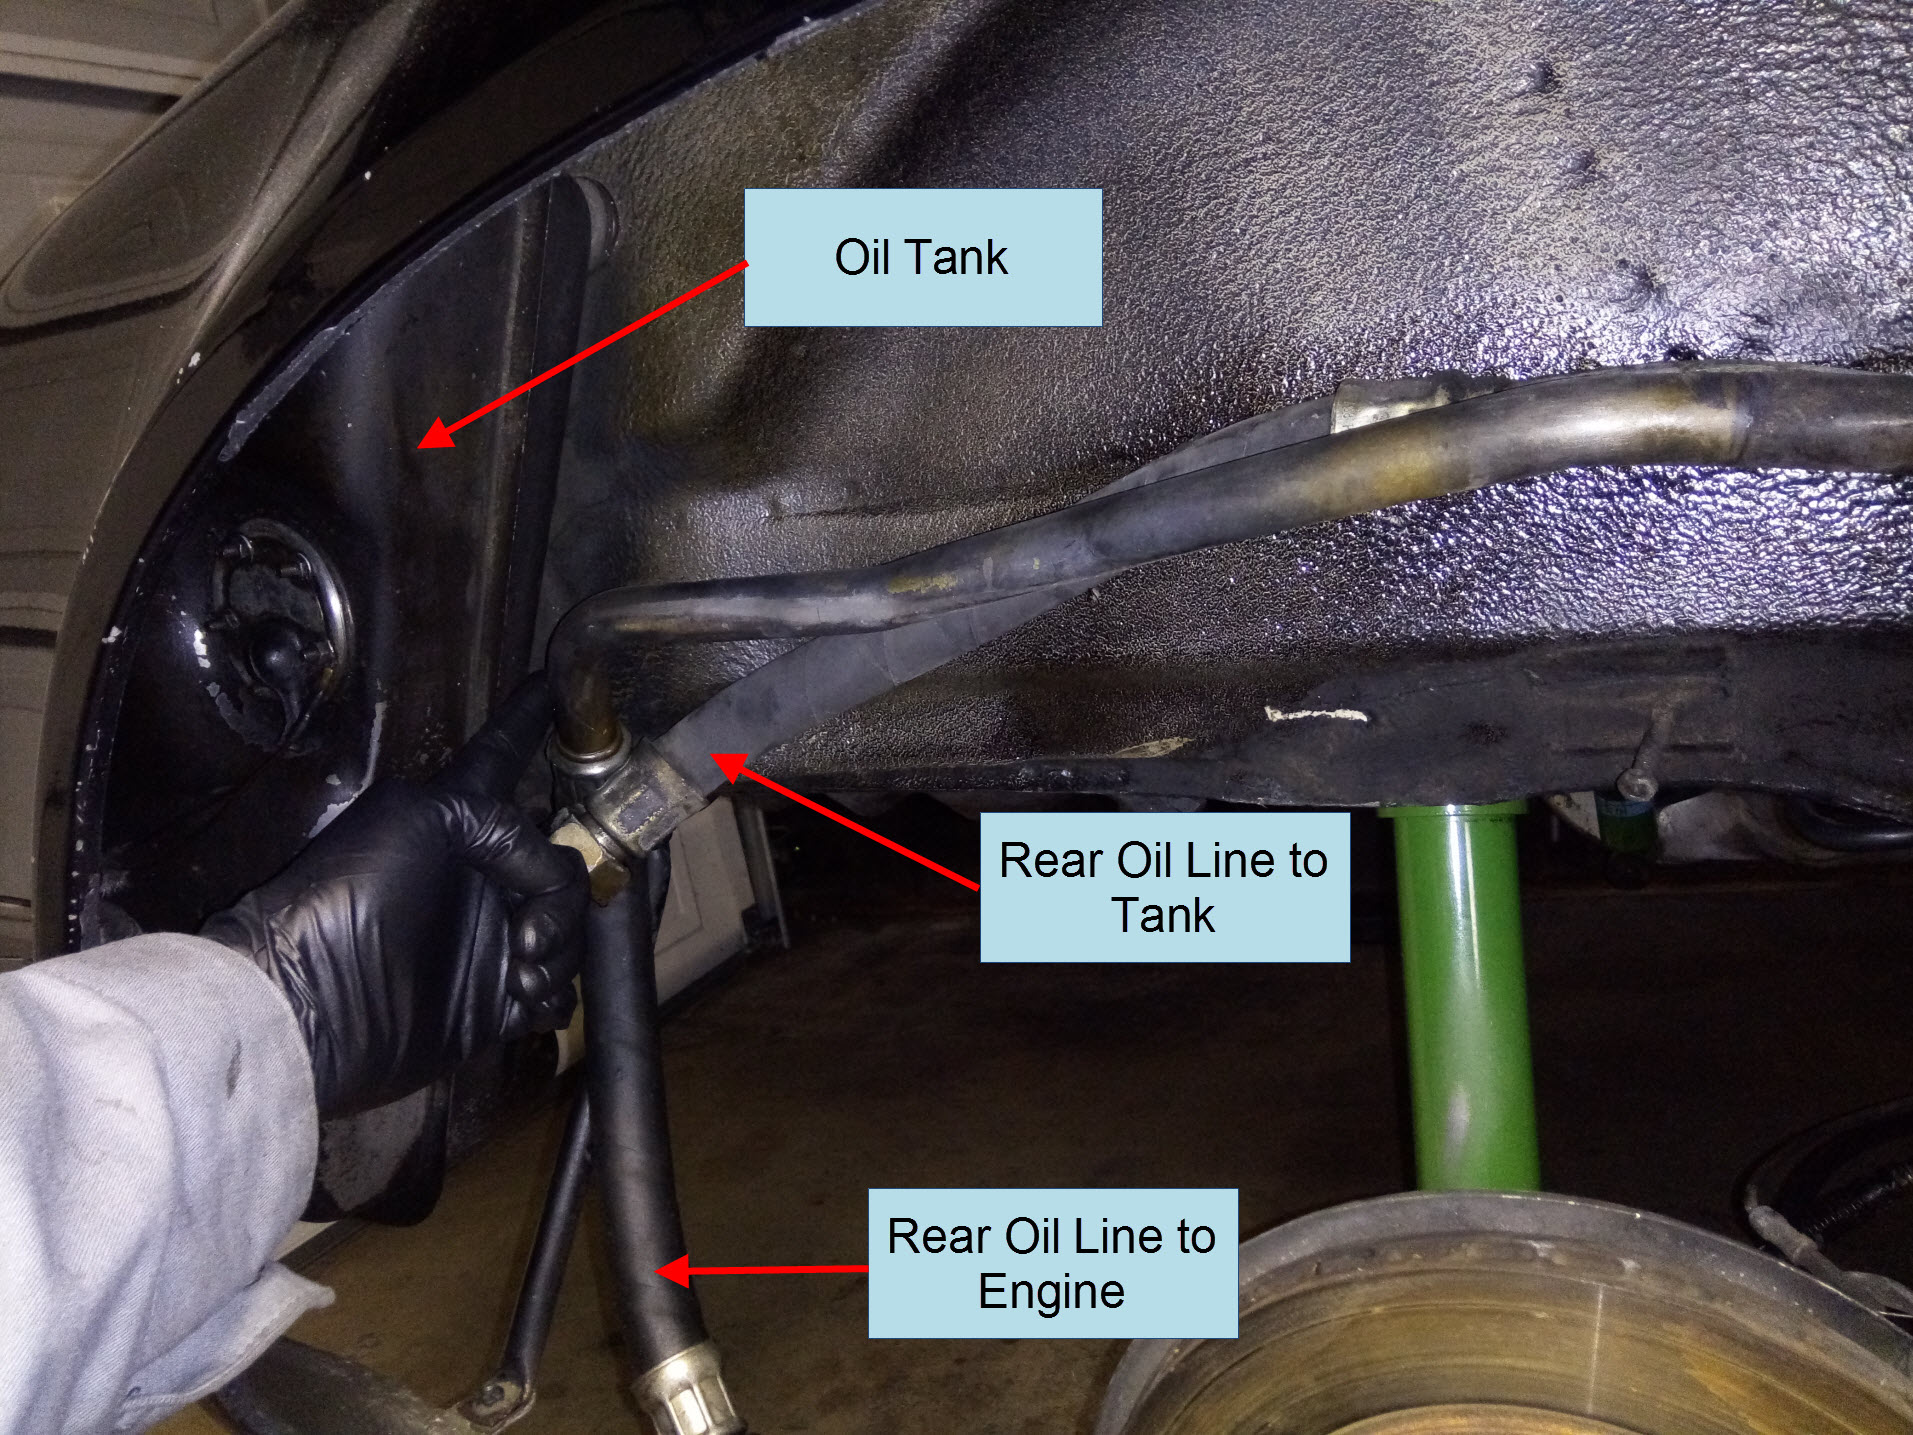
Step 6: Disconnect Rear Oil Lines at Thermostat
Disconnect the two rear oil lines where they both connect to the thermostat. If the hex nuts won't budge or they are too difficult to get to under the wheel well, disconnect the rear oil lines from the oil tank and engine using step six of this procedure.
Step 7: Disconnect Oil Lines at Front Oil Cooler
Disconnect the oil lines that are connected to the front oil cooler. On 1984 and later cars you will disconnect the short front lines from the cooler itself. These coolers are heavy and can have fan wiring attached so they should remain on the car while disconnecting the front oil lines. On 1983 and earlier cars, the trombone oil cooler connects directly to the hard oil lines. If you can't disconnect the hard lines easily, you can drop the entire lightweight trombone cooler along with the hard lines by removing one bolt holding the cooler to the inside of the front right wheel well.
Note: There may be a significant amount of oil still in the oil lines, especially in the trombone cooler. After removal, rotate the lines and cooler as needed to drain as much oil as possible. You should still be prepared for surprise splashes of oil afterward.
Step 8: Remove Hard Line Clamps and Extract Oil Lines
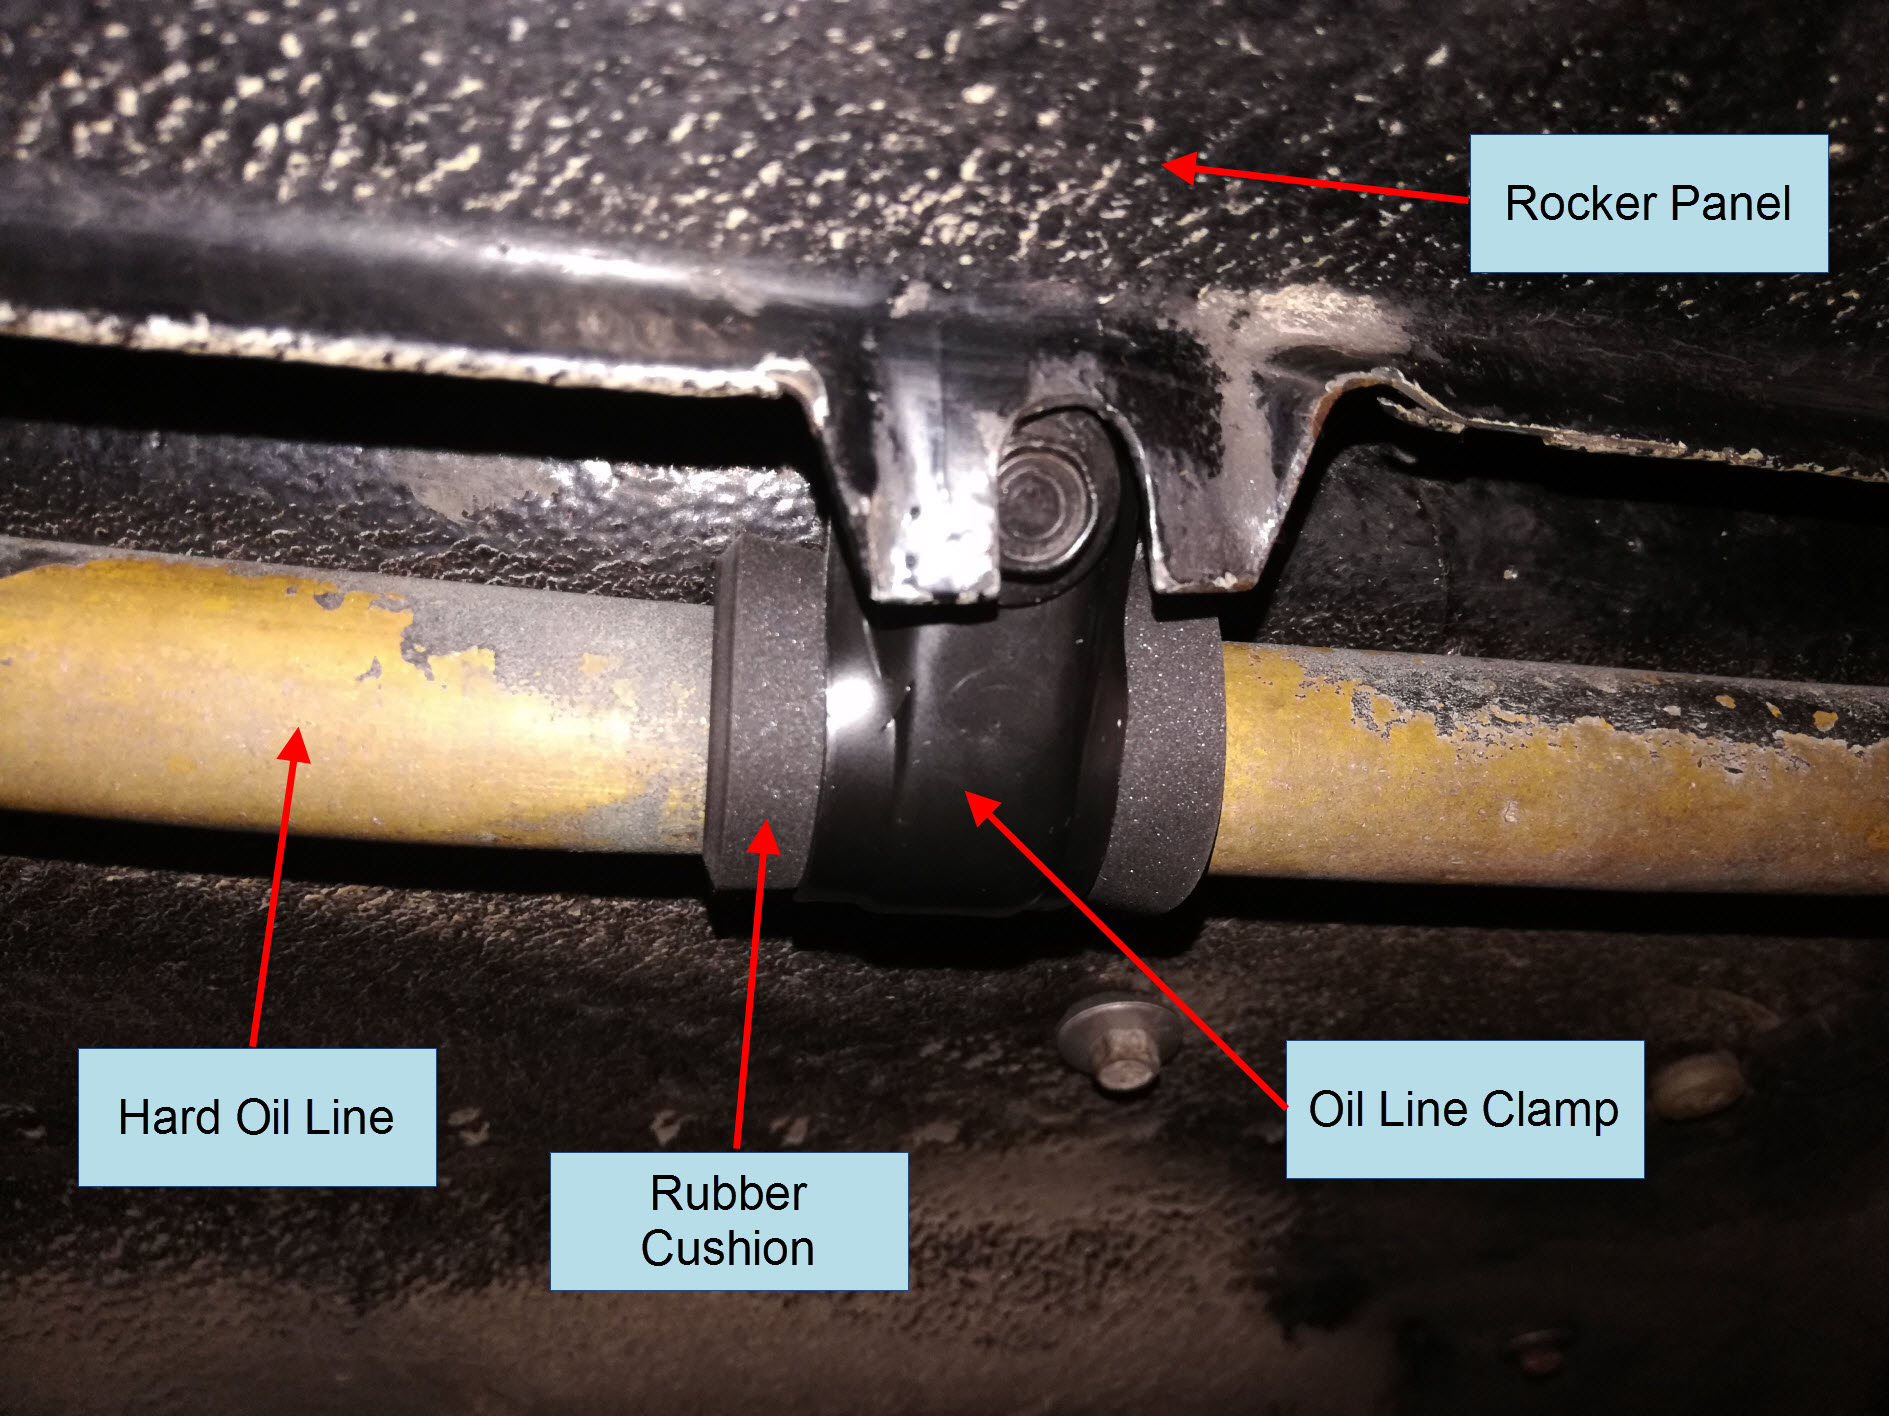
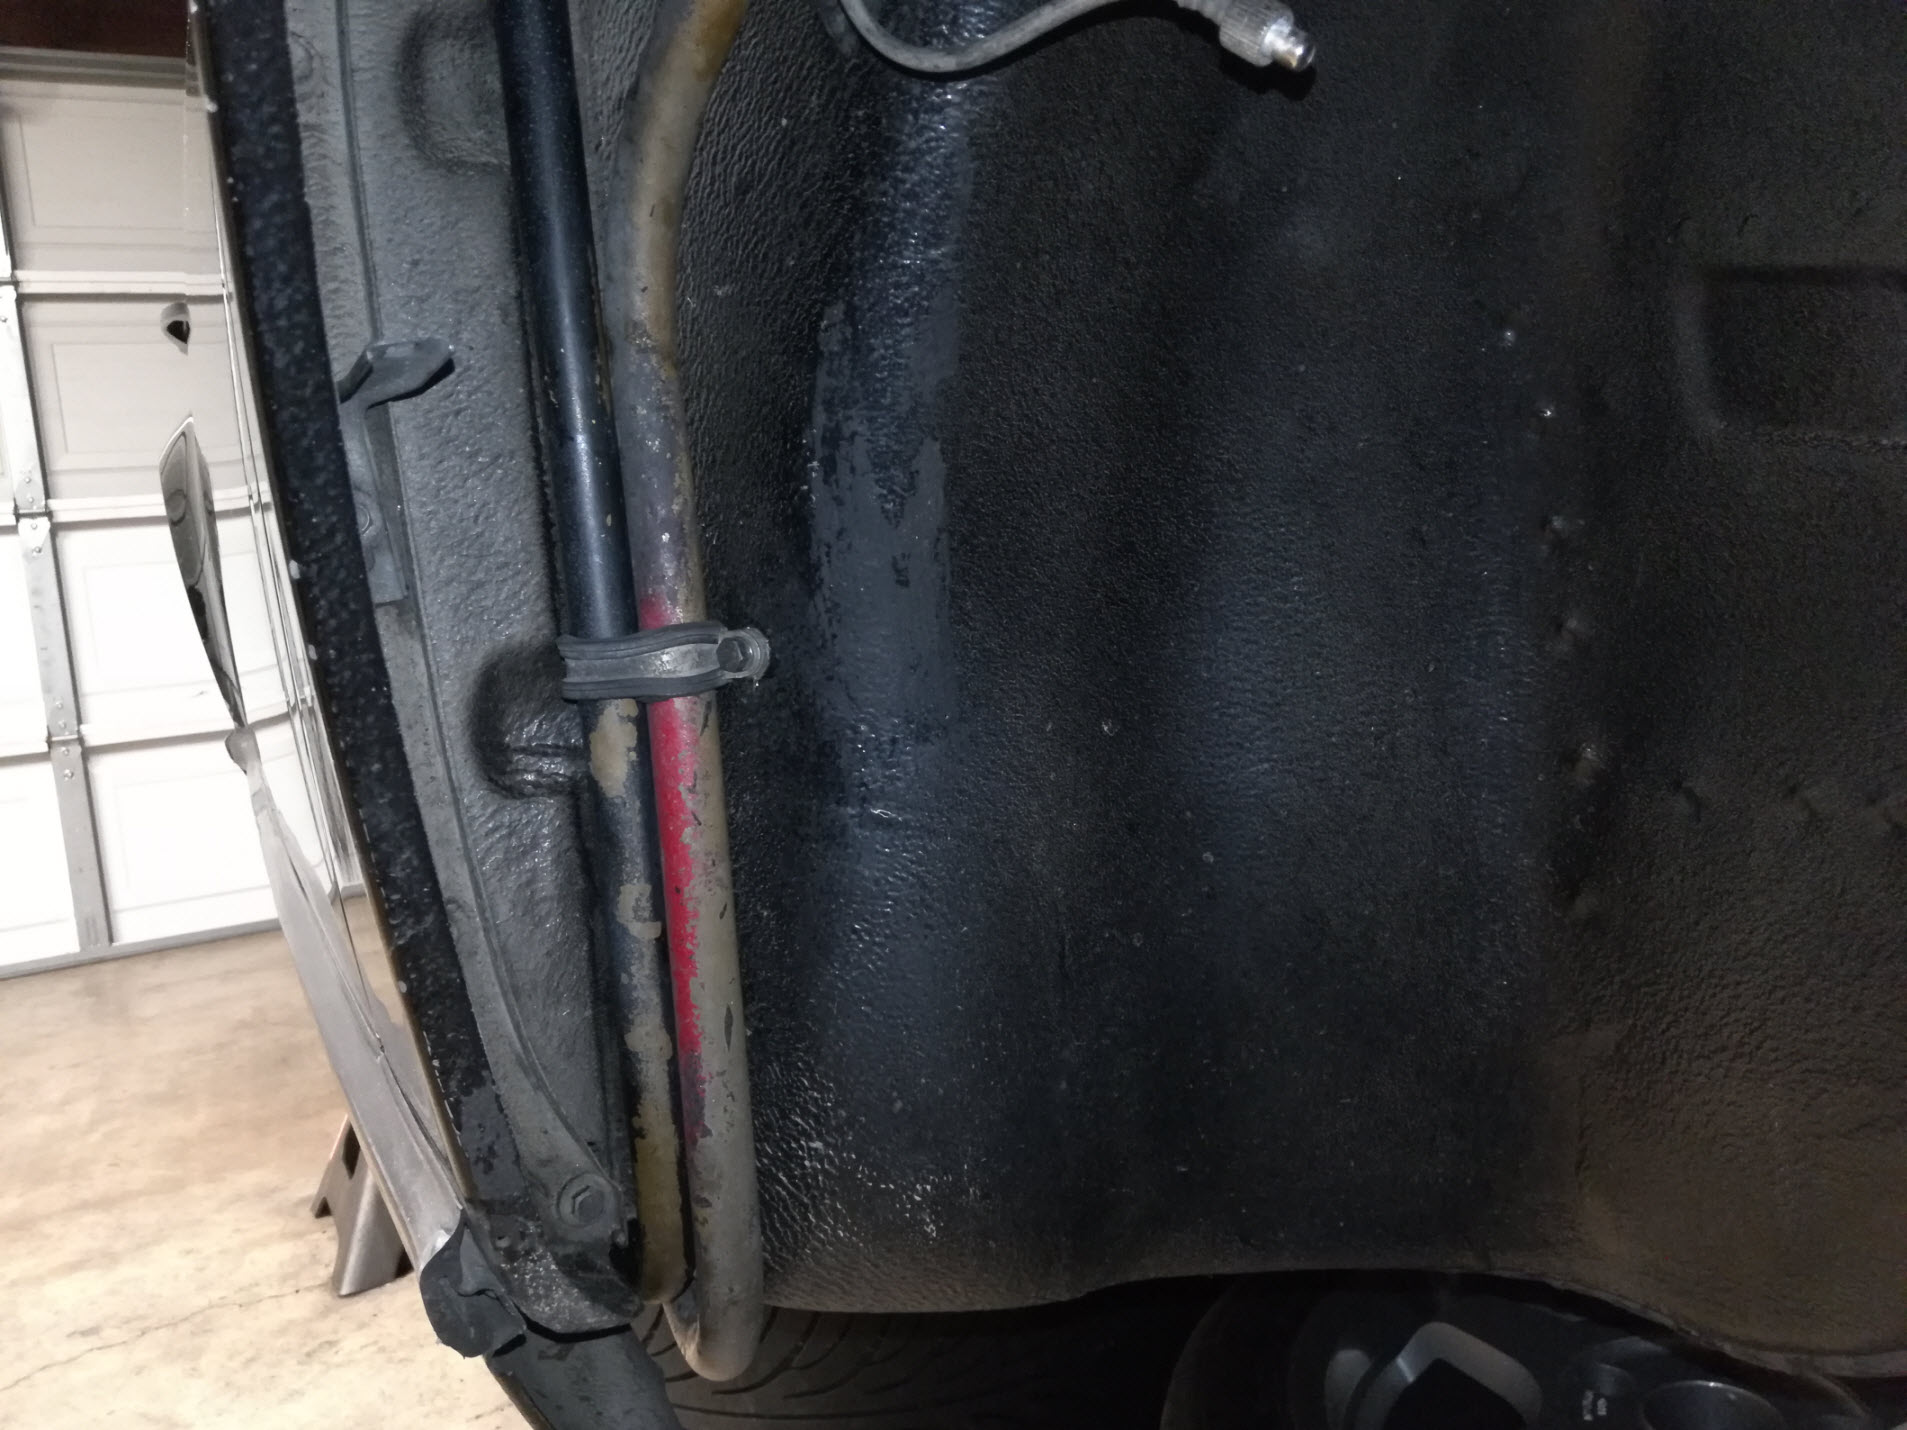
There will be three clamps holding the hard oil lines against the floor pan of the car, located just under the rocker panel. Remove each bolt holding the clamp and rubber cushions on and save all the hardware for re-use later.
Remove the two smaller rubber-lined clamps in the front right wheel well holding the hard lines. It is common for one or more of the hard oil line clamps to be missing altogether.
Once all the clamps are removed, the hard oil lines will partially drop out towards the floor. If your car has a power antenna, it will be located under the front right wheel well and may interfere with the removal of the oil line. Disconnect the wires on the unit and spin off the antenna bezel on top of the fender and withdraw the power antenna for better clearance.
Remove the trombone cooler (if your car has one), empty the oil in it, and set it aside.
With the front and rear oil lines disconnected, the entire oil line assembly can be carefully maneuvered out from the bottom of the car. The front corner of the hard lines will need to drop to the floor and flex slightly to allow the whole assembly to slide backward to free the bulky thermostat from in-between the rear wheel well and rear suspension.
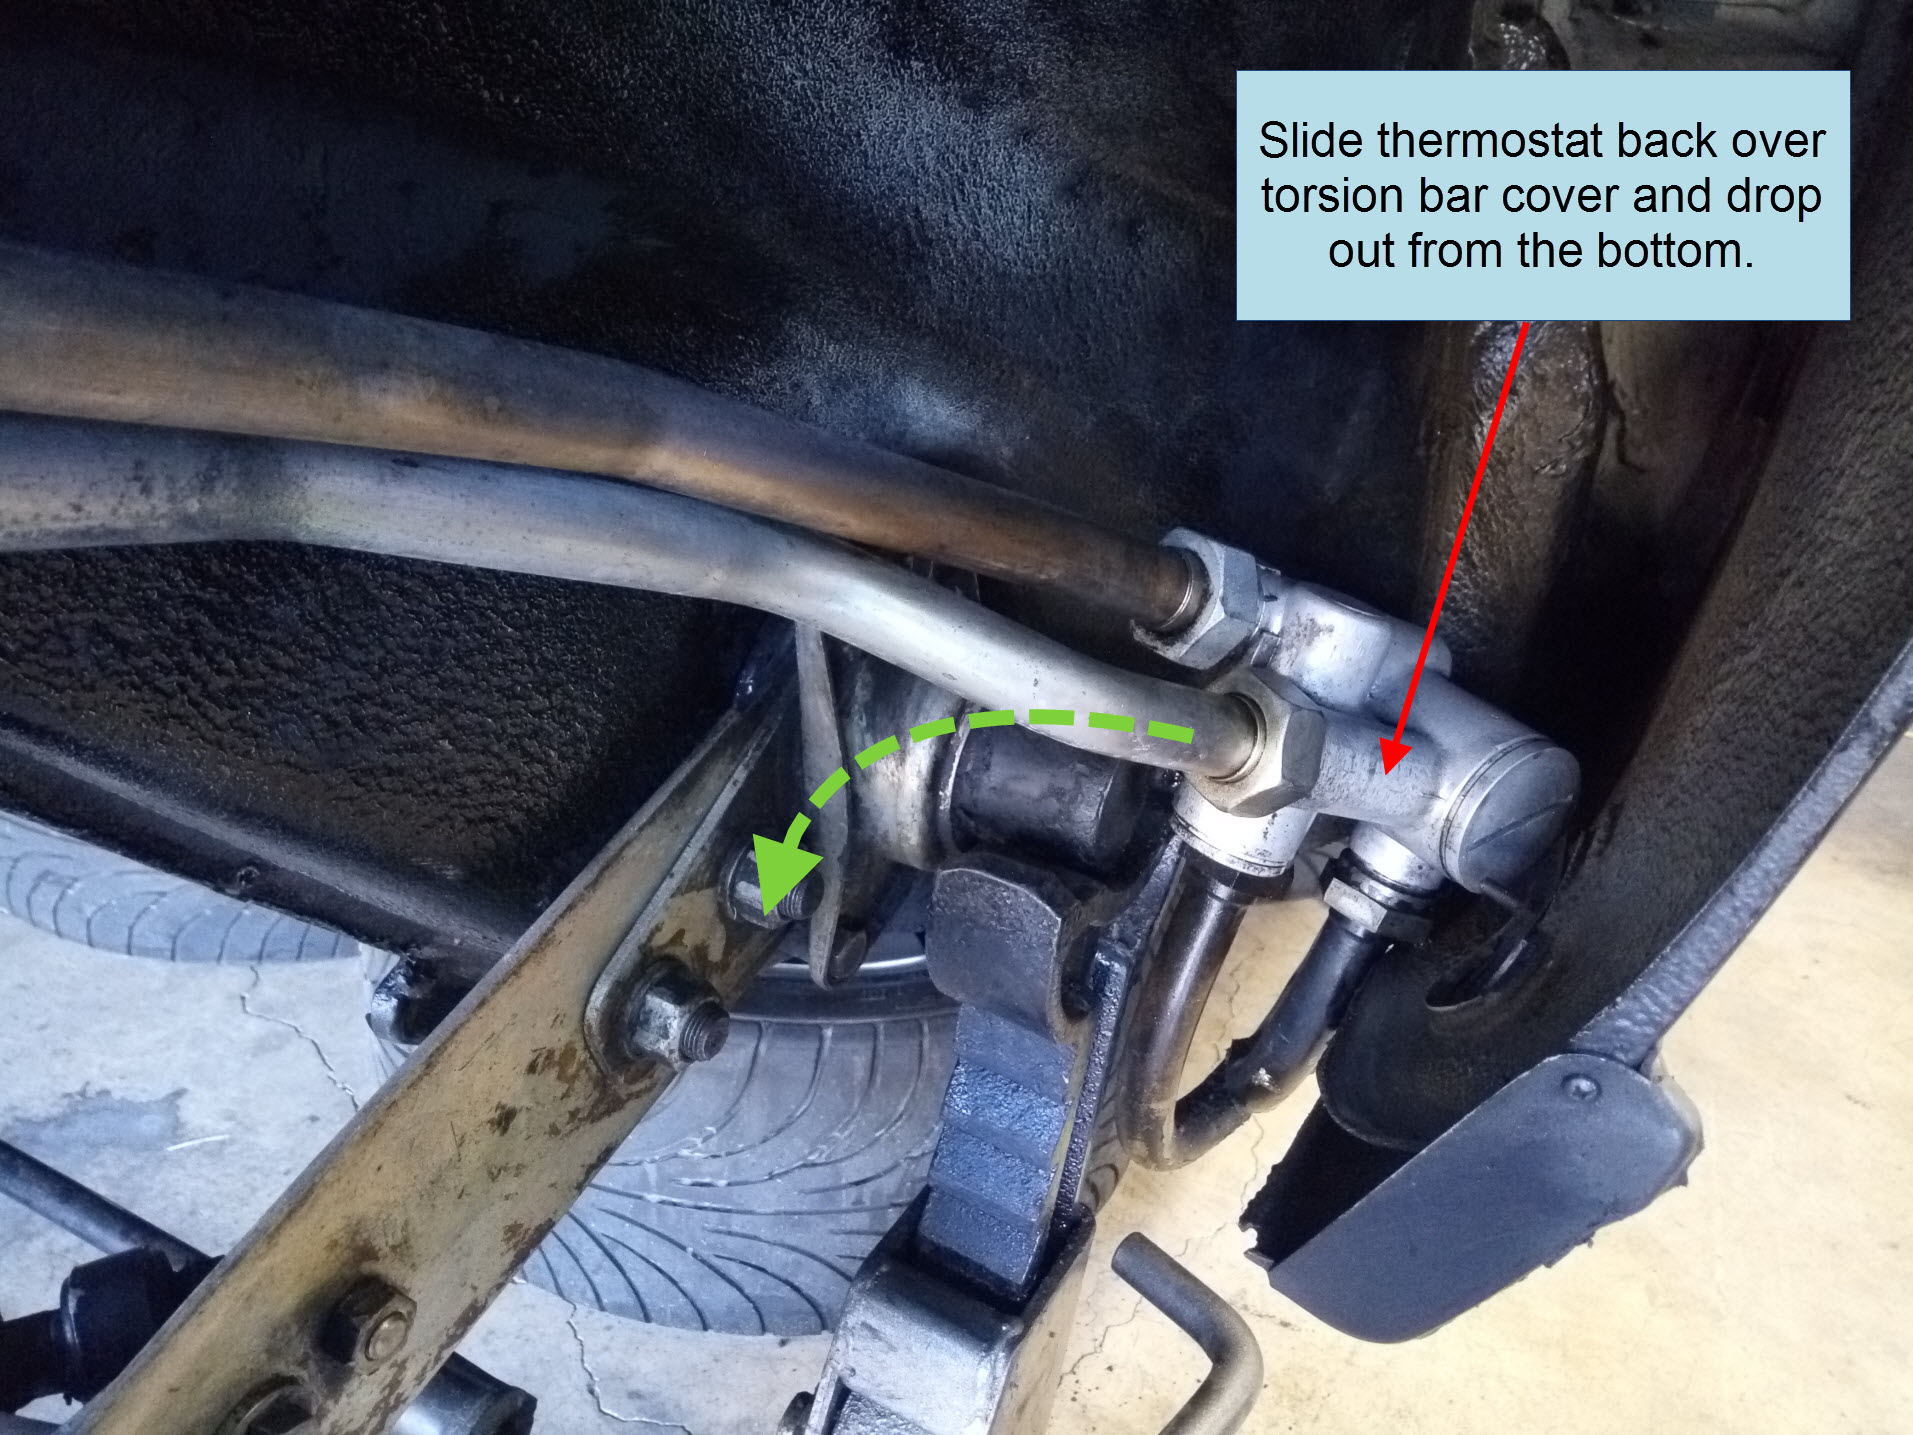
Step 9: Disconnect Oil Lines from Thermostat
Take the entire hard oil line assembly and thermostat and lay it flat on the ground. Take notice of the orientation and location of each line. Label each line with a marker and take photos to make it easy to remember. You can also mark the axial positions of the oil lines and the thermostat with a marker to later reassemble them in the same position out of the car. Or, you can loosely assemble the entire assembly, and final-tighten once everything is back on the car.
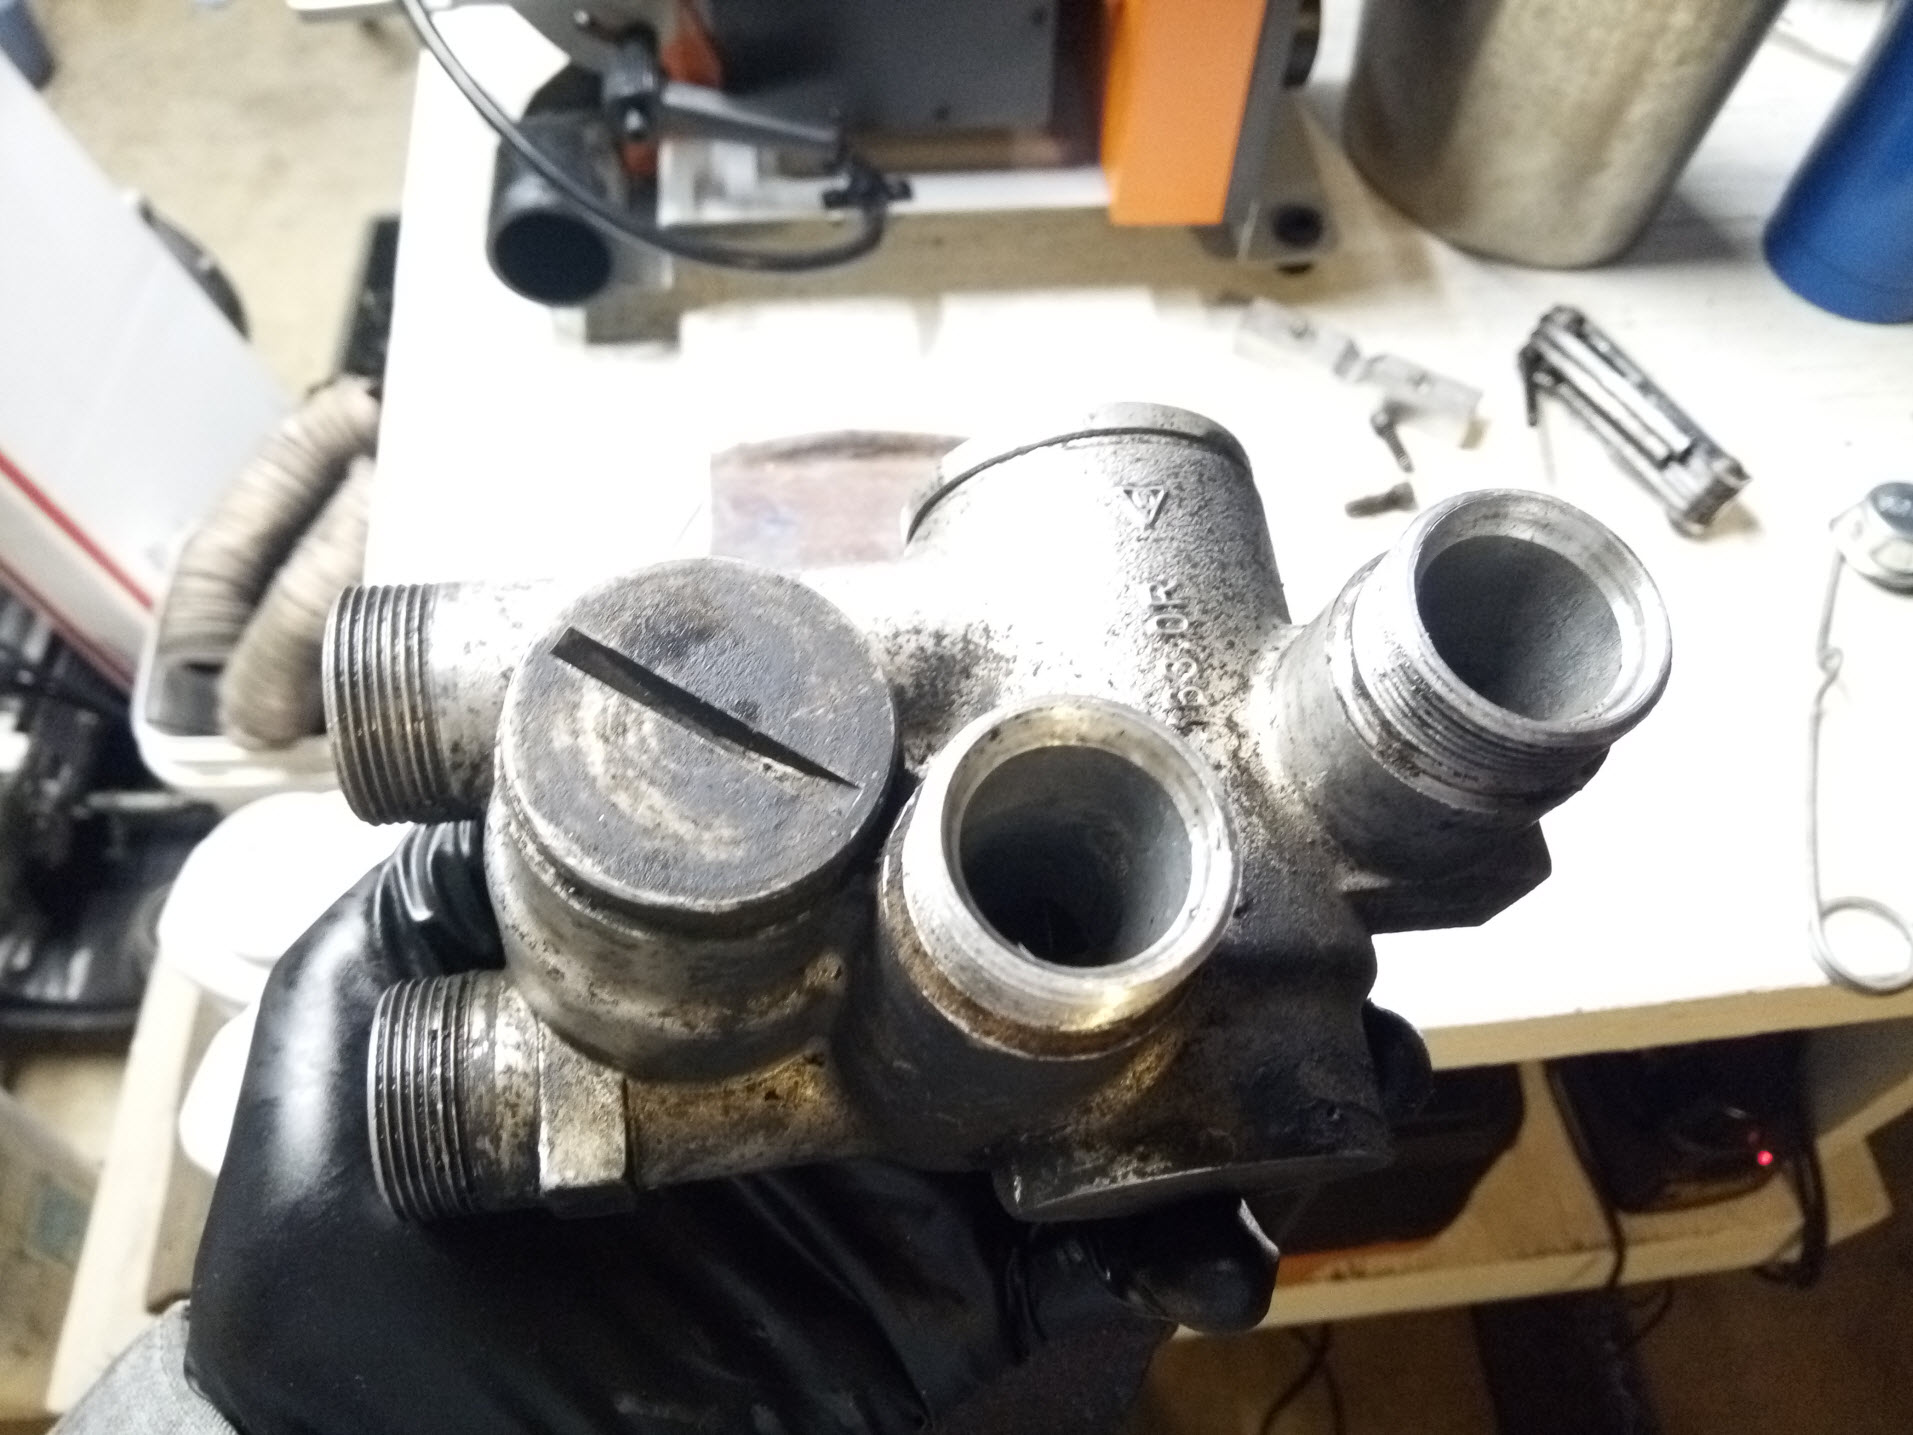
Walk it over to a bench vise and carefully clamp the thermostat in with the oil lines coming out of the sides horizontally. If the ends of the hard lines are hanging off the end of a table, support them with a sawhorse or a stool, that way they don’t flex. Now you have free access to loosen the hex nuts and remove the rear oil lines and hard oil lines from the thermostat. If the hex nuts are still stuck, use penetrating oil and a propane torch as described in step five above. Be especially careful with the threads on the aluminum thermostat housing as they're easily damaged.
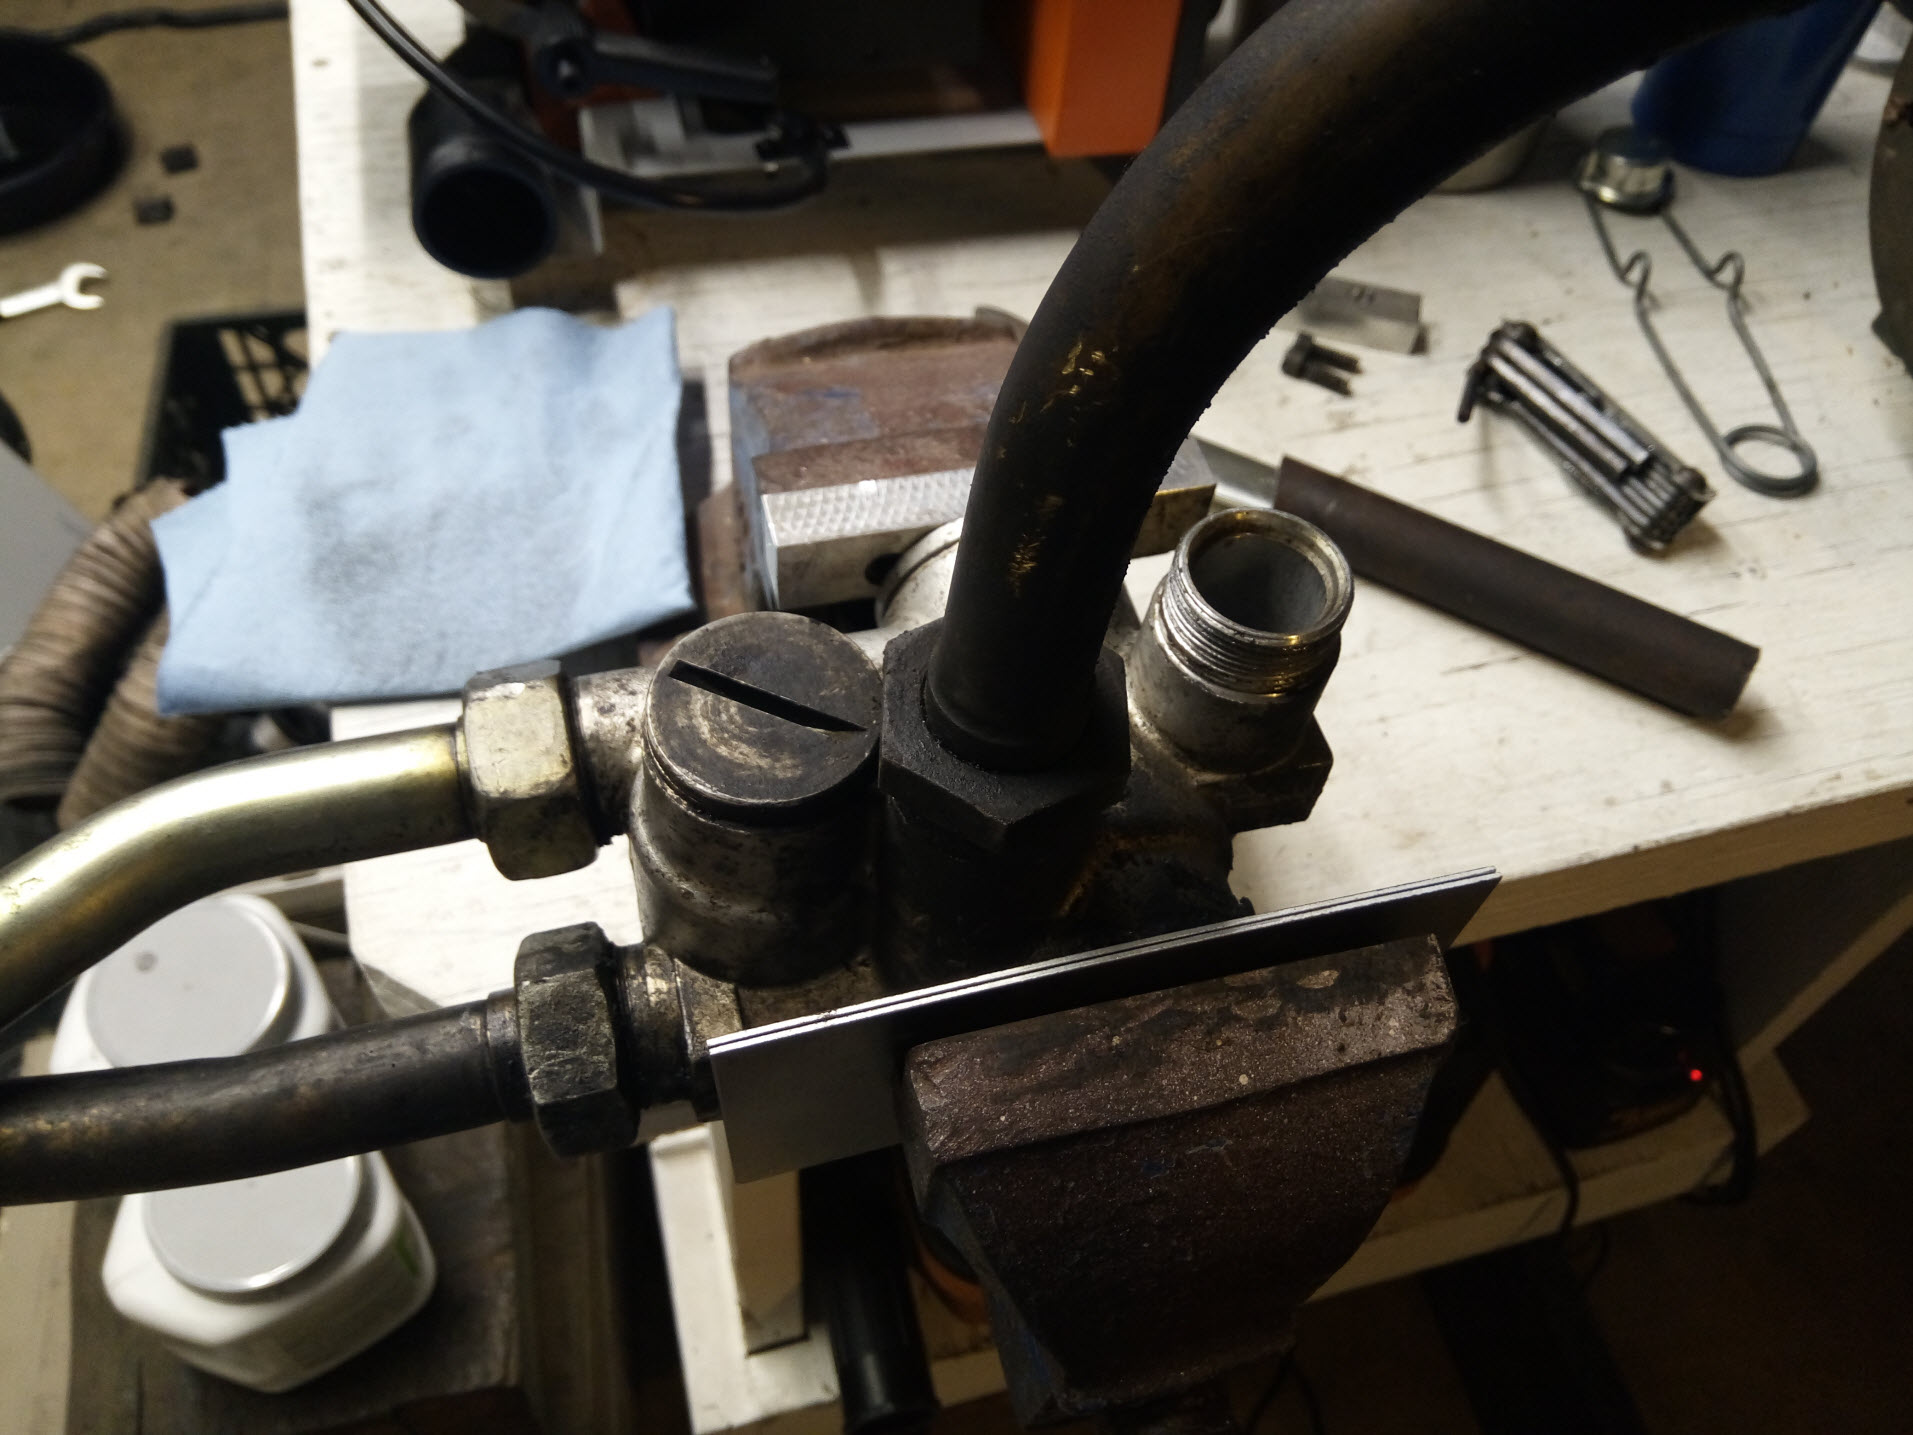
If any of the thermostat threads appear damaged after removing the oil lines, it will likely leak oil so replace the unit with a new one. If the threads are still intact, wire brush the threads clean and wipe any grime from the outside of the housing and the openings.
If any of the hard lines are pinched or crushed nearly flat, replace them with new ones. If you have front rubber oil lines and they look like they have been weeping oil around the crimped connections, replace those with new ones as well.
Step 10: Reassemble New Oil Lines and Thermostat
First, apply a little anti-seize paste on all oil line and thermostat threads.
If you marked the positions of the oil lines and thermostat you can reassemble and tighten the rear oil lines, thermostat, and hard oil lines outside of the car. Then, maneuver them back under the rocker panel in the reverse process as step eight, above.
Another method is to assemble the rear oil lines, thermostat, and hard oil lines hand-tight outside of the car and maneuver the assembly back in the car. If you do it this way, you may need a helper as the lines could rotate and flop around. Loosely connect the rear oil lines to the engine and oil tank, rear oil line clamp and the three hard-line clamps under the rocker panel. Make sure to reinstall the rubber cushions around the hard lines to protect them from each clamp and the bottom of the car. There shouldn't be any metal to metal contact with the soft brass oil lines as it could wear a hole in the lines through vibration.
Reinstall the two hard-line clamps in the front right rear wheel well just finger tight for now.
Once the rear oil lines, thermostat, hard oil lines, and if applicable, new front oil lines are loosely mounted to the car, slide the hard oil lines as needed to get the entire assembly to connect to the oil tank and engine at the rear, and the front oil cooler up front. The front oil lines are especially tricky to install because new lines are straight and in the installed position they are bent. If you have a trombone cooler it should be fairly easy to reconnect it to the hard oil lines; hang the cooler on its hook behind the headlight bucket, and bolt it back to the fender-well.
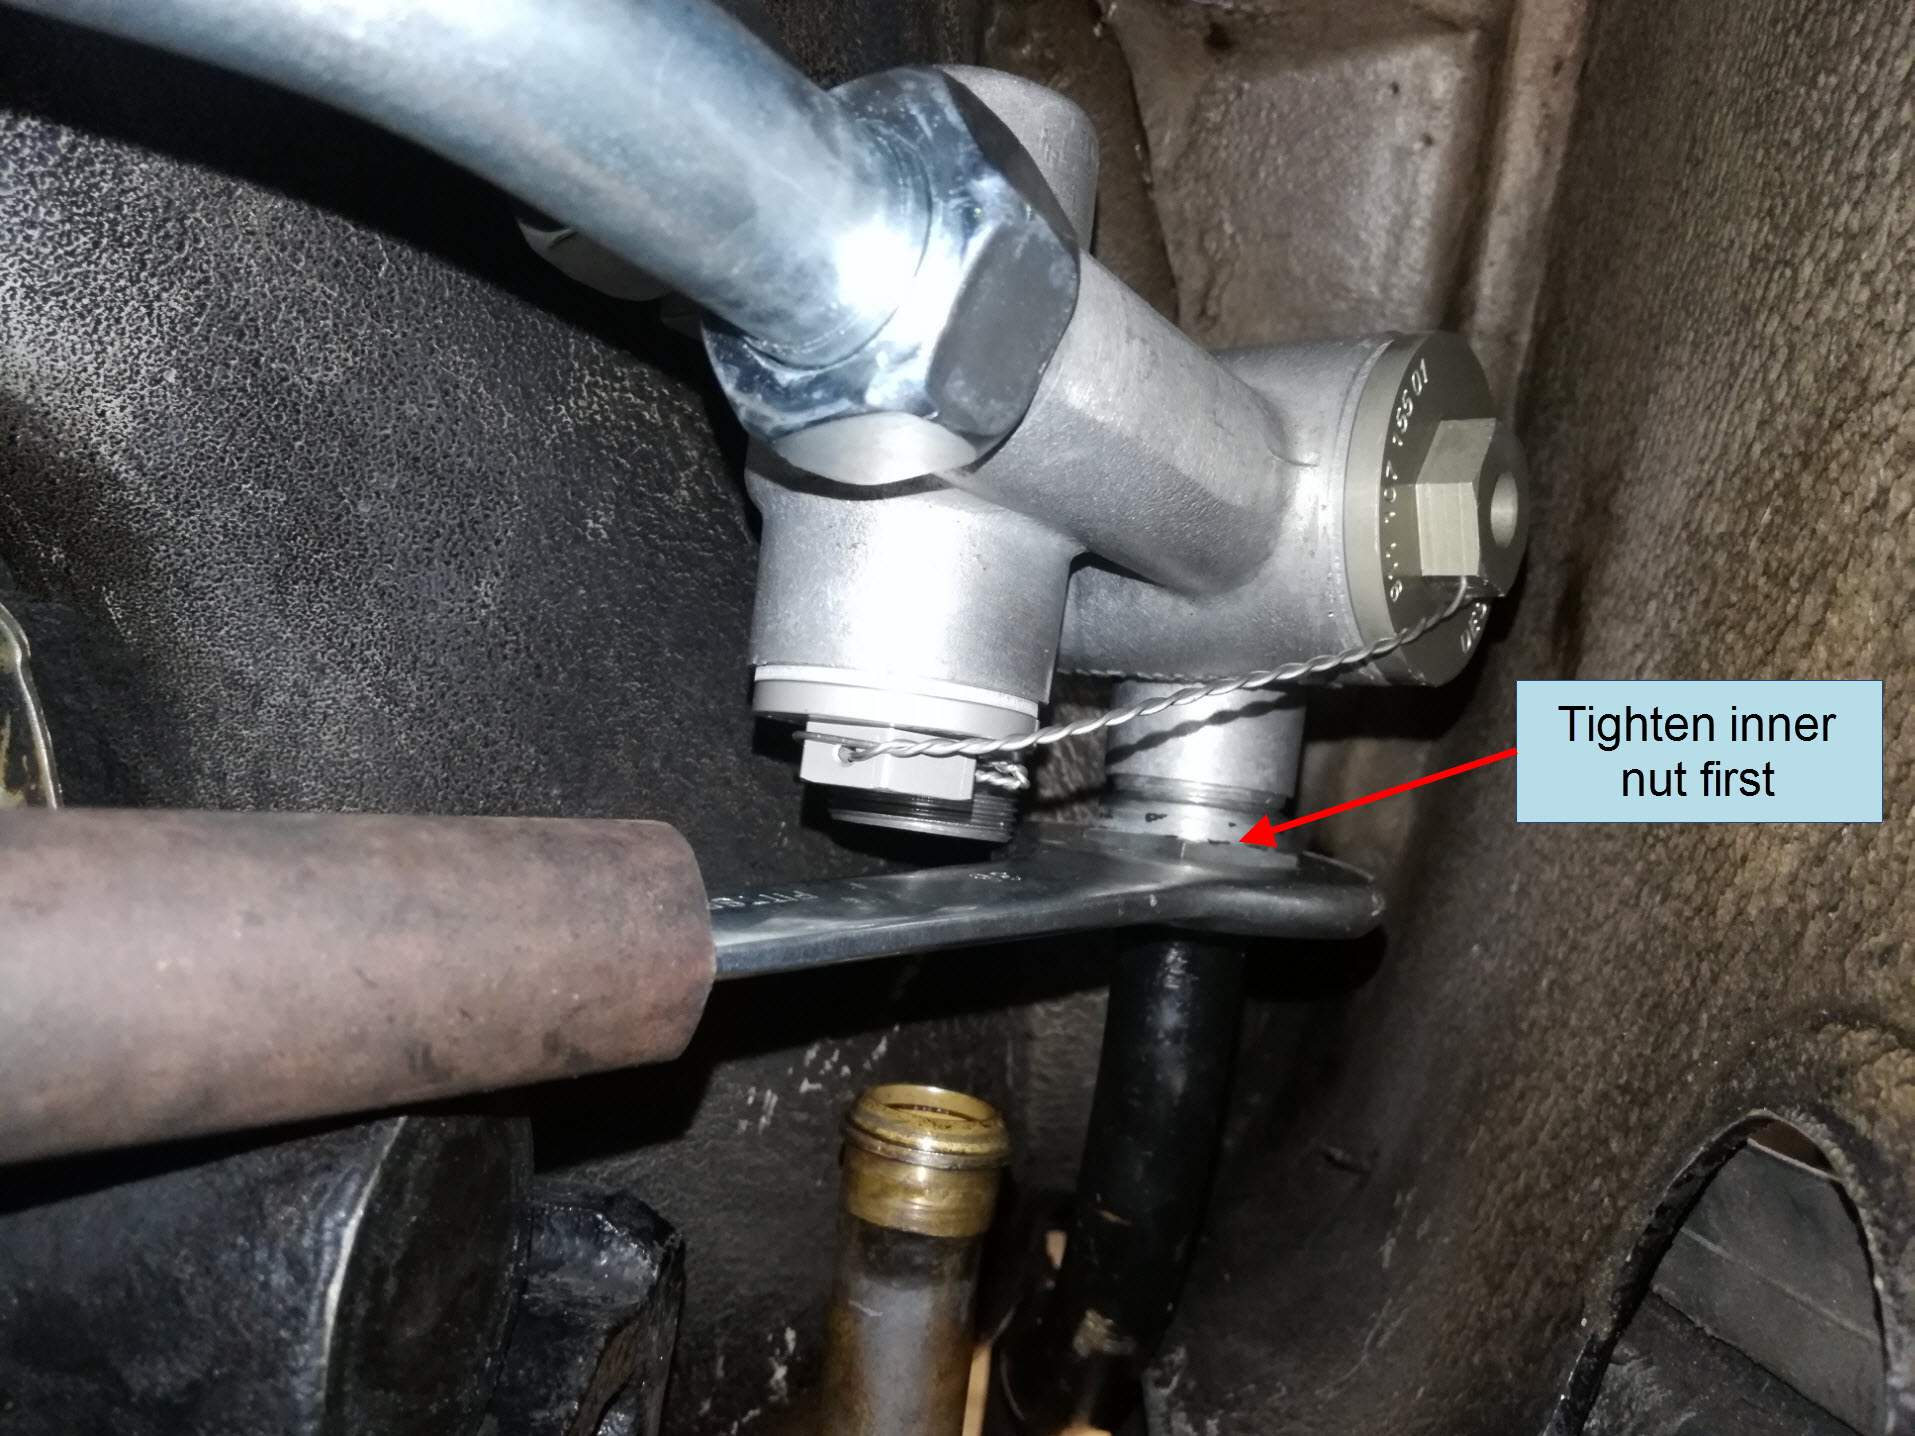
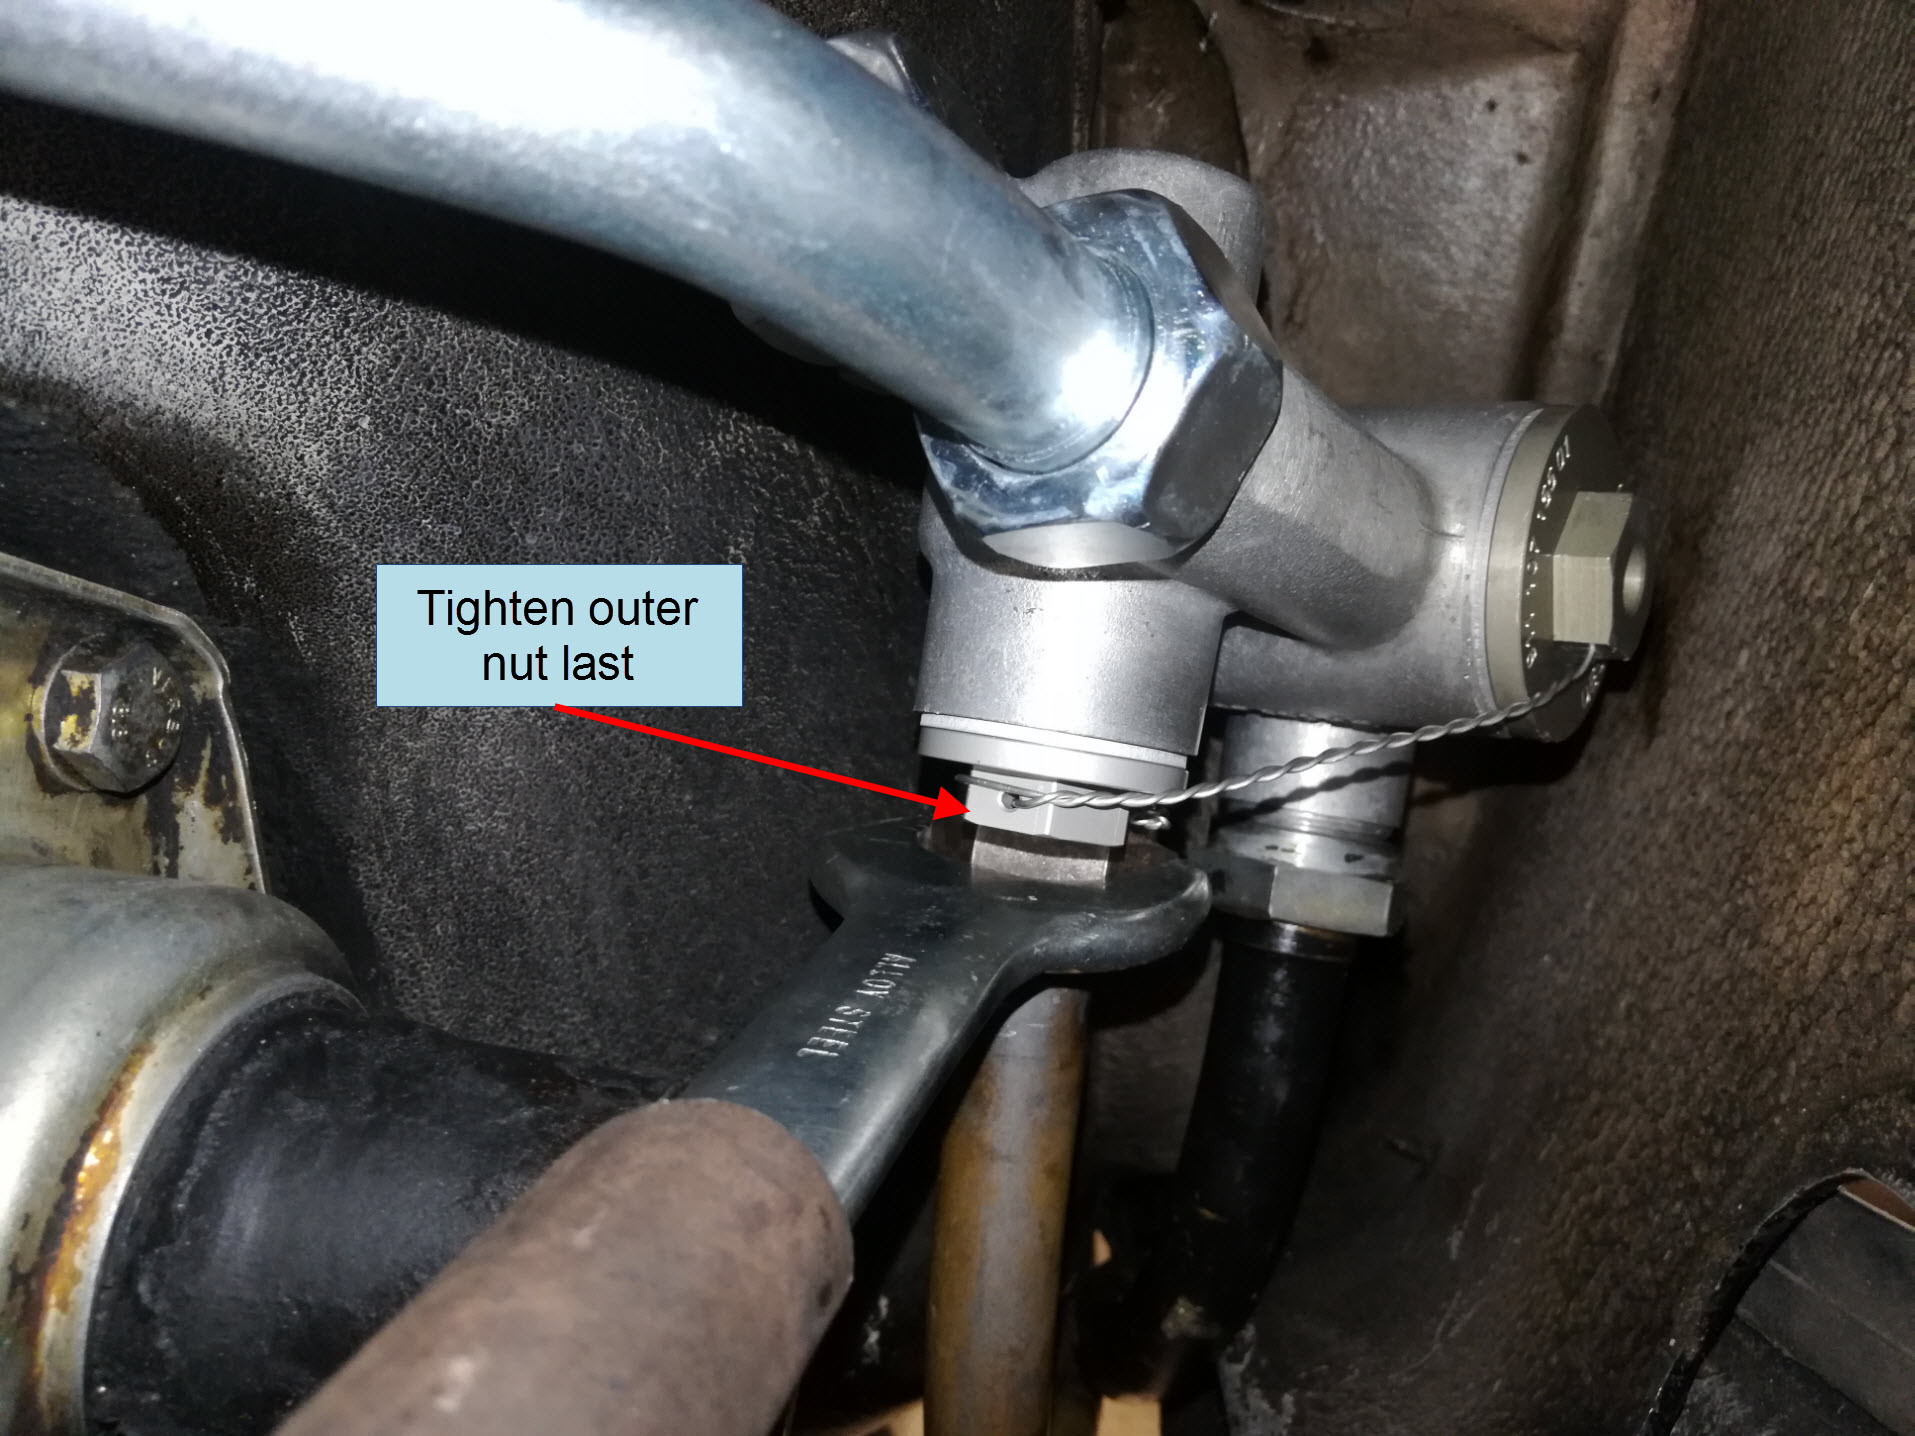
Proceed to final-tighten each threaded connection as much as you can by hand with the wrenches. On the thermostat and front oil cooler connections, you will need to disconnect the outer oil lines to get wrench access to the inner hex nuts. Then, you can tighten them, and reinstall/tighten the outer hex nuts.
Finally, snug down the bolts at each oil line clamp location. These are small so don't over-tighten them or the threads on the body may strip.
In its final position, the oil line and thermostat assembly should provide maximum tire clearance. The rear lines should be tight up against the rear right fender well, the thermostat tucked into the front of the rear right fender well, the hard lines tight against the floor of the car under the rocker panel, and also against the front right fender well. The thermostat is not bolted to anything, rather it's supported by the rigid sections of the rear oil lines and the hard oil lines.
Reinstall the power antenna unit if you removed it in step eight from above.
Step 11: Refill with Oil and Check Oil Level
Follow steps five and six of this procedure to refill your engine oil and check the oil level. Since the right wheels are currently off, check for leaks around all of the oil line connections. If you see a drip from any of them, you can snug down the oil line nuts a bit more. Be careful and wear gloves as the oil lines and exhaust will be hot at this time. Re-install the passenger-side wheels and lower the car back on the ground.
The hard oil line replacement is now complete, and you can enjoy fewer leaks, greater oil flow, and lower oil temperatures.
If you'd like to read all of my other air-cooled Porsche 911 DIYs, you can find them all here. Make sure to check back here for future DIYs and subscribe to our YouTube channel for DIYs like this, just in video form.