- 12/20/2019
- 4 Min Read
- By: Jose Martinez
Replacing Sway Bar Bushings And End Links On A Classic Air-Cooled Porsche 911

If you want improved cornering for your air-cooled Porsche 911, replacing sway bar bushings and end links is a good starting point.
If your air-cooled Porsche 911 has a bit more body roll than you would like or makes clunking sounds while cornering or going over bumps, inspecting and replacing the sway bar rubber components is a very easy way to improve those conditions. Fortunately, these are fairly inexpensive parts that can all be changed out in an afternoon.
Porsche 911 Model Years Applicable:
All Porsche 911 cars 1989 and earlier equipped with factory-style sway bars with rubber bushings. The photos shown here are on a 1983 911SC but the general procedures apply to all years within this range. Consult a service manual for detailed information on your particular model year’s part numbers and torque specs.
Note: because of the 911’s motorsports pedigree, many cars that have seen track time have been converted to racing-style sway bars that go through the body up front and have adjustable end links at all four corners. We will not cover replacement of those components as there are many hardware styles and suspension tuning parameters needed that are out of this article’s scope.
Tools Needed To Complete This Repair:
- Jack stands
- Floor jack
- Jack pad
- Bottle jack
- Rubber gloves
- Safety glasses
- Degreaser
- Paper towels
- Hex socket set
- Penetrating oil
- Propane torch
- Breaker bar
- Dish washing soap
- Socket set
- Ratchet
- Service manual for your car’s model year
Parts Needed:
- x4 Porsche 911 front sway bar bushing
- x2 Porsche 911 rear sway bar bushing
- Porsche 911 rear left sway bar end link
- Porsche 911 rear right sway bar end link
- Because this procedure covers an extensive model year range, it's recommended that you search the catalog for your car’s specific parts.
Porsche 911 Sway Bar Bushing and End Link Replacement Procedure:
Step 1: Raise Car on Jack Stands
If you are servicing both front and rear sway bars, raise the entire car on jack stands using this procedure. If you are only servicing one end, raise that respective end of the car using the procedure above.
Front Sway Bar Bushings
Step 1: Remove Belly Pan
Get underneath the front of the car and loosen the 2 nuts and 2 bolts holding on the small belly pan between the front wheels.
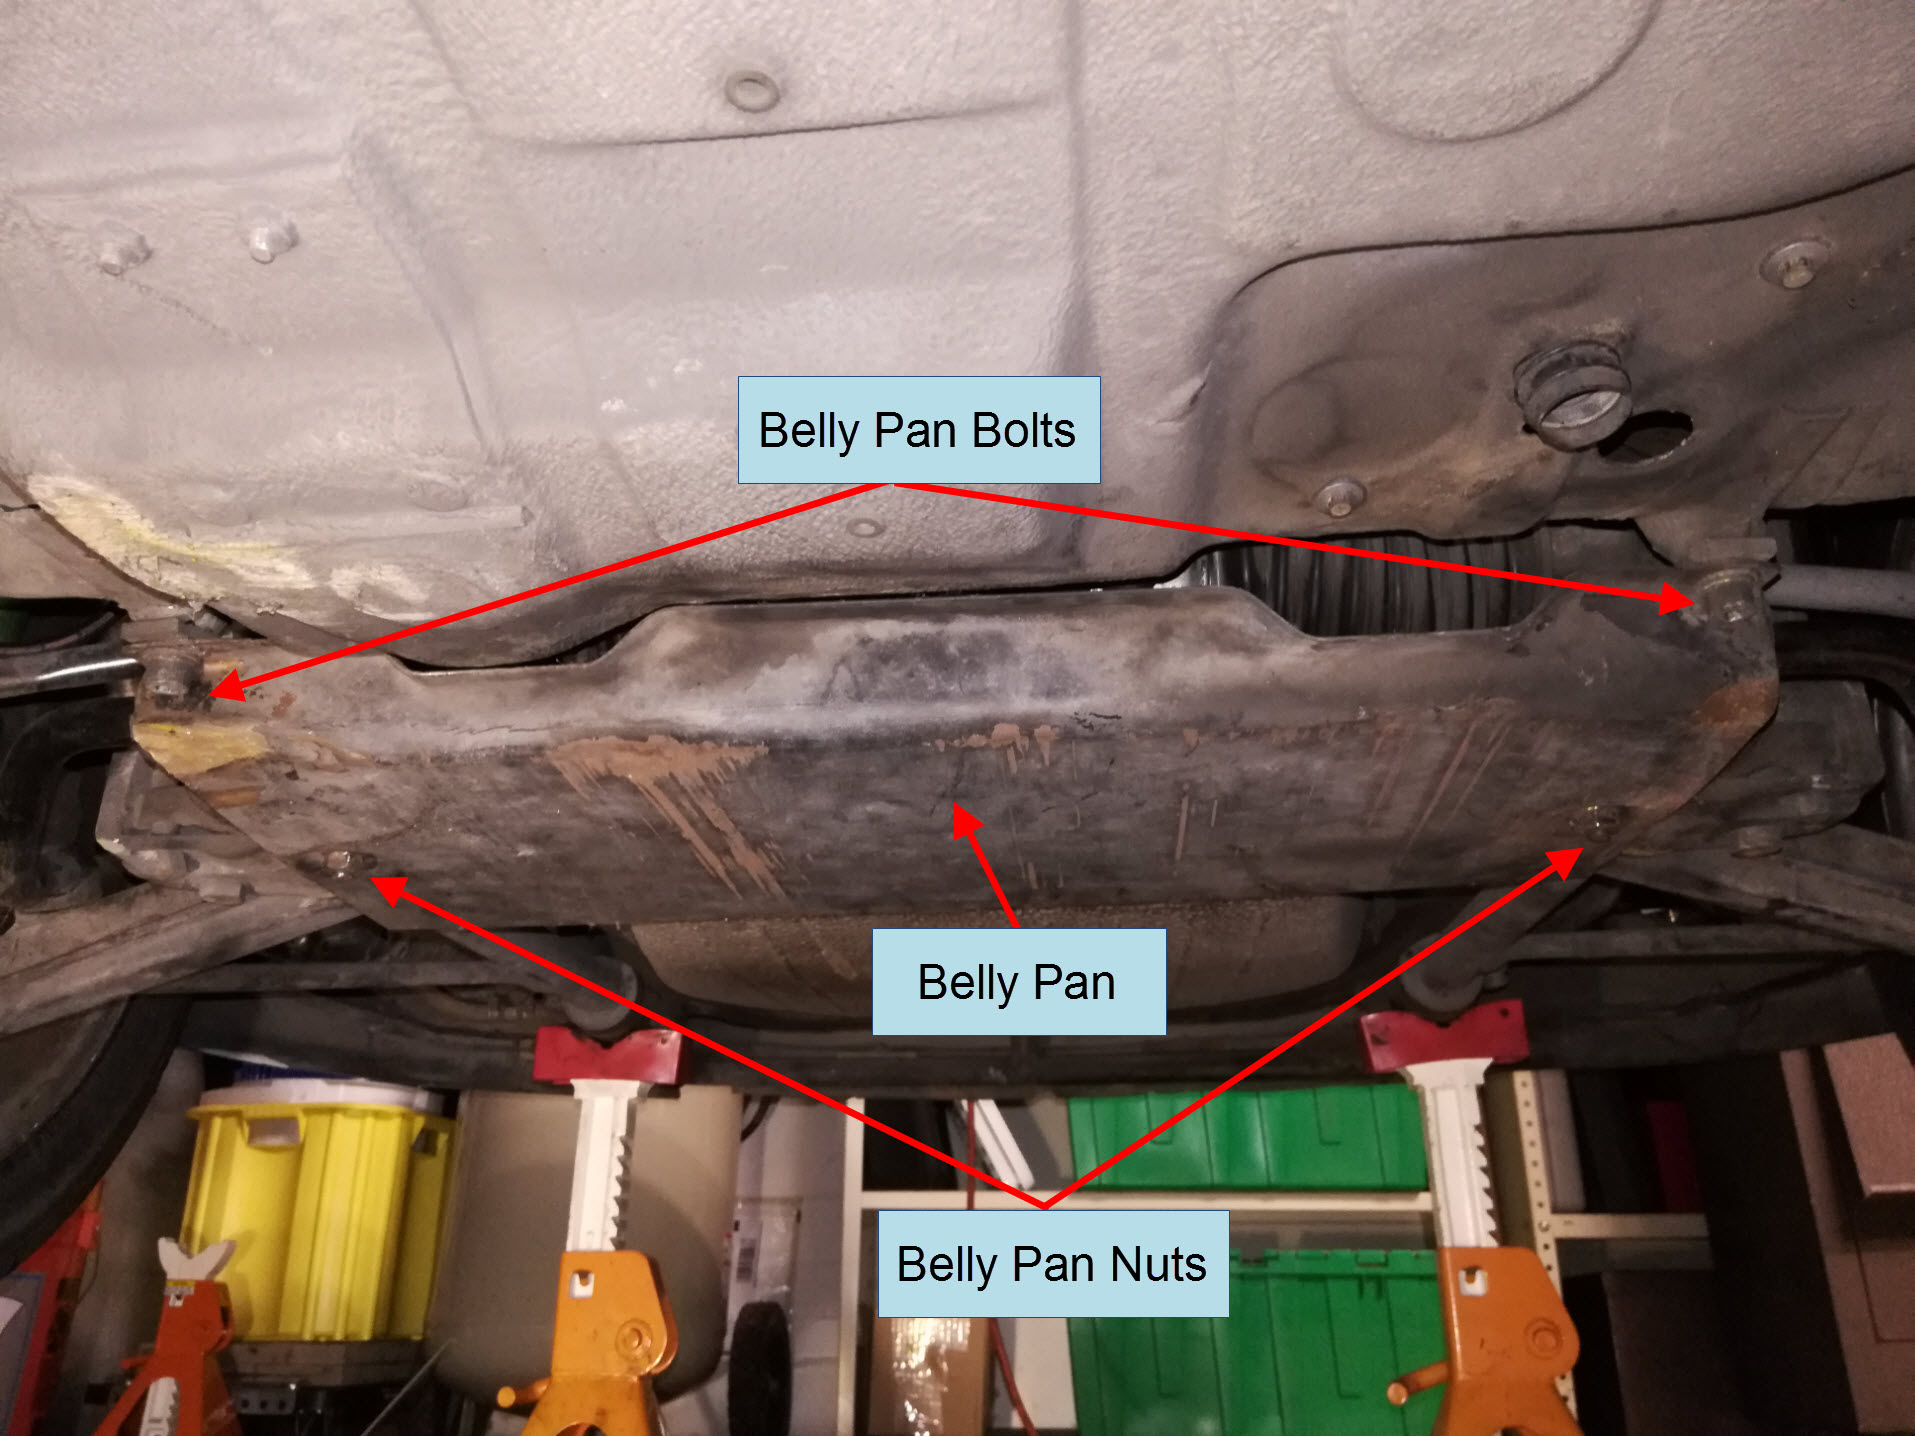
Support the belly pan up with one hand as you slowly remove the 2 nuts and bolts. The belly pan is steel and is pre-loaded a bit by the sway bar. You don’t want it to fall on your face. Set the belly pan and its nuts and bolts aside and notice how the sway bar is bolted to the body via the belly pan mounting hardware and 1 additional bolt on each inner sway bar bracket.
The ends of the sway bar are inserted into bushings located on each suspension control arm. On the 911SC the 4 front sway bar bushings are the same.
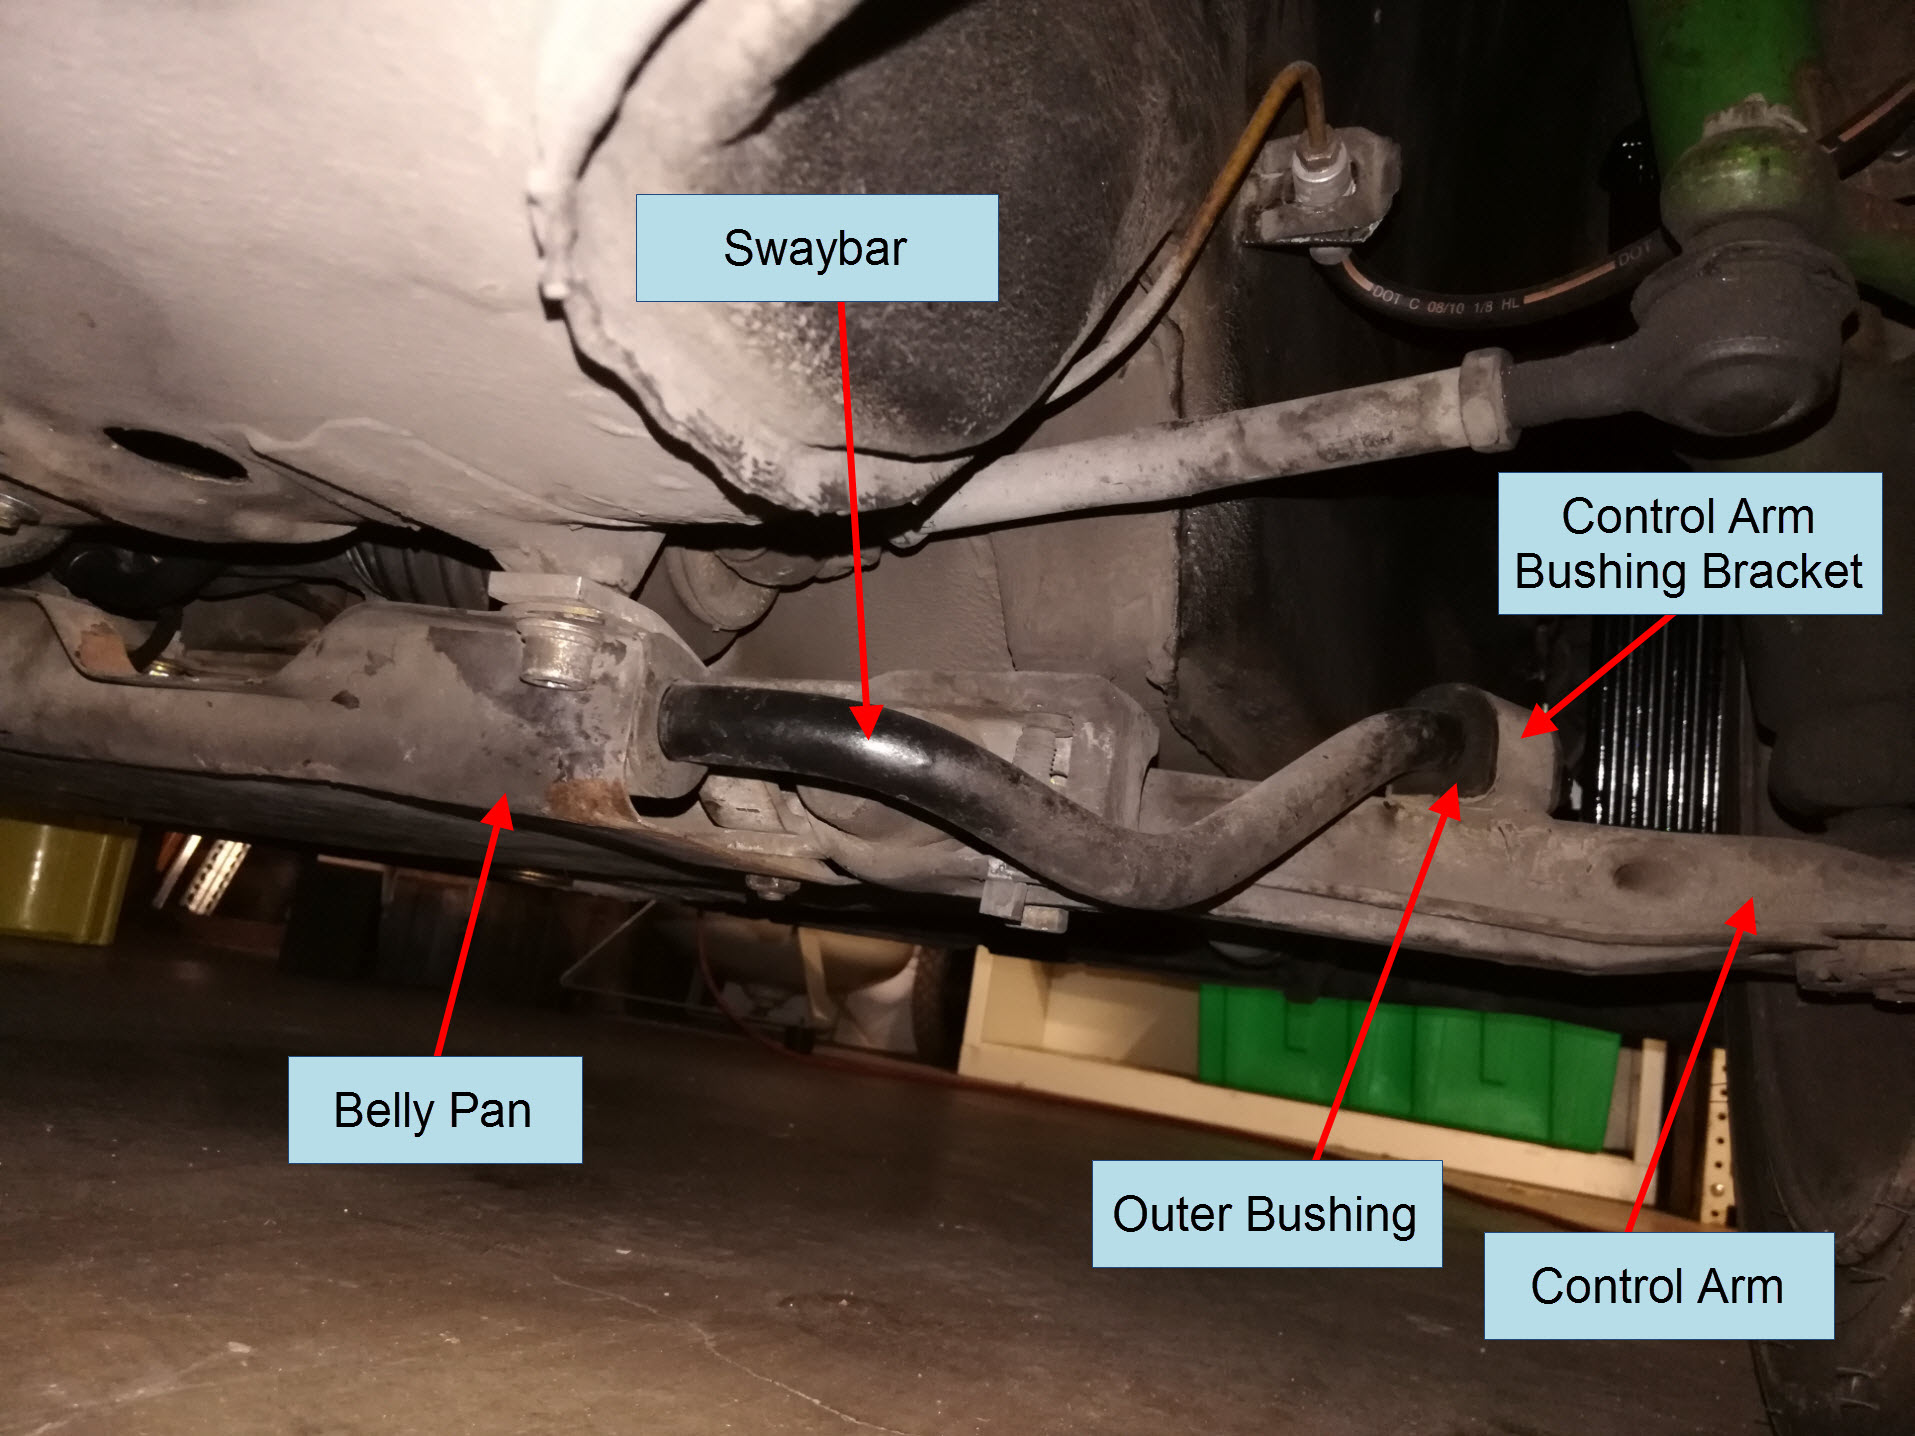
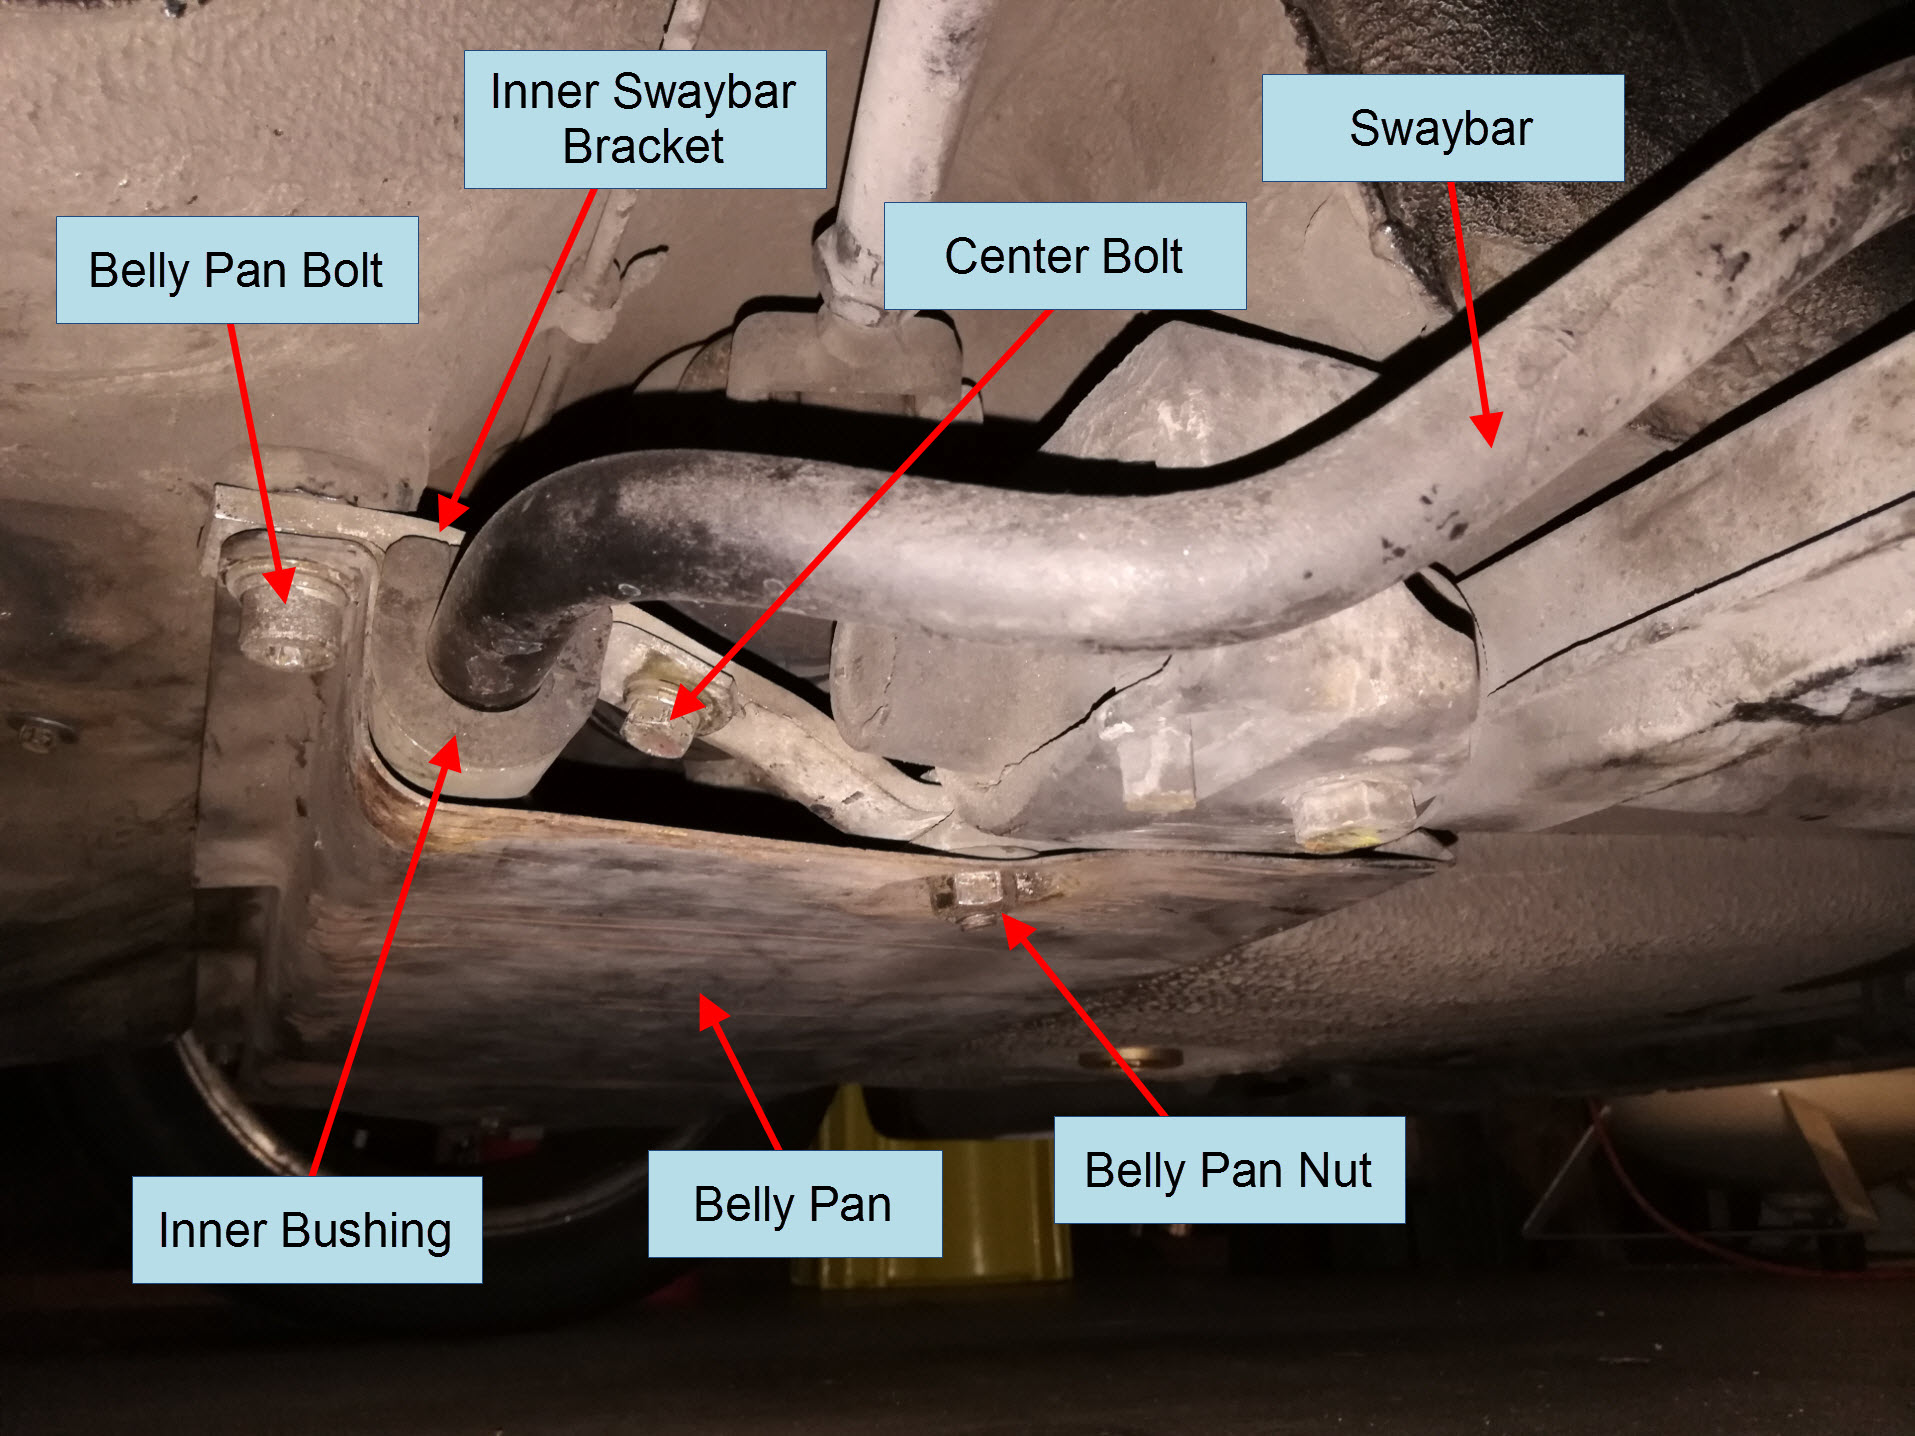
Step 2: Remove Front Sway Bar
Loosen the center bolt on each sway bar inner bracket to release the brackets and sway bar from the body.
Pull one end of the sway bar out of the control arm bushing, then pull the other end out to release the sway bar completely.
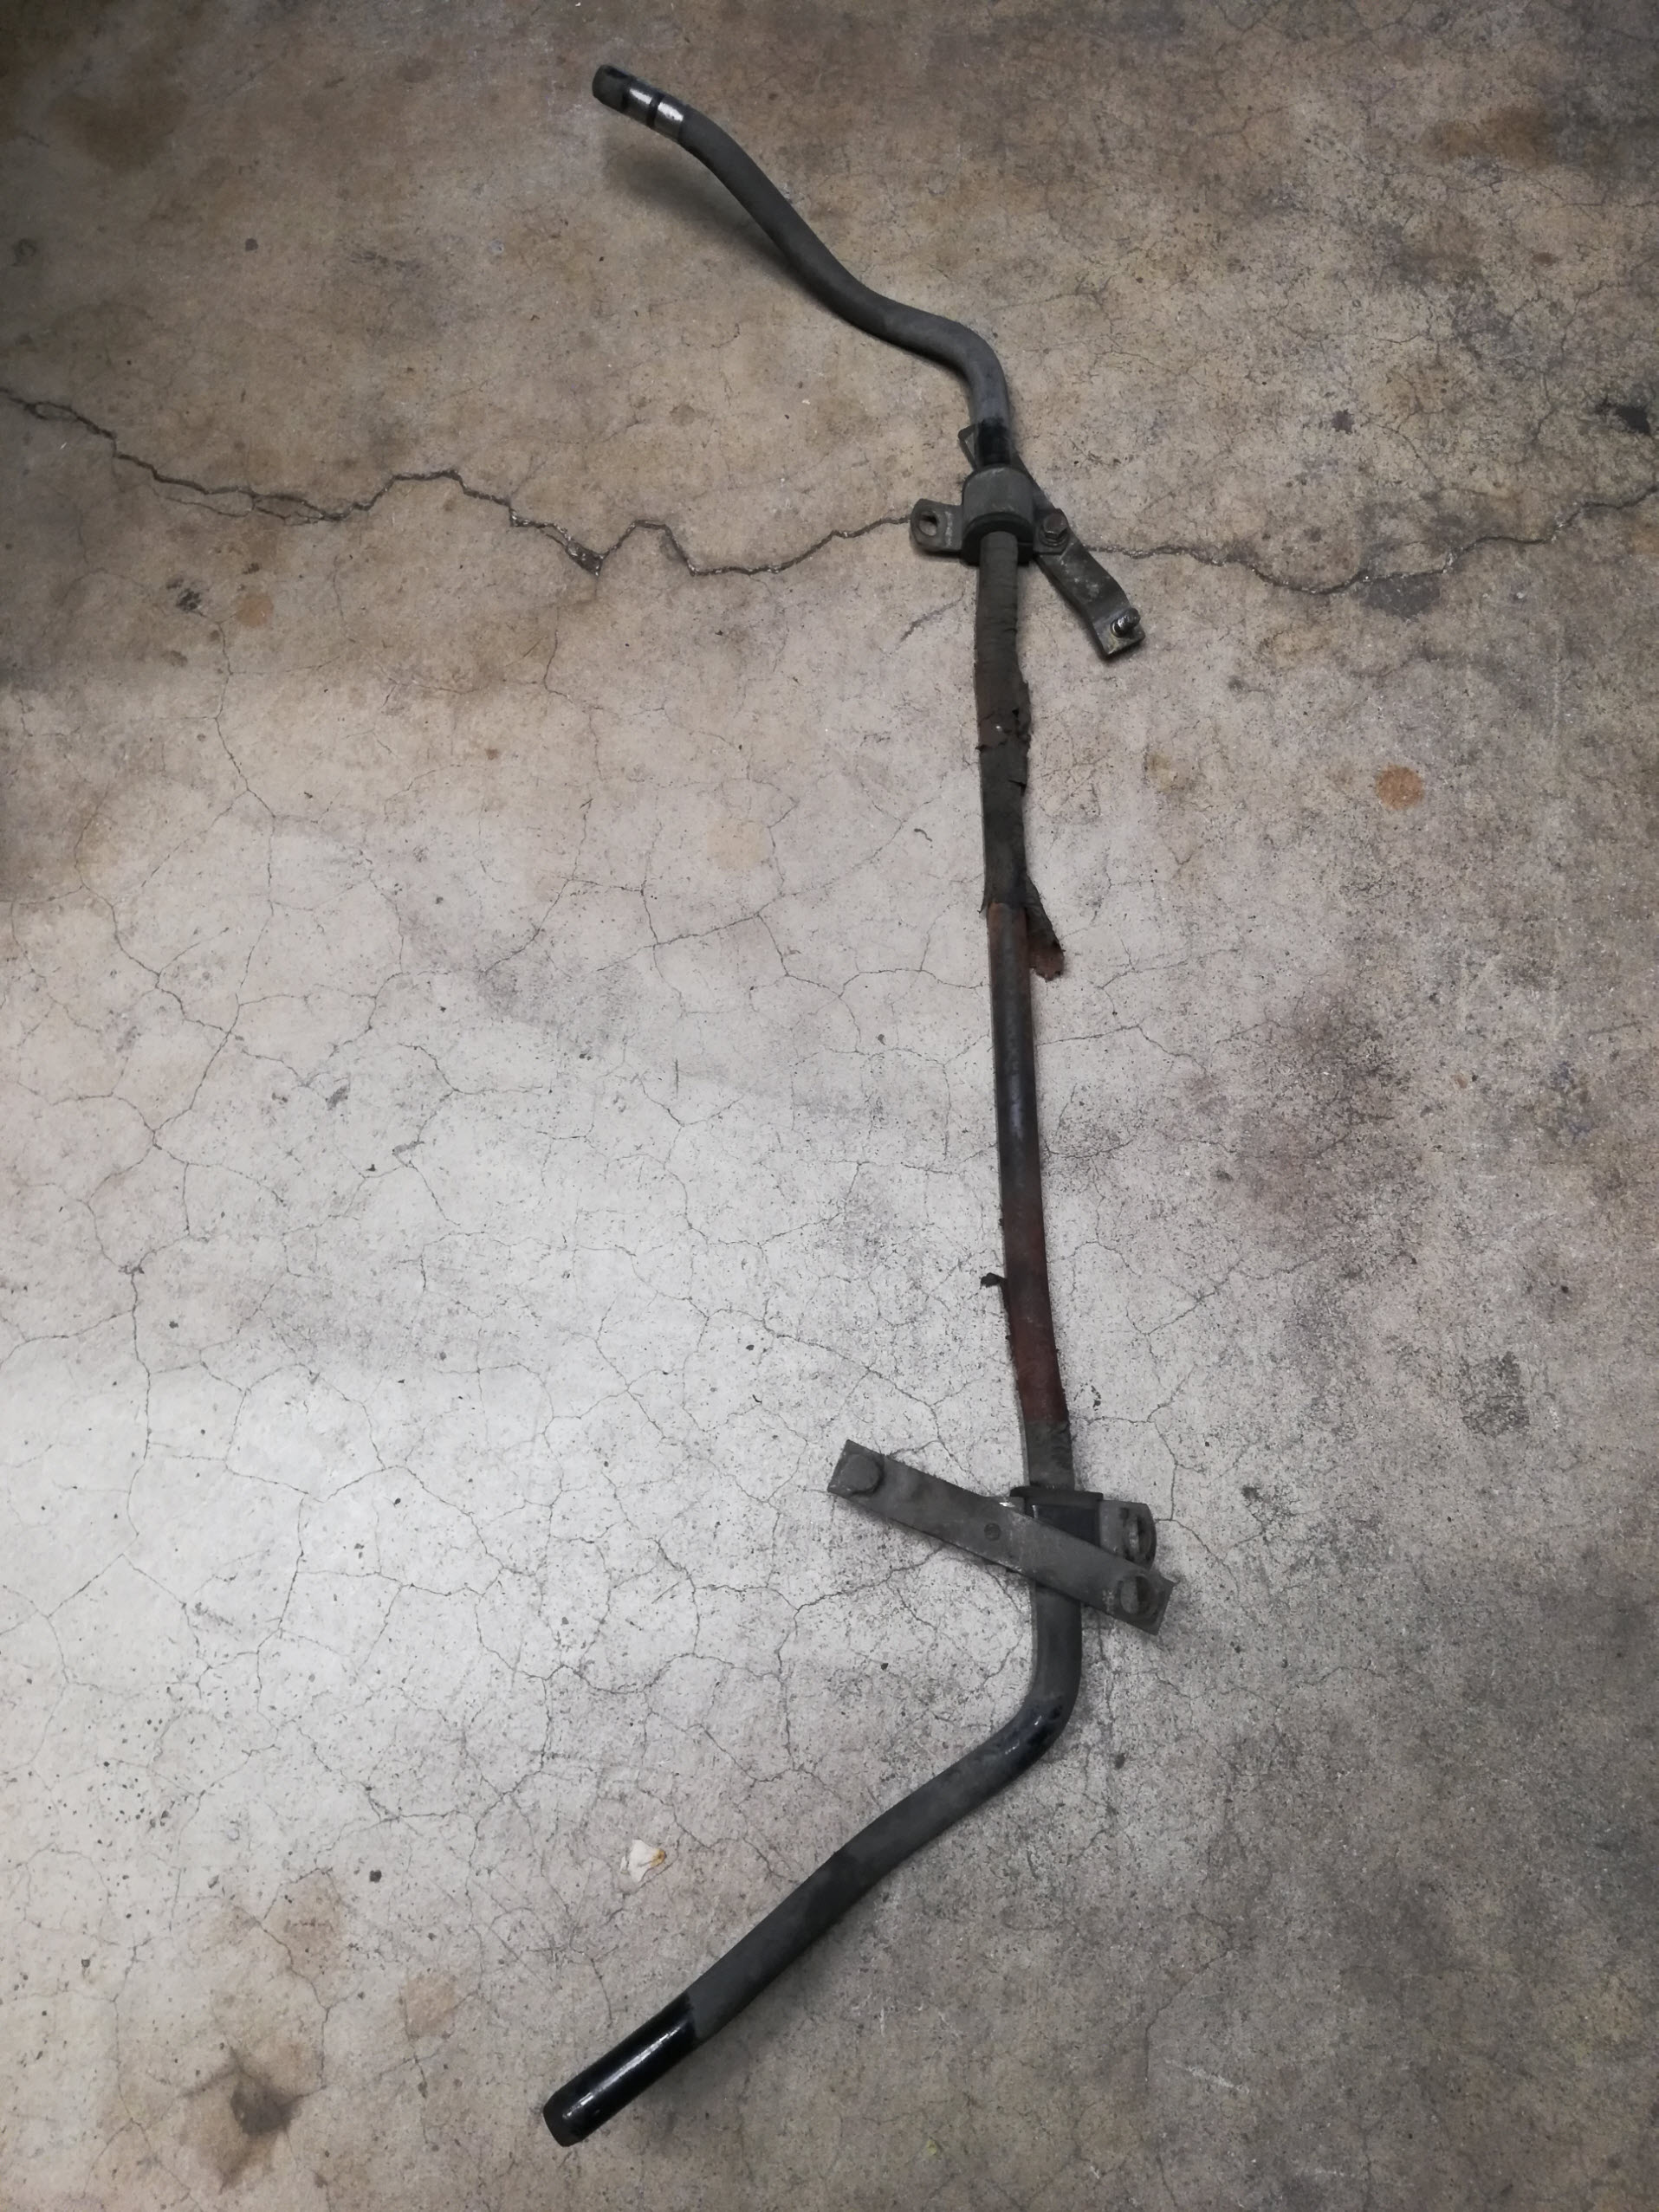
Note: If your brake master cylinder has ever leaked during your car’s life, it is possible that the paint along the straight center section of the sway bar has flaked off exposing the bare metal to the elements (as shown above). If this is the case, inspect the bar closely for rust damage. If it has light surface rust, you can probably sand the rust off and spray paint that area again to protect it. If it is heavily rusted and pitted, there is a chance the bar could snap while you are driving and it is recommended that you replace it with a new one. If you find that your master cylinder is currently leaking, replace it using this procedure.
Step 3: Replace Bushings & Reassemble
The bushings on the control arms should pop right out, but will likely crumble out. If this happens, clean out the loose rubber debris in the bushing loops and slide new ones back in with light hand pressure. Smear some lubricant inside the control arm bushings to let the sway bar ends slide in easily. Use a temporary lube that will not damage rubber, such as concentrated dish washing soap.
Insert one end of the sway bar into a control arm bushing and using moderate hand pressure guide the other end of the sway bar into the second control arm. It will take a bit of force to flex the sway bar enough to get it into the bushing but it is possible. Make sure the control arm bushings don’t slide out of position with all the pushing and pulling. Once the ends of the bar are inserted into the control arm bushings, snap new inner bushings onto the bar and tighten each sway bar bracket back onto the bar by the center bolt.
Re-install the belly pan using the same 2 nuts and 2 bolts as before. Note that the sway bar will have to bend upwards slightly to allow the rear bolts to engage with their threaded holes. The easiest way to do this is to put a floor jack or bottle jack directly under the sway bar at the bend between the control arm and inner bushings and apply a bit of pressure upward to get the bar to bend and allow the bracket and belly pan bolt to engage into the body. This exact process is described and illustrated in step 7 of the fuel pump replacement procedure. Once you get both the nut and the bolt on that side of the belly pan hand-tightened, remove the jack and repeat the same procedure on the other side to get all 4 corners of the belly pan secured. Torque both nuts and bolts to spec.
Rear Sway Bar Bushings and End Links
Step 1: Loosen Bolts and Remove Sway Bar
The rear sway bar is more straightforward since you don’t have to deal with a belly pan or sway bar preload. However you may have to deal with some very stuck bolts.
Get underneath the engine and gearbox and degrease the sway bar mounting hardware as needed to expose the bolt heads. Attempt to loosen the lower end link bolt and nut attached to the flat end of the sway bar. If this nut is stuck and simply flexes the sway bar rubber components, try to loosen the upper end link bolt attached to the rear trailing arm. Use penetrating oil and a propane torch to heat the trailing arm around the bolt hole to get it to loosen if needed. A breaker bar will crack it loose after an initial treatment with heat and penetrating oil.
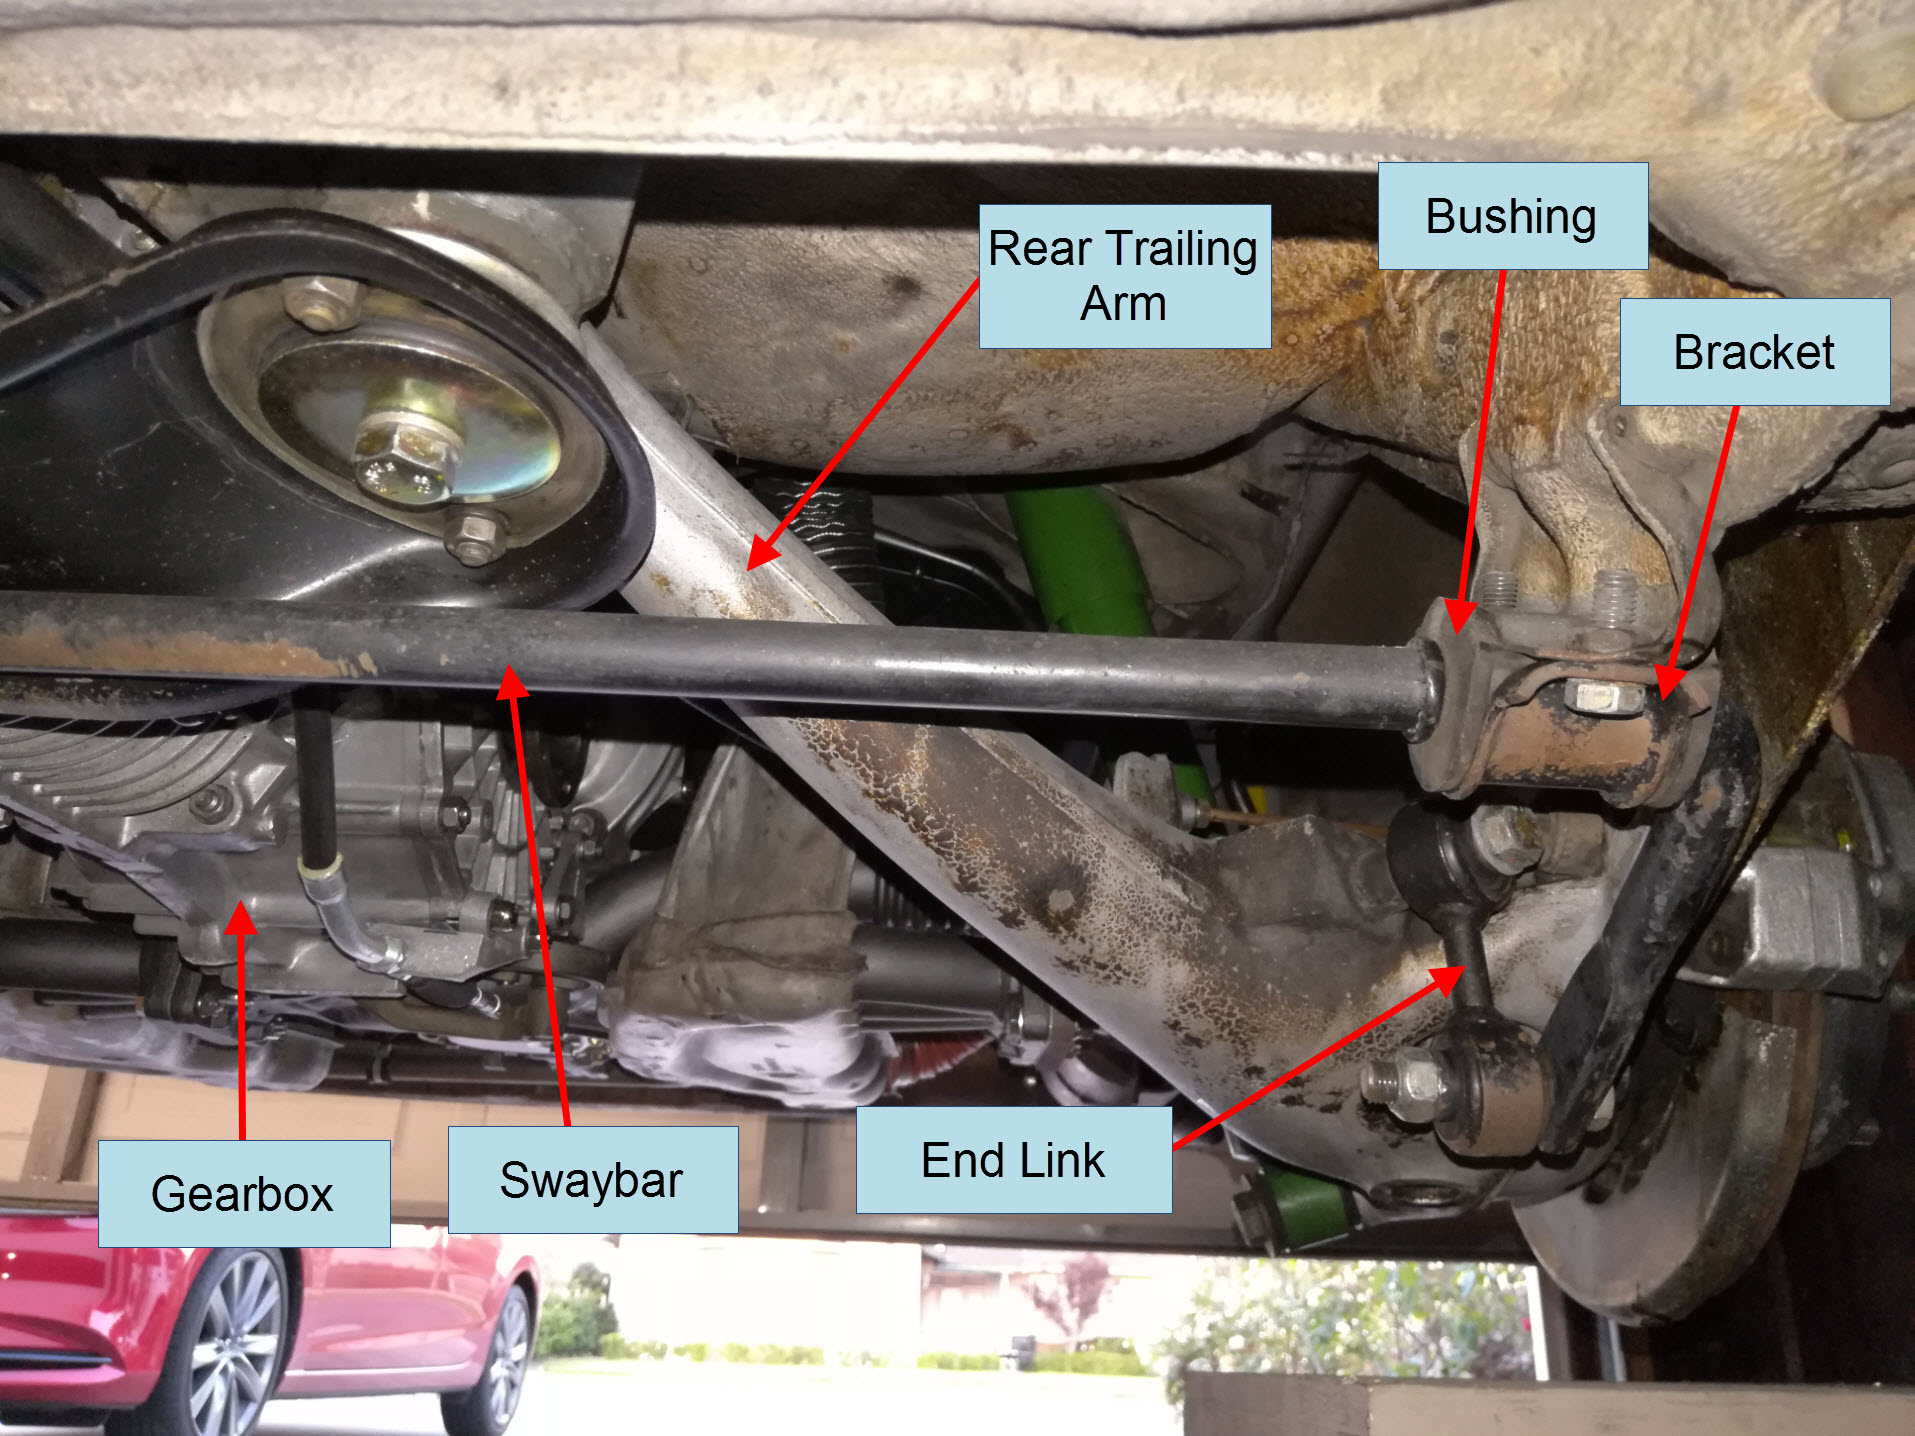
After loosening the upper end link bolts, remove the 2 small bolts on each sway bar bracket holding the bar and bushing to the car. Unbolt the entire sway bar and end link assembly off the car and set the mounting hardware aside. If your end links are still stuck to the ends of the sway bar you will need to clamp the sway bar or the end link bolt head onto a vise and use penetrating oil and heat as needed to remove the nut on the end of the bolt. Get a second pair of hands to hold the sway bar as you focus on the stuck fasteners.
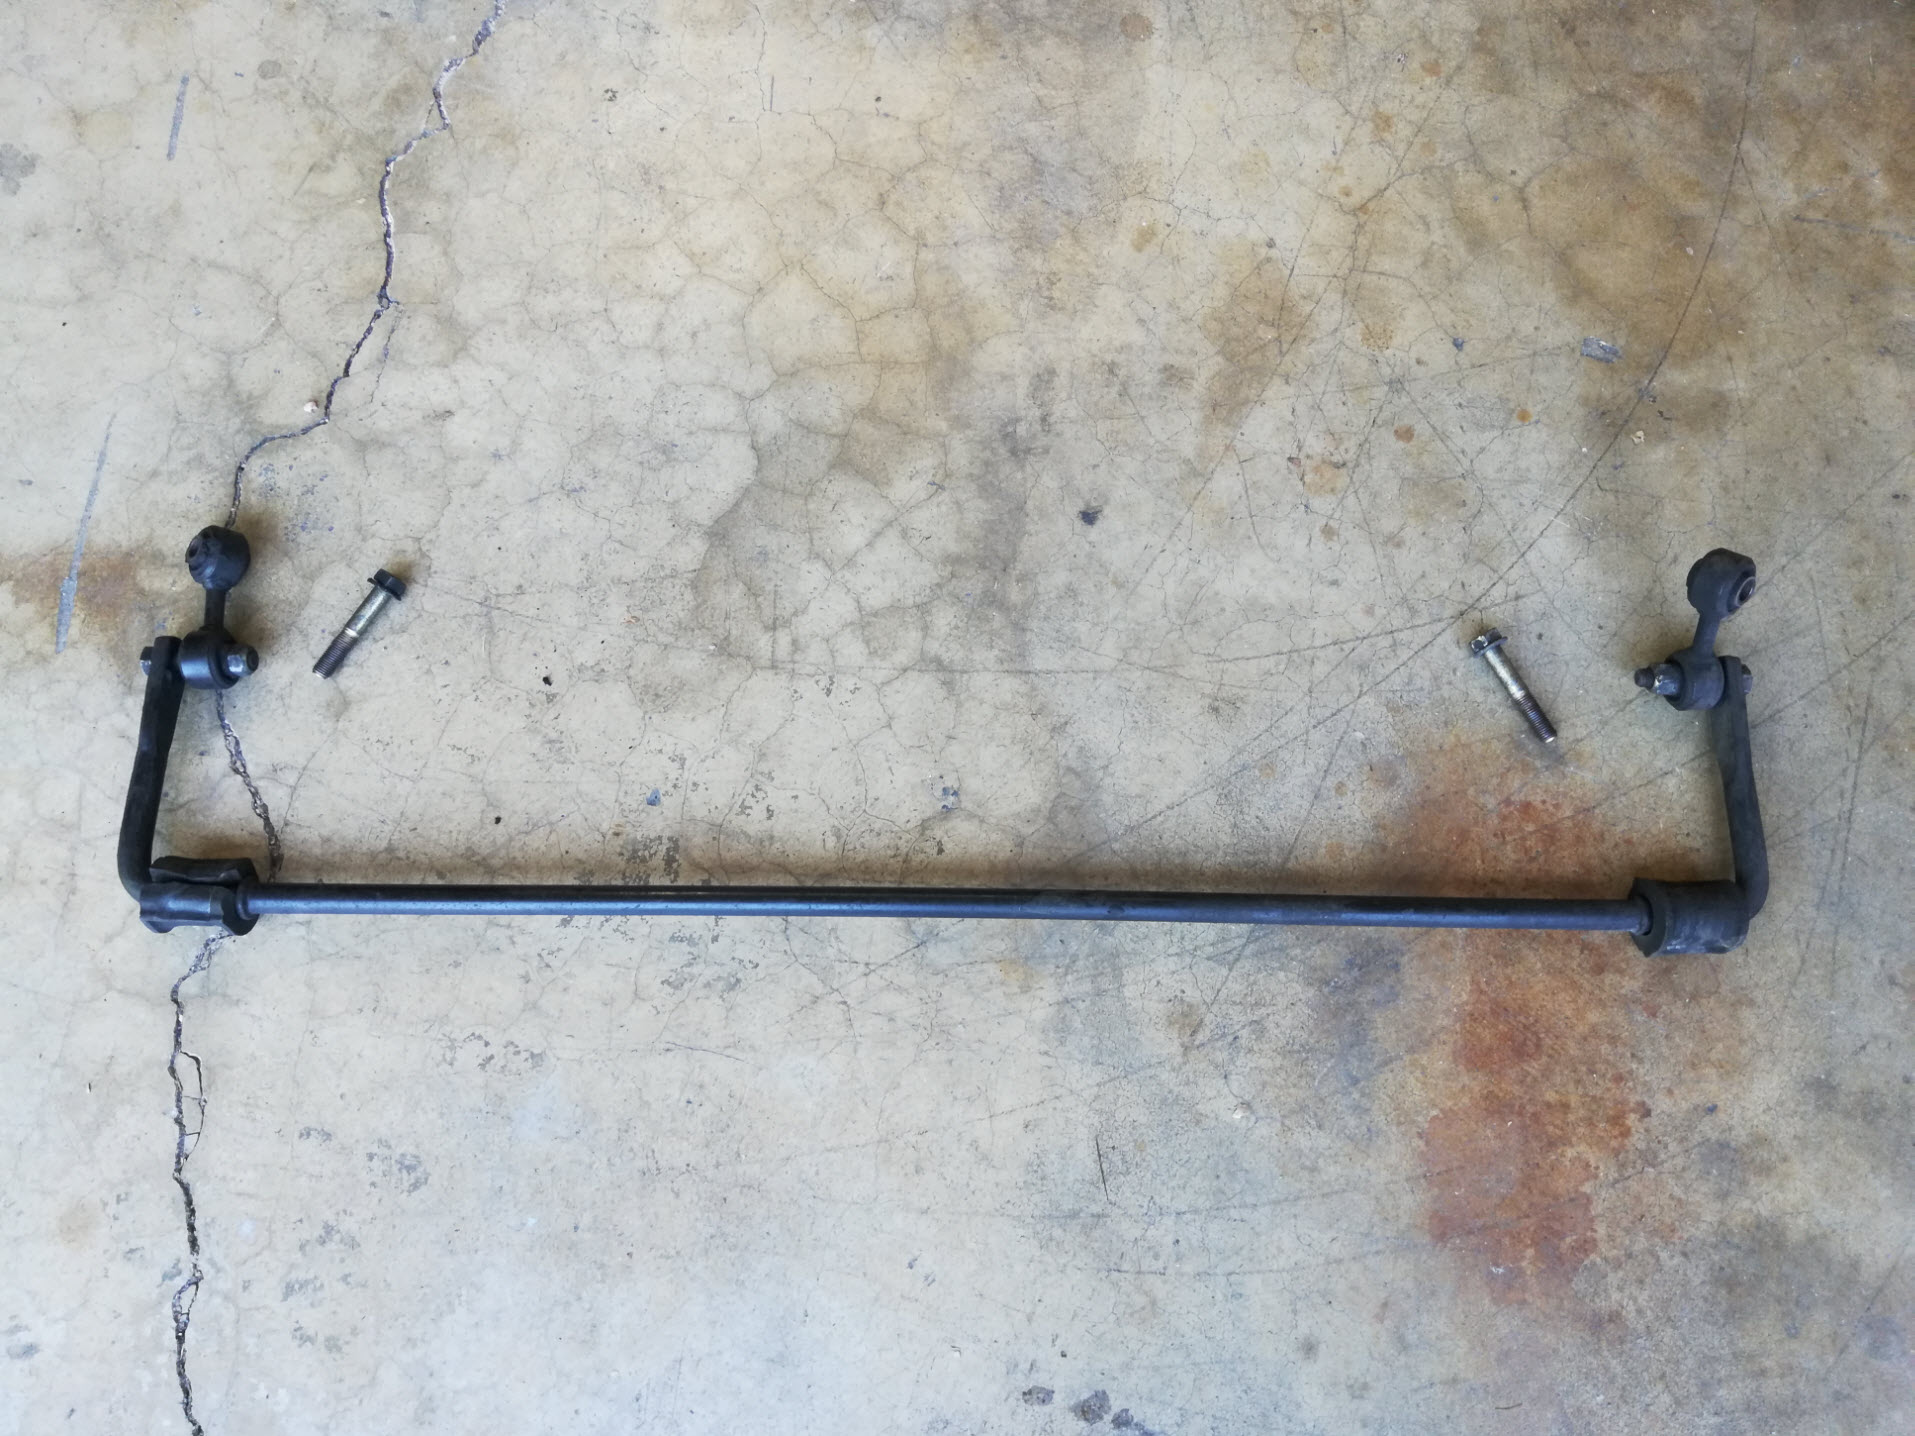
Step 2: Replace Bushings and End Links
Once all hardware is disassembled, clean the sway bar with degreaser if needed and the area on the car where it gets bolted. If your car has been leaking oil at any point this area is probably very greasy. Fit new bushings over the sway bar and bolt it to the car finger tight so the bar can still rotate. Bolt in the new end links finger tight. There are specific left and right end links so make sure they are installed in the correct orientation. Snug all hardware hand tight and final torque to spec.
Final Step: Test Drive
Put the car back on the ground for a test drive. With fresh tight bushings, the ride should be more compliant over bumps and tighter around corners. Enjoy your refreshed sway bars and go for a spirited drive.